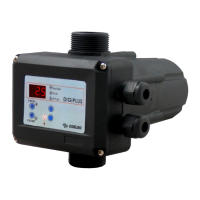
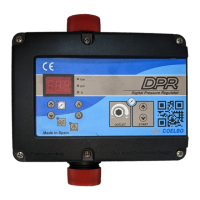
5
LEDS DISPLAY ACTION
O
Is displayed on screen the instan-
taneous pressure in bar or psi
( ( O ) )
Pump ON and is displayed on
screen the instantaneous pressure
in bar or psi
A
(only
DGplus
and
DGM2)
O
Is displayed on screen the instan-
taneous current consumption in
Ampere units
( ( O ) )
Pump ON and is displayed on
screen the instantaneous current
consumption in Ampere units
P START
O Is displayed the start pressure
( ( O ) ) Adjusting start pressure
P STOP
O
Is displayed the stop pressure
(only in pressure dependent
MODE)
( ( O ) )
Adjusting stop pressure
(only in pressure dependent
MODE)
FLOW O
ALARM
O
alarms
( ( O ) )
Dry-running alarm performing ART
or overload alarm preforming any
of the 4 restore attempts
P-BUT
TON
TOUCH ACTION
click!
From state ON: any alarm is res-
tored.
From state OFF: system changes to
STATE ON, the pump starts.
:
the parameter value is accepted.
HOLD
DOWN
From state ON: unit OFF, relay
disconnection.
From state OFF: the pump starts
and keeps operating until the
push-button is released.
click!
Pstop is displayed on the screen for
3 seconds.
click!
Inside CONFIG or ADJUSTMENT
modes is used to increase the para-
meters values.
3” Pstop adjustment mode.
click!
Pstart is displayed on the screen for
3 seconds.
click!
Inside CONFIG or ADJUSTMENT
modes is used to dicrease the para-
meters values.
3” Pstart adjustment mode.
(only DG-
plus and
DGM2)
click!
Is displayed on the screen instanta-
neous current consumption.
If it is already displayed then we
switch to instantaneous pressure
view.
3” Rated current adjustment.
STARTUP (diagram C)
Before starting the device please read the pre-
Follow next steps:
1. Start the device by pressing .
2. (only DGplus and DGM2)
Set the pump rated current intensity value:
- Press during 3 seconds.
- The current intensity value is displayed on screen
- By mean of and is adjusted the rated cu-
motor. See Note 1.
- Press for validation.
3. Set the cut-in (start) pressure:
- Press during 3 seconds.
- The start pressure value is displayed on screen
- By mean of and is adjusted the start pressu-
*If it is higher than 3 bar, it
is advisable to use a small expansion tank.
- Press for validation.
4. Set the cut-out pressure (only if it has been set on
ADVANCED MENU the pressure dependent operation
mode):
- Press during 3 seconds.
- The stop pressure value is displayed on screen
- By mean of and is adjusted the stop pressu-
- Press for validation.
In pressure dependent mode is compulsory the
installation of a pneumatic tank.
adjustments can be set through basic and advanced
MENUS. See the next chapter.
Note 1: it is important to introduce exactly the
pump. If a new pump is installed this process
should be repeated.
BASIC MENU + (diagram C)
- Press simultaneously +
- By mean of or the values can be changed.
- Press for validation.
- This is the parameters sequence:
TYPE SYSTEM REACTION
FACTORY
SETTING
bar psi
We can select the pressure units
displayed beetween bar and psi.
bar