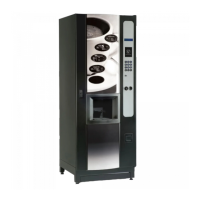
The provided document is an "OPERATORS GUIDE" for the "GENEVA VENDING MACHINE" manufactured by COFFEtek LTD, identified by document number 56571. This guide outlines the safety warnings, operational procedures, and maintenance instructions for the Geneva vending machine.
Function Description:
The Geneva Vending Machine is designed to dispense beverages, including coffee and tea, and likely other mixed beverages, given the presence of "mixing systems." It operates by combining ingredients and hot water to produce drinks. The machine is intended for indoor use and requires connection to both electrical and water services.
Important Technical Specifications:
- Operating Environment: The machine is designed for indoor use with an ambient temperature range between 0°C and 40°C.
- Clearance: A minimum of 100mm (4in) clearance is required between the rear of the cabinet and the wall for adequate ventilation. If located in a corner, it should not be closer to the right-hand wall than 400mm (16in) to accommodate door opening.
- Weight: The vending machine is a heavy item, requiring sufficient personnel and suitable equipment for movement.
- Electrical Safety: The appliance must be earthed. Lethal voltages are exposed when the mains electrical supply is available and the left or right-hand side boiler cover or illuminated door panel are removed. Maintenance personnel must ensure the machine is isolated from the mains electrical supply before removing these items.
- Water System Compliance: Connection to the water system must comply with pertinent national and local legislation (e.g., UK Model Water Bylaws 1986 Statutory Instrument (SI) No. 1147).
- Mains Cable: Replacement of the Type Y mains cable requires special tools and must be carried out by a trained person from an approved service agent if damaged.
- Plug Accessibility: The unit must be positioned so that the plug connecting it to the mains supply is accessible.
Usage Features:
- Beverage Dispensing: The machine dispenses various beverages, including coffee and tea.
- User Interaction: The guide implies a "flush button" and "brewer flush button" for operational flushing.
- Safety for Users: Young children, the aged, and infirm should not operate the machine unsupervised due to the risk of scalding from hot beverages.
Maintenance Features:
The manual provides detailed instructions for various maintenance tasks, emphasizing safety precautions due to moving parts and hot water.
- General Safety: The machine must be switched off before undertaking any activity on the mixing or brewing systems that requires component removal. Maintenance should only be undertaken by trained personnel.
- Flushing the Machine:
- Frequency: At least once a day.
- Procedure: Open the machine, ensure it's on, press the flush button to flush whipper and mixing bowl assemblies with hot water. Repeat as necessary.
- Flushing Brewer(s):
- Frequency: At least once a day.
- Procedure: Open the machine, ensure it's on, ensure hands and loose clothing are clear, press the brewer flush button to flush brewer(s) with hot water. Repeat as necessary.
- Cleaning the Mixing Systems:
- Frequency: At least once a week.
- Procedure: Switch off the machine. Remove dispense nozzle and mixing system (labeled 'A'). Detach the steam cover from the mixing chamber. Remove the impeller disk (labeled 'B'). Remove the whipper seal (labeled 'C') and inspect the running surface (labeled 'D') for smoothness and freedom from ingredient residues. Inspect the whipper seal for damage and replace if necessary. Wash all removed mixing system components in destaining fluid and rinse with clean water. Reassemble the mixing systems, ensuring the whipper seal 'C' is tight. Ensure both locking pegs (labeled 'E') on the mixing system are correctly located. After reassembly, switch on the machine and perform a flush operation, checking for leaks and abnormal sounds.
- Cleaning the Tea Brewer:
- Frequency: At least once a week.
- Procedure: Switch off the machine. Turn the tea canister dispense chute upwards. Remove the tealeaf waste chute (labeled '1'). Remove the outlet elbow (labeled '5'). Raise the brewer release lever (labeled '4') to unlock the carriage assembly. Slide the carriage assembly (labeled '6') out. Remove the mixing bowl (labeled '3'). Remove the brewer cylinder (labeled '8') by swinging it upwards and pulling. Wash the brewer and cylinder in de-staining fluid and rinse with clean water.
- Refitting the Tea Brewer: Refit the brewer cylinder and mixing chamber. Refit the brewer carriage, ensuring it slides into place (gently turn filter belt if needed). Lock the carriage by returning the release lever to the horizontal position. Refit the tealeaf waste chute, outlet elbow, and mixing bowl. Turn the tea canister dispense chute downward. Switch the machine on, ensuring hands and loose clothing are clear. Close and lock the door. Test with at least one tea.
- Cleaning the Coffee Brewer Unit:
- Frequency: At least once a week.
- Procedure: Switch off the machine. Turn the coffee canister dispense chute upwards. Remove the coffee brewer outlet spout (labeled '1'). Remove the brewer splashguard (labeled '2'). Pull the brewer shaft (labeled '4') from the spindle (labeled '5'). Lift the brewer retaining clips (labeled '7' and '9') to release the carriage assembly (labeled '8'). Remove the carriage assembly. Remove the steam trap and brewer chamber (labeled '6'). Separate the steam trap from the brewing chamber. Use a de-staining product to wash the brewer, cylinder, steam trap, and carriage assembly, then rinse thoroughly with clean water.
- Refitting the Coffee Brewer: Clip the steam trap back onto the brewer chamber and refit the unit to the machine. Refit the carriage assembly. Use the brewer retaining clips to lock the brewer in place. Firmly push the brewer shaft back onto the spindle. Refit the splashguard. Refit the outlet nozzle. Align the ingredients chute with the brewer chamber. Switch the machine back on, ensuring hands and loose clothing are clear. Close and lock the machine. Test with at least one coffee.
- Filter Belt Removal and Replacement:
- Procedure: Compress the tensioning rollers (as shown in 'A'). Push and turn the red lever (labeled '1') to the locked position (as shown in 'B'). Remove the belt.
- Cleaning/Replacement: The belt can be cleaned with de-staining solution but will progressively block with scale. A new belt performs approximately 2000 vends before cleaning and should be replaced after approximately 4000 vends.
- Refitting: Thread the bottom edge beneath the scraper plate. Thread over all three rollers and ease into place by sliding sideways while turning the drive shaft. Press the red lever to release the tensioning roller and tighten the belt.
- Extract Duct Cleaning:
- Procedure: Switch off the machine. Turn ingredient nozzles upwards and remove all canisters. Lift the extract duct cover upwards and forwards to remove it. Thoroughly clean both the extract duct and its cover. Refit the cover and replace the canisters. Ensure all ingredient chutes are correctly positioned. Switch on the machine and perform a flush operation.
- Frost Warning: Care must be taken to protect the machine from frost. Do not operate if frozen. Contact a service agent immediately. Do not restore to operational use until checked and approved by a service agent.
- Hot Water Warning: The water from the optional shower head cleaning attachment is hot enough to scald or burn. Initially, the water will be cool but rapidly become extremely hot.