Do you have a question about the cogeco TiVo Mini and is the answer not in the manual?
Press the TiVo button on your remote and select Menu.
Select Settings, then Network settings.
Select Network Troubleshooting and then Internet Connection.
Wait for three blue checkmarks to confirm a successful connection.
Connect the coaxial cable from the wall outlet to the TiVo Mini's Cable In.
Connect HDMI Out from the TiVo Mini to a TV HDMI input.
Connect the power supply to the TiVo Mini and an active power outlet.
Use TV remote's INPUT/SOURCE button to select the correct HDMI input.
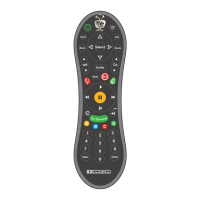
Hold C and TiVo buttons for 5 seconds if remote light is amber for pairing.
On the Welcome screen, select Canada and then your preferred language.
Press SELECT to begin the Guided Setup for Canada.
Select MoCA connection, then Continue, and get IP automatically from DHCP.
Wait for all setup stages to complete and press SELECT.
Name your TiVo Mini and select your Main TiVo DVR if prompted.
Press the TiVo button to complete setup and begin downloading guide information.
Program your TiVo remote to control your TV or sound system via Menu settings.
Follow Equipment Return guide instructions to avoid unnecessary charges.
The Cogeco TiVo Mini is a compact entertainment device designed to extend your TiVo experience to additional televisions in your home. It functions as a client device, allowing you to access content and features from your main Cogeco TiVo PVR (Personal Video Recorder) on other screens without needing a separate PVR for each TV. This means you can watch live TV, recorded shows, and streaming content from your TiVo service in multiple rooms, all managed through a single, central TiVo PVR.
The primary function of the Cogeco TiVo Mini is to provide a seamless multi-room viewing experience. It connects to your main TiVo PVR via your home network, typically using MoCA (Multimedia over Coax Alliance) technology, which utilizes your existing coaxial cable wiring to create a robust network connection. Alternatively, it can connect via Ethernet if your home is wired for it. Once connected, the TiVo Mini acts as an extension of your main PVR, allowing you to:
The device is designed for ease of installation and setup, guiding users through a step-by-step activation process that ensures proper connection to the home network and the main TiVo PVR. It's an ideal solution for households that want to expand their TiVo service without the added cost and complexity of multiple PVRs.
The Cogeco TiVo Mini is designed for user-friendly operation, offering a range of features that enhance the television viewing experience:
While the Cogeco TiVo Mini is largely a plug-and-play device with minimal ongoing maintenance requirements, there are aspects related to its upkeep and troubleshooting that contribute to its long-term usability:
| Model | TiVo Mini |
|---|---|
| Video Output | HDMI |
| Resolution | Up to 1080p |
| Category | Set-top box |
| Audio Output | HDMI, Optical |
| Storage | None (streaming device) |
| Compatibility | TiVo DVRs |
| Connectivity | Ethernet |
| Remote | TiVo Remote |