Do you have a question about the Coleman 14' EVENT SHADE and is the answer not in the manual?
Assemble the peak pole with the center hub for initial frame setup.
Connect the two peak connector poles to prepare them for frame assembly.
Insert connector pole ends with arrows into the central peak pole hub.
Partially assemble the four leg poles with their respective ridge hubs.
Insert peak connector poles into the ridge hubs, ensuring metal pins lock into slots.
Unfold the canopy and pull it over the assembled frame.
Locate and wrap hook & loop fasteners around poles for canopy security.
Position pad feet at corners and twist poles until metal pins lock into slots.
Drive stakes through pad feet holes to secure the shelter to the ground.
Attach canopy tension strap hooks to square slots on pad feet and pull to tighten.
Wrap web straps around poles at corners and hook snap-in buckles to tighten.
Locate all hook & loop fasteners on canopy seams and wrap around poles.
Attach guy lines to exterior canopy loops and secure with stakes.
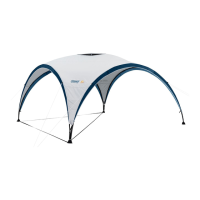
The Coleman 14' Event Shade, Model 2000001447, is a portable shelter designed for outdoor use, providing shade and protection from the elements. It is intended for temporary setup in various outdoor environments, such as events, gatherings, or recreational activities.
The primary function of the Event Shade is to create a shaded area, offering relief from direct sunlight. Its design emphasizes ease of assembly and stability, making it suitable for temporary outdoor installations. The shelter is constructed from a fabric canopy supported by a pole frame system, designed to be robust enough for outdoor conditions while remaining portable.
Dimensions:
Components: The shelter consists of several key components, each with a specific part number:
Materials:
Safety Warnings:
Setup Process: The setup process is detailed and requires at least two people for assistance. It involves several distinct steps:
Corner Locator Tool: A specialized corner locator tool is provided to ensure accurate placement of the four Pad Feet, which must be 14 feet apart.
Optional Accessories: Optional sun walls can be placed in any of the arched openings of the shelter. These can be purchased separately from a local retailer or via www.coleman.com (part number 2000001440).
Cleaning and Storage:
General Care: The manual implies that proper care, including cleaning and correct storage, will contribute to the stability and life of the shelter. Regular inspection of components for wear and tear is also implicitly recommended to maintain the shelter's integrity.
| Brand | Coleman |
|---|---|
| Model | 14' EVENT SHADE |
| Category | Indoor Furnishing |
| Language | English |