8
1. Referring to Figure 11, you will install two
O-Rings on each filter housing. Install one O-Ring
seal on the top outside grove of the filter housing.
Gently slide the O-Ring down the outside filter
housing surface until the O-Ring is seated into the
upper grove. The second O-Ring lays on the top
inside end-face of the filter housing. Note: applying
a light amount of food-grade silicone jelly may
be used to help the O-Ring seal better.
2. When placing the filter cartridge into its housing,
make sure that the inner hole of the filter cartridge is
aligned with the cylindrical boss at the bottom of the
filter housing. If not aligned properly, the water filter
will leak.
3. Screw the filter housing assembly, with filters
installed, to the filter head. Turn the filter housing in
a clockwise direction. Once snug to the filter head,
use the Filter Housing Wrench to tighten it another
¼ to ½ of a turn. See Figure 12.
4. Follow these steps to install the stage 1 - PP
Sediment Filter, stage 2 - Pre-Carbon Filter and
Stage 3 - Carbon Block Filter. Refer to Figure 13 for
order of filter installation.
INSTALL THE VERTICAL FILTERS
Figure 11
Figure 12
Figure 13
1
2
3
4
5
6
8
7
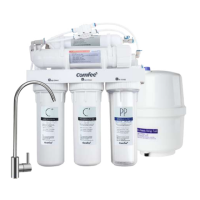
1. Post Carbon Filter
2. Reverse Osmosis Filter
3. Fresh Water Storage Tank
4. Support Frame
5. PP Sediment Filter (Stage 1)
6. Pre-Carbon Filter (Stage 2)
7. Carbon Block Filter (Stage 3)
8. Faucet
Top Inside Grove
Top Outside Grove