Do you have a question about the Commercial Electric 5310-WH and is the answer not in the manual?
Locate and center the plate between wall studs, ensuring vertical and horizontal alignment for proper mounting.
Trace the opening using the provided template on the wall, positioning it centered between studs.
Use a drywall saw to cut a hole in the wall matching the size of the template for the cable plate.
Thread the electrical building wire through the drywall hole and the designated tab in the old work box.
Connect wires to the receptacle screws (white to silver, black to brass, green to ground) and insert it into the box.
Fasten the electrical work box to the back of the cable plate using a Phillips head screwdriver.
Swing the plate into the wall opening, receptacle first, and tighten screws to secure it flush against the wall.
Always adhere to manufacturer safety guidelines when operating tools during the installation process.
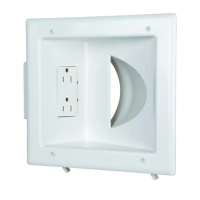
This document provides an installation guide for the Commercial Electric Low Voltage Recessed Cable Plate with Duplex Receptacle, Model #5310-WH, Item #641134. This product is designed to provide a clean and organized solution for routing low voltage cables through a wall while also offering a convenient power outlet. It's particularly useful for installations where you want to hide cables from devices like televisions, sound systems, or other media equipment, creating a more streamlined and professional look.
The primary function of this device is to allow low voltage cables to pass through a wall without leaving unsightly holes or exposed wires, while simultaneously providing an accessible electrical outlet. This combination helps to manage both power and data/signal cables in a single, integrated unit. The recessed design ensures that the cables and receptacle sit flush with the wall surface, minimizing protrusion and enhancing the aesthetic appeal of your installation.
The installation process is designed to be straightforward for individuals with basic DIY skills. Before beginning, it's crucial to turn off the electrical power at the circuit breaker or remove the fuse(s) to ensure safety.
Determining the Plate Location: The first step involves selecting an appropriate location on your wall. You'll need a stud finder to locate the wall studs and ensure the plate is centered between them. This is important because the plate is designed to fit within the standard 2x4 framed walls, utilizing the space between the studs. The guide emphasizes the importance of framing the plate both vertically and horizontally, suggesting careful planning for the final appearance. The recommended installation height for the outlet is typically around 18 inches from the floor, or at a height of up to 7 feet, depending on your specific needs, such as for a wall-mounted TV. The low voltage cable pass-through section is designed to be placed up to 6 feet from the floor. If your wall does not have the standard 3.5-inch spacing between the drywall, a separate kit that mounts on the front of the wall may be required, indicating a consideration for non-standard wall constructions.
Preparing the Wall for Installation: A template is provided (and can be found on page 3 of the manual) to help you accurately mark the opening on the wall. You'll trace this template onto the drywall, ensuring the opening is correctly sized for the low voltage recessed cable plate. A helpful tip suggests looping a piece of tape with the sticky side outward to form a circle and applying it to the back of the template to secure it to the wall, making the tracing process easier and more precise.
Cutting Drywall for Low Voltage Cable Plate: Once the outline is traced, a drywall saw is used to cut the hole in the drywall according to the template's size. Precision in this step is key for a snug and professional fit of the plate.
Pulling Electrical Building Wire: After cutting the hole, you'll pull the electrical building wire through the opening in the drywall. The old work electrical box (component B) has four tabs on its back; you'll break one of these tabs and push the electrical building wire through it. This secures the wire as it enters the box.
Wiring the Receptacle: This step involves connecting the electrical wires to the 15 Amp/125 Volt Tamper Resistant Receptacle (component C). Following standard electrical wiring practices, the white (neutral) wire connects to the silver screw, the black (hot) wire connects to the brass screw, and the green (ground) wire connects to the green grounding screw. Once wired, the receptacle is placed into the old work electrical box. The tamper-resistant feature of the receptacle adds a layer of safety, especially in homes with children, by preventing the insertion of foreign objects into the slots.
Securing Electrical Work Box: The old work electrical box is then secured onto the back of the cable plate using a Phillips head screwdriver. This step firmly attaches the electrical components to the main cable plate assembly.
Placing the Plate: The final installation step involves swinging the entire plate assembly into the wall opening, with the receptacle section going in first. Once in place, you tighten down the screws until the plate fastens tightly against the wall. This action typically engages "dog ears" or clamps on the old work box, securing it to the drywall from behind. The recessed design ensures that the plate sits flush, providing a clean finish.
The package contents include all necessary components for installation: the Low Voltage Recessed Cable Plate (A), an Old Work Electrical Box (B), a 15 Amp/125 Volt Tamper Resistant Receptacle (C), and four screws (D). The required tools are common household items: a #2 Phillips head screwdriver, a level, a stud finder, a pencil, a drywall saw, and tape.
While the product itself doesn't require ongoing maintenance, its design facilitates easy access for future adjustments or troubleshooting. If you need to access the wiring or cables, the plate can be unscrewed and removed from the wall. The tamper-resistant receptacle is designed for long-term safety and durability, reducing the need for frequent replacement. The robust construction of the components ensures a reliable and lasting installation.
The product is RoHS Compliant, indicating that it adheres to restrictions on hazardous substances, contributing to environmental safety. It is also patent protected by U.S. Patent numbers 0553475 & 7390964, highlighting its unique design and innovation. The ETL listing and conformity to UL STD. 514C and CAN/CSA STD. C22.2#42.1:200-1 certify that the product meets recognized safety and quality standards, providing assurance of its reliability and safe operation when installed correctly.
For additional support or video information, users can visit homedepot.com and search for SKU 641134 or model number 5310-WH. Customer assistance is also available by contacting 1-877-527-0313. This comprehensive support system ensures that users have resources available if they encounter any difficulties during installation or have questions about the product. The guide also includes a "Scan Me" QR code for quick access to online resources.
In summary, this Low Voltage Recessed Cable Plate with Duplex Receptacle offers a practical and aesthetically pleasing solution for managing cables and power outlets in a wall. Its design focuses on ease of installation, safety, and a clean, integrated appearance, making it an ideal choice for modern home entertainment and office setups.
| Color | White |
|---|---|
| Material | Plastic |
| Brand | Commercial Electric |
| Model | 5310-WH |
| Item Weight | 0.16 ounces |