LIMITED ONE-YEAR WARRANTY
(U.S. AND CANADA ONLY)
Conair will repair or replace (at our option)
your unit free of charge for 12 months from
the date of purchase if the appliance is defec-
tive in workmanship or materials.
To obtain service under this warranty, return
the defective product to the service center
listed, together with your purchase receipt.
California residents need only provide proof of
purchase and should call 1-800-3-CONAIR
for shipping instructions. In the absence of a
purchase receipt, the warranty period shall be
12 months from the date of manufacture.
ANY IMPLIED WARRANTIES, INCLUDING BUT
NOT LIMITED TO THE IMPLIED WARRANTY
OF MERCHANTABILITY AND FITNESS FOR A
PARTICULAR PURPOSE, SHALL BE LIMITED
IN DURATION TO THE 12-MONTH DURATION
OF THIS WRITTEN, LIMITED WARRANTY.
Some states do not allow limitations on how
long an implied warranty lasts, so the above
limitations may not apply to you.
IN NO EVENT SHALL CONAIR BE LIABLE
FOR ANY SPECIAL, INCIDENTAL, OR
CONSEQUENTIAL DAMAGES FOR BREACH OF
THIS OR ANY OTHER WARRANTY, EXPRESS
OR IMPLIED, WHATSOEVER.
Some states do not allow the exclusion or
limitation of special, incidental, or consequen-
tial damages, so the above limitation may not
apply to you.
This warranty gives you specific legal rights,
and you may also have other rights, which
vary from state to state.
21PA080513 IB-13483C
OPERATING
INSTRUCTIONS
1. Fill water reservoir with distilled water.
We recommend that you use distilled water
only, as this will prevent mineral deposits in
the boiler that can reduce performance or
clog the water system.
2. Plug the unit into the electrical outlet.
3. The POWER light will light up (red).
Allow approximately 40 seconds for the
unit to warm up. The appliance is ready to
use when the READY light goes on (green).
4. Pointing the steam jets away from you,
and anyone else in the room, engage the
trigger. Steam should now be released from
the steam jets. To have continuous steam,
move switch down so you will have continu-
ous steam without having to hold the trigger.
Always have steam facing away from you
or anyone in the room.
5. When first using the device, test on an
old cloth, as there may be sediment left from
the manufacturing process or transportation.
6. On the back of the steamer there is a
sliding switch for HIGH and LOW settings.
HIGH is for heavier and badly wrinkled fabric
and provides faster, hotter, less visible
steam. LOW setting should be used for
delicate fabrics, in combination with the soft
cushion brush attachment.
7. To stop the flow of steam, release the
trigger or raise the switch.
8. Unplug the device when it is not in use.
KILLS 99.9% OF BACTERIA*
1. Position the garment steamer’s soleplate
at a minimum distance of 0.5 inch (1.3 cm)
from material to be treated.
2. Remain steaming in this position for 2
minutes, then move to the next area to be
treated and repeat.
*Bacteria reduction rate was measured after
exposing the tested samples for 2 minutes
at a ½" distance from the garment steamer’s
soleplate. Testing was performed on E. coli.
STEAMING TIPS
1. To prepare your fabric for steaming, brush
it with the soft cushion brush attachment.
This will loosen the fibers and allow better
steam penetration.
2. Hang your garment or fabric. NOTE: Avoid
using metal clothes hangers, if possible.
3. Pass the steam jets just above the fabric
where the wrinkles are. It may take a few
passes to remove the wrinkles completely.
4. After use, unplug steamer and empty any
remaining water from the tank to avoid leakage.
5. CAUTION: When hanging garment on a
door while steaming, be careful not to
damage the door with steam.
6. First test unit on an inconspicuous area of the
item to be steamed, using the HIGH setting to
ensure fabric can tolerate the effects of steam.
If there is no evidence of damage, you can pro-
ceed to use the steamer on that item.
7. When steaming, always keep the unit in
motion and about one inch from the surface
of the item being steamed to avoid potential
damage. Do not continuously hold steamer
over an area or touch steamer jets directly to
fabric, as this can cause damage, including
shrinkage, melting, or color shift on certain
types of material.
8. In the case of heavier, durable fabrics such as
wool coats or bedding, slower passes with the
steamer may be necessary to achieve desired
results. As always, start by testing on an incon-
spicuous area of the item to be steamed, using
the HIGH setting to ensure fabric can tolerate
the effects of steam, and adjust your technique
as needed to obtain the results desired..
CONAIR GARMENT
STEAMING ACCESSORIES
(sold separately)
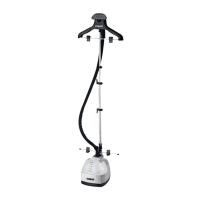
Steaming/Storage
Station
Model DH1
Steaming Mitt
Model GPP1
Door Press Pad
Model GDPP1
INSTRUCTION BOOKLET
For your safety and continued enjoyment
of this product, always read the instruction
book carefully before using.
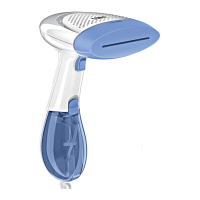
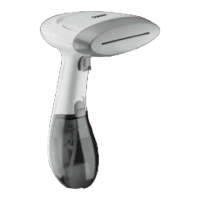
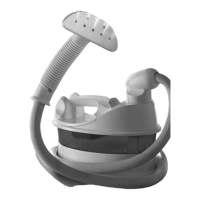
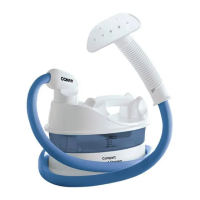
HANDHELD
FABRIC STEAMER
MODEL GS23X
Service Center
Conair LLC
Service Department
7475 N. Glen Harbor Blvd.
Glendale, AZ 85307
For information on any Conair product, call
1-800-3-CONAIR or visit us on the web at
www.conair.com
Please register this product at
www.conair.com/registration
©2021 Conair LLC
Glendale, AZ 85307
Made in China
IMPORTANT
FOR HOUSEHOLD USE ONLY
FILLING INSTRUCTIONS
1. Make sure unit is unplugged.
2. Place the unit on its back on a flat and
stable surface.
3. While holding the water reservoir with one
hand, move the release switch up toward the
steam head nozzle.
4. Pull the reservoir out, away from the
steamer body.
5. Turn the reservoir over, revealing the
rubber inlet cover.
6. Open the inlet cover and fill the reservoir
with distilled water (which can be found in
grocery stores). We recommend that you
use distilled water only, as this will prevent
mineral deposits in the boiler that can reduce
performance or clog the water system.
7. Close the inlet cover and return the reser-
voir to its place, making sure that it is secure.
21PA080513 IB-13483C
INSTRUCCIONES
DE USO
1. Llene el depósito de agua con agua
destilada. Nota: Para evitar los depósitos
minerales, los cuales pueden perjudicar el
rendimiento del aparato o tapar el sistema
de vaporización, se recomienda usar agua
destilada solamente.
2. Enchufe el cable en una toma de corriente.
3. La luz roja de encendido se encenderá.
Permita que la unidad se caliente por
aprox. 40 segundos. La luz verde de listo se
encenderá cuando el aparato esté listo para
su uso.
4. Sosteniendo la unidad de tal manera que
el vapor no esté dirigido a nadie, presione el
disparo de vapor. El vapor empezará a salir
de la boquilla. Para conseguir vapor continuo,
deslice el botón de bloqueo ubicado sobre el
disparo de vapor hacia abajo; esto bloqueará
el disparo de vapor. Siempre oriente la
boquilla de tal manera que el vapor no
esté dirigido a nadie.
5. Antes del primer uso, haga una prueba
en un trapo para eliminar el polvo y otros
residuos acumulados durante la fabricación y
el transporte.
6. Ajuste el calor al nivel deseado, alto
(“HIGH”) o bajo (“LOW”), deslizando el botón
ubicado en la parte trasera del aparato.
Use el ajuste de calor alto (“HIGH”) para
desarrugar las prendas de tela gruesa o las
prendas muy arrugadas; el vapor estará
más caliente y saldrá más rápidamente
de la boquilla. Use el ajuste de calor bajo
(“LOW”), junto con el cepillo quitapelusas,
para desarrugar las telas delicadas.
7. Para detener el flujo vapor, suelte el
disparo de vapor o deslice el botón de
bloqueo hacia arriba.
8. Desenchufe la unidad cuando no esté
en uso.
MATA EL 99.9 % DE LAS BACTERIAS*
1. Coloque la suela/placa de la plancha
a vapor a una distancia mínima de ½in.
(1.5cm) del material que desea tratar.
2. Deje la plancha en esta posición por 2
minutos, luego pase a la zona siguiente,
y repita el proceso.
* La tasa de reducción de bacterias se midió
después de exponer las muestras probadas
al vapor por 2 minutos, a una distancia de ½
in. (1.5 cm) de la placa/suela de la plancha
a vapor. Las pruebas se realizaron con la
bacteria E. Coli.
CONSEJOS
1. Cepille las prendas con el cepillo
quitapelusas antes de desarrugarlas; esto
soltará las fibras del tejido para una mejor
penetración del vapor.
2. Cuelgue la prenda o la tela. NOTA:
En lo posible, evite usar perchas/ganchos
de metal.
3. Pase la boquilla lentamente por encima
de las arrugas. Puede que sea necesario
dar varias pasadas para desarrugar
completamente la tela.
4. Después del uso, desenchufe el aparato y
vacíe el depósito de agua.
5. PRECAUCIÓN: Si cuelga las prendas
atrás de una puerta, tenga cuidado de no
dañar la puerta con el vapor.
6. Haga una prueba en un área discreta de la
tela antes de desarrugar la prenda, usando el
ajuste bajo (“LOW”), para comprobar que la
tela soporta el vapor. En caso de daño,
NO use la unidad.
7. Mueva constantemente la unidad,
manteniéndola a aprox. 1 in. (2.5cm) de la
prenda para evitar los daños. No sostenga
la unidad en el mismo sitio por un tiempo
prolongado, y no permita que la boquilla haga
contacto con la tela; esto podría encoger,
desteñir o derretir ciertos tipos de material.
8. Al desarrugar telas gruesas, tales como
abrigos de lana o sábanas de algodón
pesado, puede que sea necesario pasar la
unidad más lentamente para conseguir los
resultados deseados. Como siempre, haga
una prueba preliminar en un área discreta de
la tela, usando el ajuste bajo (“LOW”), para
comprobar que la tela soporta el vapor.
ACCESORIOS PARA
PLANCHAS A VAPOR CONAIR
(vendidos por separado)
Soporte de
almacenamiento para
plancha a vapor
Modelo DH1
Guante protector
para planchado
a vapor
Modelo GPP1
Almohadilla protectora para puerta
Modelo GDPP1
MANUAL DE INSTRUCCIONES
Para su seguridad y para disfrutar plenamente
de este producto, siempre lea atentamente las
instrucciones antes del uso.
PLANCHA A VAPOR
PORTÁTIL
MODELO GS23X
Centro de servicio
Conair LLC
Service Department
7475 N. Glen Harbor Blvd.
Glendale, AZ 85307
Para más información sobre los productos Conair,
llame al 1-800-3-CONAIR o visítenos en
www.conair.com
Para registrar este producto, visítenos en:
www.conair.com/registration
©2021 Conair LLC
Glendale, AZ 85307
Hecho en China
GARANTÍA LIMITADA DE UN AÑO
(VÁLIDA EN LOS EE.UU. Y EN
CANADÁ SOLAMENTE)
Conair reparará o remplazará (a su opción)
este producto sin cargo por un período de
12 meses a partir de la fecha de compra
si presenta defectos de fabricación o
materiales.
Para obtener servicio técnico bajo esta
garantía, devuelva el producto defectuoso al
Centro de Servicio indicado a continuación,
junto con su recibo de compra.
Los residentes de California solo necesitan
dar una prueba de compra y deben llamar al
1-800-3-CONAIR para recibir instrucciones
de envío. En ausencia del recibo de compra,
el período de garantía será de 12 meses a
partir de la fecha de fabricación.
CUALQUIER GARANTÍA, OBLIGACIÓN
O RESPONSABILIDAD IMPLÍCITAS,
INCLUYENDO, PERO NO LIMITADAS,
A LA GARANTÍA IMPLÍCITA DE
COMERCIABILIDAD Y APTITUD PARA
UN PROPÓSITO ESPECÍFICO, ESTARÁN
LIMITADAS POR LOS 12 MESES DE LA
PRESENTE GARANTÍA ESCRITA. Algunos
Estados no permiten limitaciones en la
duración de una garantía implícita, de modo
que las limitaciones mencionadas pueden no
regir para usted.
CONAIR NO SERÁ RESPONSABLE, EN
NINGÚN CASO, POR NINGÚN DAÑO
ESPECIAL, INCIDENTAL O CONSECUENTE
DEBIDO AL INCUMPLIMIENTO DE ESTA
O CUALQUIER OTRA GARANTÍA, EXPRESA
O IMPLÍCITA.
IMPORTANTE
PARA USO DOMÉSTICO
SOLAMENTE
LLENADO DEL DEPÓSITO
1. Compruebe que el aparato está
desenchufado.
2. Coloque el aparato, echado en su
parte posterior, sobre una superficie
plana y segura.
3. Mientras sostiene el depósito de agua
con una mano, deslice el botón de liberación
hacia arriba.
4. Retire el depósito de agua.
5. Voltee el depósito de agua.
6. Abra el tapón de caucho y llene el depósito
con agua destilada (disponible en la mayoría
de los supermercados). Nota: Para evitar
los depósitos minerales, los cuales pueden
perjudicar el rendimiento del aparato o tapar
el sistema de vaporización, se recomienda
usar agua destilada solamente.
7. Cierre el tapón y vuelva a instalar el
depósito de manera segura.
Algunos Estados no permiten la exclusión o
limitación de daños especiales, incidentales o
consecuentes, de modo que las limitaciones
mencionadas pueden no regir para usted.
Esta garantía le otorga derechos legales
específicos y usted puede tener otros
derechos que varían de un Estado a otro.