This document is a user manual for Concept Perugini flail mowers, covering models AT, ET, JT, HT, PT, and TT. It provides comprehensive information on the operation, maintenance, and safety aspects of these agricultural machines.
Function Description
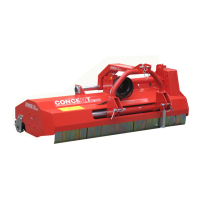
Concept Perugini flail mowers are agricultural implements designed for cutting and mulching vegetation. They are tractor-mounted machines, utilizing a power take-off (PTO) shaft for operation. The core function involves a rotor equipped with flails (blades) that rotate at high speed to cut and shred plant material. The manual highlights their versatility, with some models offering front or rear mounting options and others featuring hydraulic side shift for enhanced maneuverability.
Important Technical Specifications
The identification plate, located on the machine, provides crucial technical data:
- Manufacturer's Name: CONCEPT PERUGINI S.R.L.
- CE Mark: Indicates compliance with European safety standards.
- Year of Production: Essential for tracking machine age and ordering parts.
- Serial Number: Unique identifier for each machine, critical for spare parts and warranty.
- Recommended Tractor Horsepower (HP): Specifies the suitable power range for the tractor to operate the mower effectively and safely.
- Overall Weight: Important for tractor compatibility and transport considerations.
- P.T.O. Speed and Direction of Rotation: Ensures proper connection and operation with the tractor's PTO.
The HT model is specifically noted for tractors ranging from 40 to 70 HP, emphasizing its suitability for small to medium-sized tractors.
Usage Features
Attaching to the Tractor:
- Flail mowers can be linked to any tractor with a category 1 or 2 three-point linkage.
- The process involves adjusting tractor arm width, reversing the tractor to the machine, attaching lower links, adjusting for sideways movement, and lengthening/attaching the top link to ensure the machine is parallel to the ground.
- All locking pins must be fitted for secure attachment.
- For PT models, the top link bracket has a hole for transport and a slot for work, crucial for preventing damage to the headstock sliding mechanism.
Headstock Options:
- ET Headstock: Offers a fixed headstock with two attachment options for the 3-point linkage, allowing for either direct rear mounting or a fixed offset of 30 cm.
- HT Front or Rear Mounting: The HT model is versatile, allowing mounting on either the rear as a standard flail mower or on the front as a front-mounted flail mower. This requires repositioning the top link on the headstock. During transport, both pins should be in the top link, while for use, one pin (B) must be removed to allow the machine to follow the terrain.
PTO Shaft:
- The PTO shaft must be cut to the correct length according to the manufacturer's instructions.
- If an overrun clutch is fitted, it must be installed on the implement.
- Ensure the locking pin is correctly located and secure, and all chains and guards are fitted before use.
Working Depth Adjustment:
- The height of the machine from the ground is controlled by the rear roller, skids, and top link.
- It's critical to ensure flails do not hit the ground to prevent wear and damage.
- The top link should always be adjusted to keep the machine parallel to the ground when altering the rear roller height.
- AT, ET, JT Models: Roller height is adjusted by removing bolts (A) and repositioning the plate to align with higher or lower holes. Moving supports horizontally can increase space for cuttings discharge.
- TT Model: Skid height is adjusted by removing bolt (B) and loosening (C), repositioning the skid, then tightening B and C.
- PT, HT Models: Roller bracket height is adjusted by undoing bolts (E), moving the plate, and re-tightening. Plates can be on the inside or outside of the chassis depending on machine width.
Side Shift:
- Most models feature hydraulic side shift, which requires connecting hoses to the tractor's double-acting spool valve.
- The ET model does not have hydraulic side shift.
In the Field Operation:
- Lower the machine to approximately 10 cm from the ground.
- Engage the tractor PTO and slowly increase speed to 540 rpm.
- Lower the machine to the ground, engage a forward gear, and begin motion.
- Always drive in a straight line; lift the machine off the ground when turning to prevent straining parts.
- If equipped with an opening tailgate, it must only be opened when the machine is stopped and the PTO is disengaged. Using the machine with an open tailgate is strictly prohibited.
Road Transport:
- Disconnect the PTO shaft.
- If fitted with wheels, fold them in by relocating the pin.
- Adhere to local traffic regulations.
Safety Instructions:
- General Safety: Keep away from rotating parts and PTO shaft during operation. Do not remove safety guards.
- Servicing: Always perform servicing with the engine stopped, brakes applied and locked, and the starter key removed. If the machine is raised, support it securely before working underneath.
- Lifting: Always use appropriate lifting gear and designated lifting points (indicated by yellow and black stickers).
- Operator Prerequisites: The operator must be physically and mentally sound, and trained. They should read and understand the manual.
- Work Clothing: Operators must wear working gloves, appropriate overalls, working boots, protective glasses, and a protective helmet.
- Dark Conditions: Do not work in the dark unless suitable lighting is available.
- Stone Guards: Front stone guards are crucial for tractor driver protection. They must never be removed and should be immediately replaced if bent, worn, or broken. Proper setup ensures they hang freely and don't dig into the ground.
Maintenance Features
Lubrication:
- Every 10 working hours: Grease the side shift sliding parts with Agip 33/FD or equivalent.
- Every 50 working hours: Check the gearbox and side shaft oil level. Top up with gear oil EP90 if necessary.
- Every 250 working hours or once a year: Change the oil in the gearbox and side shaft.
- Gearbox oil is controlled via cap A.
- Side shaft oil level is checked via cap B, and plug C is used to empty the oil.
Rotor Maintenance:
- Before and After each use: Inspect the rotor and flails for damage. An unbalanced rotor due to damage can cause vibrations and lead to support breakage. Contact a dealer for repair or replacement if damaged.
- Check bolts for tightness and flails for wear and breakages. Replace all broken, bent, or worn blades.
- Blade Replacement:
- AT, ET, JT, HT, PT Models: The machine must be lifted and securely supported to replace blades from underneath.
- TT Model: Open the rear tailgate for blade replacement.
- Tailgate Rule: The tailgate must be closed during use and can only be opened when the machine is stopped and the PTO is disengaged.
Belt Tensioning (Transmission):
- All Concept Perugini flail mowers are belt-driven.
- Initial Check: After the first 2-3 hours of use, check belt tension via the slot on the belt guard; there should be 5 mm play when 10 kgf is applied.
- Tensioning Procedure:
- AT Model: Slacken 2 nuts (C) and 4 bolts (A). Adjust tension by tightening or slackening bolt (B) (after loosening counter nuts on B). Once tensioned, tighten counter nuts on B and nuts C. Move the gearbox slightly to ensure the side shaft is square with the flail mower side, which is vital for belt life and even wear.
- ET, JT, HT, PT Models: Slacken 3 bolts (C) and 4 bolts (A). Tighten or loosen bolt (B) to achieve optimum tension (after loosening counter nut on B). Once tensioned, tighten all bolts B and C. Move the gearbox upwards or downwards to square the side shaft with the flail mower side, crucial for belt life and even wear.
- TT Model: Slacken nuts (C) and 4 bolts (A) under the gearbox. Slacken counter nuts on (B) and tighten or slacken bolt (B). Once desired tension is achieved, tighten all nuts on B and nuts C. Move the gearbox to square the side shaft with the flail mower side, then tighten bolts A.
Storage:
- Before seasonal storage, perform a thorough check and clean.
- Remove dirt, address worn or broken parts.
- Treat areas where paint has worn off with a rust inhibitor.
- Store in a dry place, out of the elements, to prolong lifespan.
- Grease the PTO shaft according to manufacturer recommendations.
Spare Parts:
- Contact a local dealer for correct spare parts.
- Provide all identification data and part codes.
- Only use genuine Concept spare parts; using non-genuine parts will nullify the warranty.
Warranty:
- Warranty coverage is dependent on appropriate maintenance being carried out.
- Concept Perugini S.R.L. covers defects in workmanship or material, excluding wearing parts, misuse, lack of reasonable care, general wear, or fitting of non-approved spares/components.
- Failure to comply with these conditions will void the warranty.