Do you have a question about the CONCORD QC3914 and is the answer not in the manual?
Instructions for downloading the 'Tuya Smart' app and setting up an account for device connection.
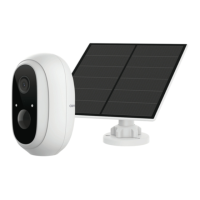
The Concord QC3914 is a Wi-Fi battery-powered camera designed for home security and surveillance, complemented by a solar panel for continuous power. This system offers a versatile and eco-friendly solution for monitoring your property, combining wireless convenience with sustainable energy.
The core of the system is the Wi-Fi Battery Powered Camera, which captures video footage and provides real-time monitoring. It connects to your home's Wi-Fi network, allowing you to access live feeds and recorded content remotely via a smartphone app. The camera is equipped with a lens for capturing visuals, a microphone for audio input, and an infrared LED for night vision, ensuring clear visibility even in low-light conditions. A PIR (Passive Infrared) sensor detects motion, triggering recordings and alerts to enhance security. A light sensor helps the camera adapt to varying light levels. For local storage of recordings, the camera features a Micro SD card slot, supporting cards up to 128GB. It also includes a reset button for troubleshooting, an on/off button for power control, and a power input for charging.
The accompanying Solar Panel serves as a sustainable power source for the camera. It is designed to convert sunlight into electrical energy, which then charges the camera's battery. This feature significantly reduces the need for manual recharging, making the system more autonomous and environmentally friendly. The solar panel includes a USB charging output, indicating its compatibility with the camera's power input.
Setting up the Concord QC3914 system involves a few straightforward steps. First, you'll need to insert a microSD card (not included) into the camera for local storage of recordings. Class 10 Micro SD cards are recommended, with a maximum supported capacity of 128GB. The camera's battery needs to be charged initially, which is done by connecting the included USB charging cable to the camera's power input socket and then to a USB mains power adapter or computer with at least 2 amps of charging. It is suggested to fully charge the camera for up to 3 hours on first-time use.
Once charged, the camera needs to be reset by pressing and holding the reset button for more than 5 seconds until the blue LED blinks quickly. This prepares the camera for pairing with the "Tuya Smart" app. The app, available on both the App Store and Google Play, is central to controlling and monitoring the camera. After downloading and setting up an account, you can add the device by selecting "Security & Video Surveillance" and then "Smart Camera (Wi-Fi)." The app will guide you through the process, which includes inputting your Wi-Fi password and scanning a QR code displayed on your smartphone with the camera. A beeping sound from the camera confirms successful pairing, and the blue LED staying on indicates that the camera is ready for use.
The camera offers flexible installation options. It can be placed on a shelf or any flat surface. For wall mounting, the package includes wall mounting hardware, including screws and plastic drywall anchors. The camera attaches to a magnetic mount, which is then fastened to the wall, allowing for easy adjustment of the camera's angle.
The solar panel's installation is also designed for optimal performance. It should be fixed to a wall in an area that receives consistent direct sunlight throughout the day, as even a few hours of direct sunlight are sufficient to keep the camera powered. The mounting base of the solar panel is secured to the wall using the provided screws and, if necessary, wall anchors. The solar panel features a universal joint, allowing its angle to be adjusted up and down by up to 90 degrees to maximize sun exposure. This adjustability is crucial for ensuring efficient charging regardless of the sun's position throughout the day or year. The universal joint is assembled by first installing a locking screw cap, then screwing a circular socket nut into the joint, and finally attaching the joint to the back of the solar panel, tightening it firmly with the attached nut.
The Concord QC3914 system is designed for relatively low maintenance, primarily due to its solar charging capability. The solar panel continuously charges the camera's battery, reducing the need for manual recharging. However, the efficiency of the solar panel can be affected by weather conditions, seasonal changes, and geographic location, so occasional checks on the camera's battery status via the app might be beneficial.
The camera's LED status indicators provide quick diagnostic information:
These LED statuses help users quickly identify the camera's operational state or any issues that might require attention. Regular cleaning of the solar panel surface to remove dust or debris can help maintain its charging efficiency. The camera's robust design and wireless connectivity aim to provide a reliable and user-friendly surveillance experience with minimal ongoing intervention.
| Optical zoom | 3x |
|---|---|
| Digital zoom | 5x |
| LCD screen size | 3.0 inch |
| Storage media | SD/SDHC card |
| Weight | 120g |
| ISO sensitivity | 100, 200, 400, 800, 1600 |