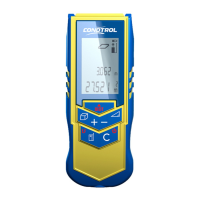
CONDTROL X1
Руководство по эксплуатации
• Берегите прибор от ударов, вибрации, сильной жары и сильного хо-
лода.
• Всегда храните прибор в помещении. Когда вы не используете
прибор, храните его в специальной сумке.
• Берегите прибор от воздействия пыли и жидкостей. Для чистки
прибора используйте только чистую, мягкую ткань. Если необходи-
мо, слегка смочите ткань чистым спиртом или водой.
• Не дотрагивайтесь до линз.
• Регулярно проверяйте заряд батарей во избежание ухудшения рабо-
ты прибора. Всегда убирайте батареи из прибора, если не собирае-
тесь им пользоваться длительное время.
• Замените батареи, когда на экране загорится соответствующий
индикатор.
• Не разбирайте дальномер.
УТИЛИЗАЦИЯ
Не выбрасывайте измерительные инструменты в коммунальный мусор!
Согласно Европейской Директиве 2002/96/EC о старых электрических
и электронных инструментах и приборах и её претворению в нацио-
нальное право, отслужившие свой срок измерительные инструменты
должны собираться отдельно и быть переданы на экологически чистую
рециркуляцию отходов.
CONDTROL оставляет за собой право вносить изменения в данную ин-
струкцию.
LASER
DISTANCE METER
user manual
CONDTROL X1
LASER
DISTANCE METER
user manual
CONDTROL X1
LASER
DISTANCE METER
user manual
CONDTROL X1
Congratulations on the purchase of your CONDTROL X1.
The safety instructions can be found in the back of the booklet. The safety
instructions and the user manual should be read through carefully before
you use the product for the first time.
COMPLETE SET
Laser distance meter - 1
Battery - 1
Carrying case - 1
User manual - 1
START-UP
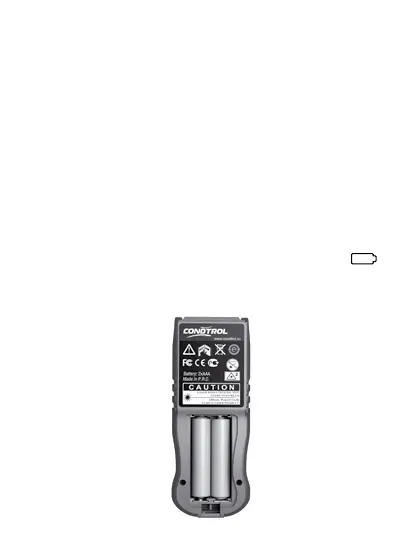
INSERTING/REPLACING BATTERY
1. Remove the battery compartment lid and attach handstrap.
2. Insert the battery, observing correct polarity
3. Close the battery cover. Replace the battery when the symbol
flashes permanently in the display.
Remove the battery before any long period of non-use to avoid the
danger of corrosion.
Note:
- Replace the battery when the indicator shows absence of a charge .
- If the indicator of the battery charge shows one division, you can make
approximately 100 measurements .
- The power indicator blinks when the battery is low .
USE OF THE INSTRUMENT
- Measurements of linear distances.
- Carrying out of indirect measurements (Pythagorean method).
- Calculation of the area and volume.
- Minimum/maximum measurements.
CHANGING THE REFERENCE POINT
The instrument can take measurements from two points:
-From a back edge of the instrument
-From a forward edge of the instrument
Switching of reference points is carried out by consecutive pressing the
button . Thus the corresponding indicator lights up on the display.
1 Belt holder
2 LCD Display
3 ON/ Measuring button
4 Plus ( + ) /minus ( - ) button
5 Area/volume/wall area button
6 Indirect measurement button
7 Reference button/ Unit of measurement
8 OFF/Clear button
OPERATION
5
4
6
8
1
2
3
7
1 «+» or « -» symbol
2 Minimal measurement
3 Single / continuous measurement
4 Area/ volume/Indirect measurementt
5 Main line
6 Battery status
7 Laser active
8 Measuring reference
9 Measuring units
Display
2
3
4
4
5
6
7
9
8
1
TECHNICAL DATA
Laser type 650 nm/ Class II / < 1 mW
Range 0,5 m - 30 m * ( 1.65 ft – 98 ft )*
M e a s u r i n g a c c u r a c y T y p i c a l l y ± 2 mm (± 1/13 ‘‘ )**
Smallest unit displayed 1 mm ( 1/16 in )
Autom.
switch off Laser:
Instrument:
45 sec
180 sec
Storage temperature range -25 °С ...+70 °С ( -13 °F ... +158 °F )
Operation temperature range 0 °С ...+40 °С ( +32 °F ... +104 °F)
Dimensions 110 mm х 43 mm х 26 mm
(4.33 in x1.69 in x 1.02 in)
Weight 70 g
* Use a target plate to increase the measurement range during daylight or if
the target has poor reflection properties
** in favourable conditions (good target surface properties, room
temperature) up to 10 m (33 ft). In unfovourable conditions, such as intense
sunshine, poorly reflecting target surface or high temperature variations,
the deviation over distances above 10 m (33 ft) can increase by ± 0.25 mm/m
(± 0.003 in/ft)
MENU FUNCTIONS
SETTING
1 Unit Setting
The following unit can be set:
Distance Area Volume
1 0.000 m 0.000 m
2
0.000 m
3
2 0’00’’1/16 0.000 ft
2
0.000 ft
3
3 0000 1/16 in 0.000 ft
2
0.000 ft
3
4 0.000 ft 0.000 ft
2
0.000 ft
3
1.1 In Order to change measuring units press and hold U.
1.2 In order to switch to the next unit repeat 1.1 again.
2 Beep
You can switch the beep on or off + - . Press for longer to switch.
3 Display-keypad backlight
Automatic illumination of the display. Backlight cannot be switched off.
Every time you switch on the meter or press any button – backlight switch
on for 30 seconds.
4 Single distance measuring mode
press once. Activate the product and all symbol display for checking.
The display standby mode. When the meter switching on pause should be as
short as possible. Measuring time in single mode should be < 0.5sec to 90%
Kodak grey card at distance <15m. Lighting condition <2000 LUX. Indoors.
Press button for turn on the laser beam to aim at object which you
want to measure.
1 Press
Result appears in lower (big) string.
Laser switched off.
2 Press once again
Laser switch on for targeting.
Previous result moves to second string.
3 Press
New measured result appears in “big”
lower string.
Laser switched off.
5 Continuous distance measuring mode
Press and hold button to switch into continuous measuring mode,
the laser beam will be also activated. The data will be display simultaneity.
Minimum in top string, Current value in lower big string.
Press any of buttons or to stop continuous laser . Catch the final
length display on the screen.
Measuring time in continuous mode should be < 0.3sec to 90% Kodak grey
card at distance <15m. Lighting condition <2000 LUX. Indoors.
6 Addition / Subtraction
Laser switching on for targeting by pressing
1
Press once again to
measure
Result appears in lower (big) string
2
Press + - button one
or two times to choose
appropriate action
Sign + or - appears
Previous result moves to upper string.
3 Press Laser switch on for targeting.
4 Press
Measured result appears in upper
string. Calculated value appears in
lower (big) string.
The last step is cancelled.
7 Area
1 Press button once The symbol appears in the display.
2
Press this button
to take the first length
measurement (height)
Measured result appears in upper string.
3
Press this button
to take the second length
measurement (width)
Measured result appears in upper string.
Calculated area appears in lower (big)
string in square meters (ft/in).
Press button once to
cancel last step.
To cancel this mode
press twice.
8 Volume
1 Press button twice.
The symbol appears in the
display
2
Press this button to take the
first length measurement (height)
Measured result appears in
upper string
3 Press this button to take
the second length measurement
(width)
Measured result appears in upper
string.
4
Press this button to take
the third length measurement
(length)
Current measurement (length)
appears in upper string. In lower
(big) string appears calculated
result in cubic meters (ft/in)
Press button once to cancel last step.
To cancel this mode press twice.
9 Simple Pythagoras
Use Pythagorean Theorem (a
2
+b
2
=C
2
) to measure height indirectly.
1 Press button once to
switch to simple Pythagoras
function
The symbol appears in the
display
2
Press this button to
measure the first (long) side
of the triangle
Measured result (Hypotenuse)
appears in upper string
3
Press this button to
measure the second (short)
side of the triangle
Previously measured result
disappear, current value (Cathetus)
appears in upper string. Calculated
CATHETUS appears in lower (big)
string.
Press button once to cancel last step.
To cancel this mode press twice.
MESSAGE CODES
The following errors can be corrected:
Code Cause Renedy
301 Distance is out of range Keep in correct measure range
302 Reflected signal is too weak Measure on a better surface
303 Out of display range Reset zero by press Power-Key
304
Pythagorean theorem
calculation error
Check value is correct
305 Low battery Change new battery
306 Temperature too low Warm up instrument
307 Temperature too high Cool down instrument
308 Ambient light is too strong
Measure in a darker
background
MEASURING CONDITIONS
Measuring range
The range is limited to 30 m.
At night or dusk and if the target is in shadow the measuring range without
target plate is increased. Use a target plate to increase the measurement
range during daylight or if the target has poor reflection properties.
Target surfaces
Measuring errors can occur when measuring toward colorless liquids
(e.g. water) or dust free glass, Styrofoam or similar semi-permeable
surfaces. Aiming at high gloss surfaces may deflect the laser beam and
lead to measurement errors. Against non-reflective and dark surfaces the
measuring time may increase.
Care
Do not immerse the instrument in water. Wipe off dirt with a damp, soft
cloth.
Do not use aggressive cleaning agents or solutions. Handle the instrument
as you would a telescope or camera.
Warranty
The Condtrol X1 comes with a one year warranty from CONDTROL Ltd.
SAFETY INSTRUCTIONS
The User Manual can be found in the first part of the booklet, forms a part of
the Safety Instructions. Carefully read the Safety Instructions and the User
Manual before using this product. The person responsible for the instrument
must ensure that all users understand these directions and adhere to them.
Symbols used
The symbols used in the Safety Instructions have the following meanings:
- WARNING:
Indicates a potentially hazardous situation or an unintended use which, if not
avoided, will result in death or serious injury.
- CAUTION:
Indicates a potentially hazardous situation or an unintended use which, if not
avoided, may result in minor injury and/or in appreciable material, financial
and environmental damage.
! Important paragraphs which must be adhered to in prac tice as they enabled
the product to be used in a technically correct and efficient manner.
Prohibited use
• Using the instrument without instruction
• Using outside the stated limits
• Deactivation of safety systems and removal of explanatory and hazard
labels. Opening of the equipment by using tools (screwdrivers, etc.), as far
as not specifically permitted for certain cases
• Carrying out modification or conversion of the product
• Use after misappropriation
NOTES
LASER
DISTANCE METER
user manual
CONDTROL X1
LASER
DISTANCE METER
user manual
CONDTROL X1
LASER
DISTANCE METER
user manual
CONDTROL X1
LASER
DISTANCE METER
user manual
CONDTROL X1
LASER
DISTANCE METER
user manual
CONDTROL X1
LASER
DISTANCE METER
user manual
CONDTROL X1
LASER
DISTANCE METER
user manual
CONDTROL X1
LASER
DISTANCE METER
user manual
CONDTROL X1
LASER
DISTANCE METER
user manual
CONDTROL X1
LASER
DISTANCE METER
user manual
CONDTROL X1
LASER
DISTANCE METER
user manual
CONDTROL X1
LASER
DISTANCE METER
user manual
CONDTROL X1
 Loading...