This document provides a comprehensive guide for the CLIND60RF induction hob, covering its functions, technical specifications, usage, and maintenance.
Function Description
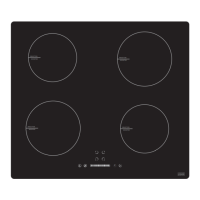
The CLIND60RF is an induction hob designed for safe, advanced, and efficient cooking. It operates by generating electromagnetic radiation in suitable pans, which then cooks the food. Unlike traditional hobs, there is no direct heat from the glass surface; instead, the surface heats up due to convection from the pan itself, which is perfectly normal.
The hob features several safety and convenience functions:
- Protection from over-heating: A built-in sensor automatically switches off the hob if it detects excessive temperatures.
- Residual heat indicator: The display shows "H" to warn that the cooking zone is too hot to touch.
- Auto shutdown: If a cooking zone is left on unintentionally, the hob will automatically shut down after a predetermined time (6 hours for power levels 1-3, 3 hours for 4-6, 2 hours for 7-8, and 90 minutes for level 9).
- Automatic pan detection: The hob automatically switches off after two minutes if a pan is removed from the cooking zone.
- Detection of small articles: If an unsuitable pan or small items (like cutlery or keys) are placed on the cooking zone, the hob will switch off automatically after one minute.
- Safety mode (Child lock): This function allows users to lock the controls to prevent unintended use, especially by children. All controls except the OFF button are disabled when the child lock is active.
- Boost function: This feature temporarily increases the power output of a cooking zone to its maximum level for faster heating. After five minutes, the power automatically reverts to level 9 to prevent overheating.
- Timer function: The timer can be set from 1 to 99 minutes and used in two ways: as an alarm that does not affect cooking zones, or as an automatic switch-off function for a specific cooking zone. This function operates on one zone at a time, with other zones continuing to operate normally.
- Remote control connectivity: This hob can be paired via radio frequency with the optional Cooke & Lewis Cooker Hood Model: CL60CGRF (EAN 3663602553052). When connected, the hob's power output controls the extraction rate of the cooker hood. The hood's speed level adjusts based on the combined power output of the hob's cooking zones.
Important Technical Specifications
- Power supply: The hob must be connected directly to the mains power supply by a suitably qualified person using an omnipolar circuit breaker with a minimum opening of 3mm between contacts.
- Earthing: This is a Class I appliance and MUST be earthed. It is supplied with a 5-core mains cable with specific color coding: Brown and Black for Live (L), Blue and Grey for Neutral (N), and Green and Yellow for Earth (E).
- Circuit breaker: The appliance requires a 32 Amp Miniature Circuit Breaker.
- Worktop thickness: The worktop for installation should be at least 30mm thick and made of a heat-resistant material.
- Clearance: A safety distance of at least 760mm is required between the induction hob and any cupboard above the hotplate. Good ventilation is essential around the appliance for heat dissipation and low power consumption.
- Cooking zone power outputs (Normal / Boost):
- Zone 1: 1500 W / 2000 W
- Zone 2: 1200 W / 1500 W
- Zone 3: 1500 W / 2000 W
- Zone 4: 1200 W / 1500 W
- Pan suitability: Only cookware with a magnetic base suitable for induction cooking should be used. Pans with jagged edges or curved bases are not suitable. Small pans less than 14cm in diameter may not be detected.
Usage Features
Using your induction hob:
- Turn on the hob by touching the On/Off control (C). A beep will sound, and "-" will appear on the zones, indicating standby mode. If no cooking zone or power level is selected within one minute, the hob will automatically switch off.
- Place an induction-suitable pan on a cooking zone, ensuring its base and the hob surface are clean and dry.
- Select a zone using (A); "0" will flash. If no power level is chosen within 5 seconds, "–" will be displayed.
- Select a power output from 0-9 using the slider control (D) to start cooking. The power level can be adjusted at any time.
- To finish cooking, select the cooking zone (A) and set the power output (D) to zero. The hob will display "H" if the zone is hot.
Safety mode (Child lock):
- To lock: Touch and hold key (B) for 3 seconds when the hob is on. "Loc" will appear on the display.
- To unlock: Touch and hold key (B) for 3 seconds.
- If the hob automatically switches off while locked, turn it back on with (C) and then unlock with (B) for 3 seconds.
Boost function:
- To activate: Select a cooking zone (A) and press the boost key (F). "P" will appear, and power output will increase to maximum.
- To cancel: Select the boosted zone (A) and adjust the power level using the slider control (D).
Timer function:
- As an alarm: Turn on the hob (C), select a zone (A) and power level. Touch the timer key (E) when the indicator stops flashing; "10" will flash. Adjust time with "+" or "–" keys. To cancel, press and then "–" until "00" is displayed.
- To switch off zones: Select a zone (A) and power level. Touch the timer key (E) before the indicator stops flashing; "10" will flash. Adjust time with "+" or "–" keys. To cancel, select the zone (A), press, and then "–" until "00" is displayed.
Controlling the cooker hood remotely (optional):
- Pairing: Ensure both hob and hood are off. Press Timer and Light icons simultaneously on the hood control panel (LED will flash red/white). Turn on the hob (connectivity indicator should be red). Press and simultaneously on the hob (connection indicator will flash). The hood panel will show "A" for 5 seconds. Press and again on the hob to save settings. This must be done within two minutes of powering on the hood.
- Operation: The hood's extraction rate adjusts automatically based on the combined power output of the hob's cooking zones (Speed 1 for output ≤ 8, Speed 3 for 9-24, Speed 5 for 25-35, Speed P-Boost for > 35). Speeds 2 and 4 are not available in this mode.
- Stopping connectivity: Touch the connectivity key on the hob. The indicator light will turn off, and the link will be dropped. If the hob is switched off, the hood will continue in timer mode, gradually reducing speed over 5 minutes.
Maintenance Features
- General cleaning: Always switch off the electricity supply before maintenance. Allow the appliance to cool down after use before cleaning.
- Surface cleaning:
- Limescale: Apply white vinegar, then wipe dry with a soft cloth.
- Burnt-on stains: Clean with a damp cloth and dry with a soft cloth.
- Light stains: Clean with a damp cloth and dry with a soft cloth.
- Melted plastics: Use a scraper suitable for induction glass to remove residue.
- Special induction cleaner is recommended for limescale, burnt-on stains, and melted plastics.
- Avoid: Abrasive materials, undiluted washing-up liquid, dishwasher detergent, scouring agents, harsh cleaning agents (oven spray, stain remover), abrasive sponges, high-pressure cleaners, or steam jet cleaners. Do not rub the hob surface with abrasive materials or pan bases to prevent wear on markings.
- Safety: If the hob surface cracks, do not use it; switch off the appliance at the fused spur and contact customer services. Avoid placing rough or uneven vessels on the hob to prevent damage to the glass surface. Do not bang pots and pans on the hob. Do not store detergents or flammable materials beneath the hob.
- Power cables: Damaged power cables must be replaced by a competent person or qualified electrician.