This document is an instruction manual for Cookology cooker hoods, covering models CDD600BK, CDD900BK, CDD605BK, CDD905BK, CDD600WH, and CDD900WH.
Function Description
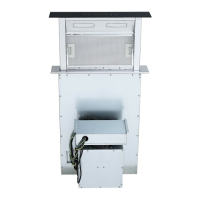
The Cookology cooker hood is designed for home use to extract fumes and odors generated during cooking. It features a streamlined design with a large power, low-noise electric motor and a centrifugal leaf for strong suction. The appliance is equipped with a non-stick grease filter for easy cleaning and a special wind tunnel construction and oil collector design to efficiently absorb dirt. The hood includes a control system with a power panel and a touch panel, offering functions such as power on/off, speed setting, lighting control, and a timer.
Important Technical Specifications
General:
- Models Covered: CDD600BK, CDD900BK, CDD605BK, CDD905BK, CDD600WH, CDD900WH
- Construction: Class II with accessible metallic enclosures.
- Power Supply: Must be connected to the correct power supply by a qualified fitter.
- Ventilation: Adequate room ventilation is required when the hood is used simultaneously with gas or other fuel-burning appliances. Air must not be discharged into a flue used for other fumes.
Installation:
- Distance from Wall: Minimum 15mm from the wall.
- Distance from Hob: Minimum 40mm from the edge of the cooker hood to the hob. When located above a gas appliance, this distance must be at least 65cm.
- Fixing: Uses 4pcs screw ST48 & ST414 for fixing the hood, and 8pcs screw M1010 for connecting the casing & hood. 4pcs screw ST414 are used to fix the PCB box.
- Ducting: The extraction duct should be direct and as short as possible to reduce environmental impact.
Lamp Replacement:
- Lamp Type: LED modules - rectangle LED lamp.
- ILCOS D Code: DSS-1-S-120/33.5.
- Max Wattage: 1W.
- Voltage Range: DC 12V.
- Dimensions: 120mm x 33.5mm x 28mm.
Usage Features
Control System:
The cooker hood is operated via a touch panel with five function buttons: power, speed, light, timer, and slide control.
Power On/Off:
- Standby: The hood enters standby with backlight after 5 seconds of inactivity. Touch any key to wake it up.
- Slide Up/Down: Touch the power button for 2 seconds to slide the hood upwards and start at the first speed. Touch it again for 2 seconds to slide it downwards and stop. If the hood is stopped without stopping the motor, it will resume at the last used speed when opened again.
- Stop Movement: Press the power button while the hood is moving up or down to stop its movement, with the motor continuing to run. Press the power button again to resume movement.
Motor On/Off and Speed Setting:
- Motor On/Off: Touch the speed button to turn the motor on; touch it again to turn it off.
- Speed Control: Slide a finger across the designated area to set the speed. There are eight speed points:
- First or second point: Lowest speed.
- Third or fourth point: Second speed.
- Fifth or sixth point: Third speed.
- Seventh or eighth point: Highest speed.
Lighting:
- Automatic On: Lights turn on automatically 8-10 seconds after the hood slides up.
- Manual On/Off: Touch the light button to turn lights on or off.
- Light Intensity Control: When the pilot light is flashing, slide the light button to control intensity. There are 8 speeds of slide button, each corresponding to a light intensity level. The light will be on at the corresponding intensity. Manual keys can also be used to operate lights. The pilot light stops flashing after 15 seconds if no adjustment is made.
Timer Function:
- Activation: Touch the timer button while the light or motor is working to enter timer mode.
- Timer Setting: When the timer pilot light is flashing, slide the timer button to select a timer section. Available settings are 5-10-15-20-25-30-35-40 minutes. Confirm the selection by touching the timer button or it will automatically confirm after 5 seconds.
- Automatic Shut-off: The motor and light turn off automatically when the timer finishes, and the decorative cover closes.
- Resuming Timer: If the timer function is used again without setting a new time, it will resume the last set time and decrease by second after 5 seconds.
- Cancellation: Touching the speed button or controlling the light intensity while the timer is active will automatically cancel the timer function.
Maintenance Features
Cleaning the Cooker Hood:
- Regular Cleaning: The cooker hood and its filter mesh should be cleaned regularly to maintain good working order.
- Power Off: Always switch off the main power supply before cleaning.
- Cleaning Method: Clean the cooker hood according to the instruction manual to prevent burning hazards.
- Filter Cleaning (Method 1 - Manual):
- Soak the filter in 40-50°C clean water with detergent for 2-3 minutes.
- Wear gloves and clean with a soft brush.
- Avoid applying too much pressure as the filter is delicate.
- Filter Cleaning (Method 2 - Dishwasher):
- The filter can be placed in a dishwasher.
- Set the dishwasher temperature to around 60°C.
- Filter Material: The filter is made of high-density metal. Do not use corrosive detergent.
- Important Notes for Cleaning:
- Do not place anything that can block the up & down movement of the hood to prevent damage or injury.
- Keep the power off when cleaning the hood.
- Failure to clean the appliance regularly poses a fire risk.
Lamp Replacement:
- Competent Person: Bulb replacement must be carried out by a competent person.
- Safety: Always switch off the electricity supply before any operations.
- Cool Down: Ensure the bulb is completely cool before handling.
- Handling: Use a cloth or gloves when handling globes to prevent perspiration contact, which can reduce globe life.
- Procedure:
- Switch off the downdraft and unplug from the main power supply.
- Open the decorative door.
- Insert a small screw-driver ("-" type) into the gap and pry up the lamp fitting.
- Disconnect the plug.
- Replace with the same type of light.
Troubleshooting:
The manual provides a table for common abnormalities and their solutions:
- Light on, but motor does not work:
- Cause: The leaf blocked. Solution: Get rid of the blocking.
- Cause: The capacitor damaged. Solution: Replace capacitor.
- Motor not work:
- Cause: The motor jammed bearing damaged. Solution: Replace motor.
- Cause: The internal with of motor off or a bad smell from the motor. Solution: Replace motor.
- Light does not work, motor does not work:
- Cause: Light damaged. Solution: Replace lights.
- Cause: Power cord looses. Solution: Connect the wires as per the electric diagram.
- Oil leakage:
- Cause: One way valve and the air ventilation entrance are not tightly sealed. Solution: Take down the one way valve and seal with glue.
- Cause: Leakage from the connection of U-shaped section and cover. Solution: Take U-shaped section down and seal with soap or paint.
- Shake of the body:
- Cause: The leaf damaged and causes shaking. Solution: Replace the leaf.
- Cause: The motor is not tightly hanged. Solution: Lock the motor tightly.
- Cause: The body is not tightly hanged. Solution: Fixed the body tightly.
- Insufficient suction:
- Cause: The distance between the body and the gas top too long. Solution: Readjust the distance.
- Cause: Too much ventilation from open doors or windows. Solution: Choose a new place and resemble the machine.
- The machine inclines:
- Cause: The fixing screw not tight enough. Solution: Tighten the hanging screw and make it horizontal.
- Cause: The hanging screw not tight enough. Solution: Tighten the hanging screw and make it horizontal.
Environmental Protection:
- The product is marked with the symbol on the selective sorting of waste electronic equipment (WEEE).
- It must not be disposed of with household waste but through a selective collection system in accordance with Directive 2002/96/EC.
- Recycling and dismantling minimize environmental impacts, as electrical and electronic products can be dangerous due to hazardous substances.
- Contact local or regional authorities for more information on disposal.
Recommendations for Environmental Impact Reduction:
- Install the product according to the user manual.
- Keep the operation area ventilated.
- Ensure the extraction duct is direct and as short as possible.
- For manual operation mode, switch off the motor within 10 minutes after cooking.
- When maintaining, dismantle components non-destructively and protect parts for re-installation.