Do you have a question about the CookRite ATO-4B and is the answer not in the manual?
This document describes the Cook Rite Gas Restaurant Ranges, available in 4, 6, and 10 burner models (ATO-4B, ATO-6B, ATO-10B), manufactured by Atosa. These appliances are designed for commercial cooking environments, offering robust construction and efficient performance for hotels, supermarkets, western restaurants, and fast-food establishments.
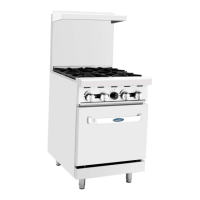
The Cook Rite Gas Restaurant Ranges are commercial cooking appliances that combine open top burners with an oven. They are designed for high-volume cooking, featuring cast-iron burners for the cooktop and high-efficiency stainless steel tubular burners for the oven. A pilot light system is integrated for convenient ignition of the main burners. The oven is equipped with a flame-out protection device for user safety and allows for constant temperature control, adjustable by the user to meet specific cooking requirements. These ranges are suitable for a variety of cooking tasks, from searing and boiling on the cooktop to baking and roasting in the oven.
The ranges feature a stainless steel exterior, including the front, back, sides, kick plate, back guard, and over shelf, ensuring durability and ease of cleaning in a commercial kitchen. Heavy-duty 12" x 12" removable cast iron top grates are provided for the burners. A drip tray is located under the burners to collect grease drippings, simplifying cleanup. The top burners are rated at 25,000 BTU each, while the oven burners are rated at 27,000 BTU. The oven temperature can be set within a range of 175°F to 550°F. The appliances are equipped with a standing pilot for the open top burners and an oven pilot with a 100% safety shut-off mechanism. The oven interior is enameled for easy cleaning. Multiple position oven rack guides are included, along with one chrome oven rack per oven as standard. The ranges are available for use with both Natural Gas (NG) and Propane (LP). A 3/4" NPT rear gas connection and regulator are provided. All models come standard with four casters for mobility. An optional leg kit (part #: 301110006) is available. The minimum supplied gas pressure regulator is factory set at 5" W.C. for Natural Gas and 10" W.C. for L.P. Gas. The external thread of the product's intake tube is 3/4 inches. The appliances conform to ANSI STD Z83.11b-2009 (2011), are certified to CSA STD 1.8b-2009 (2011), and conform to NSF/ANSI STD.4.
ATO-4B (4-burner):
ATO-6B (6-burner):
ATO-10B (10-burner):
Installation must be performed by authorized and licensed technicians in accordance with local codes, including the National Fuel Gas Code (ANSI Z223.1/NFPA 54) or the L.P. Gas Installation Code (CSA-B149.2). The appliance should be placed on a noncombustible floor, maintaining a minimum distance of 6 inches (152mm) from both sides and the back to combustible materials. Sufficient space for ventilation around the charbroiled bottom is required. Adjustable stainless steel legs allow for leveling the equipment. The appliance individual shutoff valve must be disconnected from the gas supply piping system during any pressure testing of that system at pressures exceeding 1/2psi (3.45kPa). After unpacking, all packaging materials and residues must be removed. The equipment should be checked for damage, and any issues reported to the carrier within 15 days. All accessories must be checked against the "Appendix 3 Accessories List." Supporting legs should be installed before using, ensuring no damage to labels or logos. A well-ventilated place is required for installation. The charbroiled model must be installed under a matched cooking fume exhaust system. Thread glue resistant to liquefied petroleum gases must be used for connections. Gas supply pressure must be checked after installation using a pressure gauge (U-type or digital) to ensure it is within the limits specified in Table 1.
Turn the control valve to the "0" position. Hold an ignition source at the pilots. The pilot light may not ignite immediately due to existing gas in the pipe; wait a minute for the gas to extinguish, then try again. Adjust the pilot light flame height using a screwdriver.
Revolve the main fire control valve knob counterclockwise after lighting the pilot light. The main fire burner will be lit by the pilot light. The power of the burner increases as the knob is revolved. When the knob reaches the "▲" position, the burner is at maximum power.
Align the OFF indicative line of the thermostat valve knob to the arrow to close the valve. Open the underside face plate of the oven. Thoroughly press the button at the front end of the safety valve and simultaneously ignite the pilot fire with a lighter. Keep the button pressed for 10-15 seconds after ignition to ensure the pilot fire is stable. If the pilot fire does not ignite, repeat the procedure. The pilot light may not be lighted immediately due to existing gas in the pipe; wait a minute for the gas to extinguish, then try again. Turn on and off the normally open fire of the oven with a slot-type screwdriver.
After the normally open fire is ignited, open the main fire valve of the safety valve. Press the thermostat valve knob and rotate it to the LOW position counterclockwise. The oven burner will ignite. Rotate the thermostat valve knob counterclockwise continuously to the required temperature. The thermostat valve will automatically adjust the gas flow to maintain the set temperature.
Hot plates: Remove the control panel, unscrew the damper solid screw, and revolve the damper left or right to adjust the flame. Reinstall the control panel. Griddle: Remove the control panel, unscrew the damper solid screw, and revolve the damper left or right to adjust the flame. Reinstall the control panel. Oven: Open the underside face plate of the oven, loosen the fastening screws of the damper, and rotate the damper horizontally to adjust the flame.
Do not store petrol or other flammables nearby. Keep the surroundings clean and free of flammables. Any erroneous installation, adjustment, or refit may cause property damage or personal injury. Read instructions carefully. Operation instructions must be placed in a conspicuous location. If a gas smell is detected, immediately turn off the main gas valve, extinguish all heat and flames, and call 911. Burners, stove frame, griddle, and external surfaces will be hot after use; exercise caution when touching. Do not directly touch the burner, stove frame, or griddle when operating. Turn off the equipment during repair, maintenance, and cleaning. If there are any problems (damage, gas piping leaks, igniter/valve damage, or missing accessories), do not operate and call for service immediately. Do not use attachments not recommended or sold by the manufacturer. Do not use out of doors. The appliance is for commercial use only, not household use. Do not put anything around the equipment or on the countertop/bottom that could influence combustion or air circulation. Leave enough distance in front of the equipment to remove the control panel and access major parts. Thread glue must be resistant to liquefied petroleum gases. Use soap water or a testing instrument to check for piping joint leaks before using; never use an open flame.
Do not use any abrasive or flammable detergent. Do not hose down, immerse, or pressure wash any part of the cooker, excluding the catch tray. Do not use abrasive cleaning materials to wash; only use non-corrosive detergent.
When the grill cools down, use a cloth with cleaning agent to wipe the unit surface and residue. Use a cloth with water to wipe the unit surface. Burn the main fire burner for about 10-20 minutes for sterilization. Do not use for long time, spread cooking oil on grill after cleaning. All control valves must be turned off before cleaning.
Body: Wipe with a soft cloth and mild detergent daily. Control panel: Turn off valves when not in use. Wipe the panel and control valve knob with mild detergent daily. Catch tray: Pull out the catch tray from the front body until the equipment cools down. Use a cloth with cleaning agent to wipe the unit surface, wipe up residue. Reinstall after cleaning. Warning: If the catch tray is permitted to fill too high, it should be cleaned! Oven: After the appliance is cooled, open the oven door to take out the net rack. Use a clean duster cloth and detergent to clean grease and other rubbish debris. After cleaning, reinstall the net rack to its original position. Take care when taking out the net rack and cleaning the internal part of the stove to avoid damaging the enamel coating of the oven inner wall.
The manual provides a table for common problems, possible causes, and problem-solving steps, such as contacting the local gas supply dept, dredging nozzles, adjusting control valves, checking pilot light distance, and adjusting dampers. If any fault occurs, stop using the appliance and contact technicians for check and repair. Turn off the power and gas supply before maintenance.
1-year warranty on all parts and labor (US only).