Do you have a question about the COOLFORT CF-3940 and is the answer not in the manual?
This document describes the COOLFORT CF-3940 convector, an electrical appliance designed for supplementary heating of indoor spaces. It is not intended for use as a primary heating device.
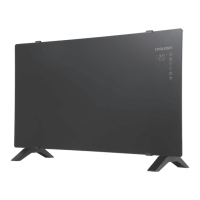
The COOLFORT CF-3940 is a convector heater that provides additional warmth to rooms. It features a control panel with touch buttons and a digital display for easy operation and mode indication. The device can be operated manually via the control panel or remotely using a dedicated remote control. Key functions include power on/off, operating mode selection, temperature adjustment, timer setting, and Wi-Fi connectivity for smart control. It also incorporates a child lock function and an anti-freeze mode to prevent the room temperature from dropping too low.
Setting Up the Convector: For floor installation, turn the unit over and attach the support legs (1) by aligning the ledge on the convector with the latch on the leg until it clicks into place. Then, turn the convector upright and ensure it is placed on a flat, stable surface.
Remote Control: The remote control (22) uses a lithium battery (CR2025). To install or replace the battery, press the side lock, remove the battery holder (27), insert the battery observing polarity, and reinsert the holder. If an insulating film is present, remove it before use. Keep lithium batteries away from children to prevent accidental ingestion.
Switching On the Convector: Before plugging in, ensure the power switch (3) is in the "Off" position and that the mains voltage matches the unit's operating voltage. Insert the power plug into a grounded mains socket. Switch on the convector using the power switch (3). A sound signal will indicate standby mode. The on/off indicator (14) will light up on the control panel (5), and the digital symbols (15) will display the room temperature with the "°C" symbol (16). To fully switch on, press the on/off button (7) on the control panel or button (23) on the remote control. The digital symbols (15) will flash, showing the set room temperature, then glow constantly. After a short period, the temperature indication, "°C" symbol, and on/off indicator will turn off, and the current mode symbol (18, 19, 20, or 21) will be displayed. To switch off, press the on/off button (7) or (23) again to enter standby mode, or use the power switch (3) to completely turn off the unit.
Setting Room Temperature: The temperature can be set from 5 °C to 45 °C, with a default of 25 °C. Use the temperature increase/decrease buttons (9, 10) on the control panel or (26) on the remote control. The digital symbols (15) will flash, and each press adjusts the temperature by 1 °C. The setting is saved after 3 seconds of no activity. If the room temperature rises 1 °C above the set temperature, heating stops; if it drops 2 °C below, heating resumes.
Setting Power Level: Pressing the mode selection button (8) on the control panel or (24) on the remote control cycles through modes: "minimal power" (1000 W), "maximal power" (2000 W), "automatic mode," and "anti-freezing mode." Each mode is indicated by a corresponding icon.
Timer Function: While the convector is on, press the timer button (11) on the control panel or (25) on the remote control to enter timer setting mode. Digital symbols (15) will flash. Adjust the timer from 0 to 24 hours using the temperature increase/decrease buttons (9, 10) or (26). The timer setting is saved after 3 seconds, and the timer indicator (17) will glow. To deactivate the timer, set its time to 0 or switch off the convector with the power switch (3).
Anti-Freeze Function: In standby mode, if the room temperature drops below 7 °C, the convector will automatically switch on, and the anti-freeze icon (21) will appear. Heating stops once the temperature reaches 7 °C.
Digital Display: Digital symbols (15) glow during operation. If inactive for some time, they dim. Pressing any button restores maximum brightness.
Child Lock: Simultaneously press and hold touch buttons (9) and (10) on the control panel (5) for 5 seconds to activate or deactivate the child lock. The LED display (15) will show "CH" to indicate activation. The child lock cannot be activated via the remote control.
Notes: Upon first use, a small amount of smoke or a foreign smell may occur as the heating element burns off manufacturing residues; this is normal. Do not open windows or doors during operation to avoid cold air inflow, which can reduce heating efficiency.
Cleaning and Care: Before cleaning, disconnect the convector from the mains and allow it to cool down completely. Regularly clean the convector to prevent dust accumulation. Wipe the upper surface of the convector (4) with a slightly damp cloth, then dry it thoroughly. Do not use abrasive cleaners or solvents. Do not submerge the convector body, power cable, or plug in water or any other liquids to avoid electric shock. Use a vacuum cleaner with an appropriate attachment to clean the unit's grids.
Storage: After cleaning, store the convector in a dark, dry, and cool place. Before subsequent use, check the unit's functionality, power cord insulation, and plug integrity for any damage. Keep the convector out of reach of children and disabled persons.