Prepare and Stake Tent
1
• Pull tent out flat and tight.
• Unfold (8) leg poles from the pod shape.
• Unfold legs again at joints to lay tent
flat. Center will stand up.
5
Attach Rainfly to Tent (Option 2)
Model #40027
Setup Tips
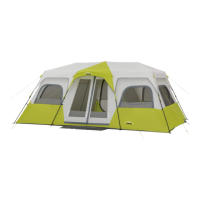
12 Person Instant Cabin Tent
18ft x 10ft x 80in
• For a comfortable night’s rest, clear your camp area of debris
before setting up your tent.
• When opening for the first time, the rainfly is rolled together
with the tent body.
• Lay out all of the contents of the bag and assemble all tent
poles before setting up your tent.
• Push the awning pole through sleeve, don’t pull.
• Make sure the sleeve fabric is evenly distributed to avoid
catching the pole section ends.
2 People
Rubber Mallet Level Area
We Recommend...
(continued on back)
Extend Leg Poles
∙ Extend each of the (8) leg poles the green
locking buttons “click,” and lock the poles
into place.
∙ You can now easily move your tent to its
final position before installing the rainfly
and securing with stakes and guylines.
3
Lift Roof and Eave Poles
• Lift up on arm joints until eave poles at 3-way side hubs are extended.
• Grab roof poles and pull straight out to create tent’s cabin shape.
• Poles will cross each other at center.
• Leg poles will angle at joints to partially stand up.
2
6
• Drive stakes at a 45º angle through web loop at base of tent to secure to
ground (fig. 6).
• Floor of tent should be taut when staked properly.
• Locate guylines attached to the rainfly (fig. 7).
• Stake out each guyline at a 45 degree angle.
• Tighten guylines as needed by adjusting the slider up the cord.
• Stake out ground vents on either side of tent (where air intake
graphics are).
Contents & Repair Parts
• Remove guylines from bag.
• Insert guyline clip into buckle located above leg pole (fig. 8).
• Repeat above step for remaining leg poles.
• See Step 5 for staking tent, guylines & ground vents (fig. 6 & 7).
NOTE: Staking the guylines help prevent damage to the tent in
windy conditions
4
Attach Rainfly to Tent (Option 1)
NOTE: See guyline attachment options with and without rainfly.
• Drape rainfly over tent, placing “Core” logo over door.
• Snap plastic clip attached to strap located at corner of rainfly onto leg
pole underneath green locking button.
• Repeat for remaining leg poles (fig. 1).
• Insert shockcorded awning pole into sleeve on underside of rainfly
above door (fig. 2).
• Insert metal end of awning pole into hole on plastic grommet located at
each side of door (fig. 3).
• Repeat steps on opposite side of tent.
• Tighten straps on rainfly to secure.
• IMPORTANT: Attach (1) hook-and-loop tab on the underside of the
Rainfly to each pole (fig. 4).
• Insert guyline clip into buckle located on rainfly (fig. 5).
• Repeat above step for remaining buckles on rainfly.
• See Step 5 for staking tent, guylines & ground vents (fig. 6 & 7).
Stake Tent, Secure Ground Vents and Guylines
7
• Hang one or both room dividers by inserting black toggles through the
plastic rings on fabric loops located at the center portion of the sides of
your tent, as needed.
• Attach gear loft by inserting the plastic hooks located at each corner
through the fabric loops located at the top of the tent.
NOTE: Gear loft is for storing personal, lightweight items. Storing heavier
items may cause damage to the tent fabric.
Room Dividers and Gear Loft
Need some help?
coreequipment.com
help@coreequipment.com
1-888-775-5628
Tent (40004)
Rainfly (91171)
LEG POLE
EAVE POLES
3-WAY HUB
ARM JOINT
ROOF POLE
LOCKING
BUTTON
fig. 6
fig. 1
fig. 2
fig. 4
fig. 7
fig. 3
fig. 5
fig. 6
fig. 7
fig. 5
Stakes x 10
(90014)
Carry Bag (90634)
Room Divider
(91130)
Reflective
Guyline x 6
(91131)
Center Hub
(91129)
Corner Joint
(91150)
Awning Pole (91128)
Gear Loft x 1 (90636) Side Hub
(90138)
Middle Eave Pole (90108)
End Eave Pole (90886)
Roof Pole (90885)