LIGHTING NODE PRO
Installation
Installation n Installation n Installatie n Installazione
Instalación n Instalação n Montaż n Установка
n 安裝 n 安装
1. Turn your system o prior to installing your Lighting Node PRO.
Éteignez votre système avant d’installer le Lighting Node PRO.
Schalten Sie Ihren Computer aus, bevor Sie den
Lighting Node PRO installieren.
Schakel het systeem uit voordat je de Lighting Node PRO installeert.
Assicurarsi che il PC sia spento prima di procedere all’installazione
del Lighting Node PRO.
Apague el sistema antes de instalar el Lighting Node PRO.
Desligue o sistema antes de instalar o Lighting Node PRO.
Przed instalacją kontrolera Lighting Node PRO wyłącz komputer.
Перед установкой Lighting Node PRO отключите ПК.
.
Lighting Node PRO
請 先 關 閉系 統,再 安 裝 Lighting Node PRO。
安装 Lighting Node PRO 前先关闭您的系统。
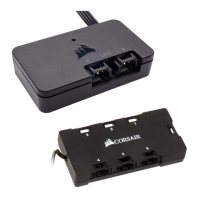
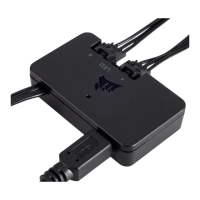
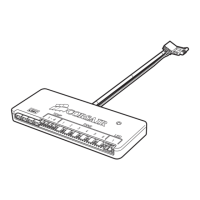
2. Plug the mini USB cable into the back of the Lighting Node PRO
then plug the 9-pin end into an available internal USB 2.0 header
in your system.
Branchez le câble mini-USB sur l’arrière du Lighting Node PRO puis branchez
l’extrémité à 9 broches sur un cavalier USB 2.0 interne disponible de
votre système.
Schließen Sie das Mini-USB-Kabel auf der Rückseite des Lighting Node PRO
an und verbinden Sie das 9-Pin-Ende mit einem freien internen
USB-2.0-Anschluss an Ihrem Computer.
Sluit de mini-USB-kabel aan op de achterzijde van de Lighting Node PRO
en sluit het 9-pins einde aan op een beschikbare interne USB 2.0-header
in het systeem.
Connettere il cavo mini USB alla parte posteriore del Lighting Node PRO
e quindi collgare il terminale a 9-pin con un header USB 2.0 interno libero.
Enchufe el cable Mini USB en la parte trasera del Lighting Node PRO y luego
enchufe el extremo de 9 clavijas en un cabezal USB 2.0 interno disponible
del sistema.
Conecte o cabo USB mini na parte traseira do Lighting Node PRO e conecte
a ponta de 9 pinos a um conector USB 2.0 interno que esteja disponível
no sistema.
Podłącz kabel mini USB do tylnej części kontrolera Lighting Node PRO,
a następnie podłącz 9-pinowy przewód USB do dostępnego wewnętrznego
gniazda USB 2.0 na płycie głównej komputera.
Вставьте штекер Mini USB в разъем на задней панели Lighting Node PRO,
потом вставьте 9-контактный штекер в разъем USB 2.0 на ПК.
Lighting Node PRO USB
.
USB 2.0 9
將 Mini USB 纜線插入 Lighting Node PRO 的 背 面,然 後 將 9 接腳端插入系統中
可用的內部 USB 2.0 接 頭。
将 Mini USB 电缆插入 Lighting Node PRO 背面, 然後将 9 引脚端插入系统可用的
内部 USB 2.0 接头。
1615
 Loading...