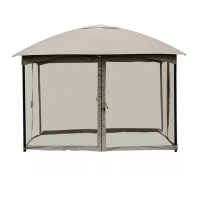
This document is a user manual for the Costway Dome Metal Gazebo, model OP3600. It provides essential information for assembly, usage, and maintenance of the gazebo.
Function Description:
The Costway Dome Metal Gazebo is designed to provide a shaded and protected outdoor space. It features a dome-shaped roof supported by a metal frame, offering shelter from sun, light rain, and potentially wind. The gazebo includes mesh sidewalls, which likely provide insect protection while allowing air circulation. It is intended for outdoor use in various settings such as gardens, patios, or other recreational areas, creating a comfortable spot for relaxation or social gatherings. The design emphasizes ease of assembly and a sturdy structure for temporary or semi-permanent outdoor installation.
Important Technical Specifications (Derived from Part List and Assembly Steps):
The gazebo's structure is primarily composed of metal components, indicated by the "Dome Metal Gazebo" description and the visual representation of the parts.
- Frame Components:
- A (4 units): Likely main support poles, given their length and quantity.
- B (4 units): Possibly upper frame connectors or shorter support beams.
- C (8 units): Shorter horizontal beams, frequently used in the top frame structure.
- D (4 units): Curved beams, forming part of the dome's upper structure.
- E (4 units): Shorter curved beams, also contributing to the dome shape.
- F (4 units): Longer curved beams, crucial for the dome's curvature.
- G (4 units): Connecting pieces, possibly for the roof ribs.
- H (4 units): Straight connecting bars, used in the initial frame assembly.
- Hardware and Accessories:
- J (1 unit): Central roof connector or decorative finial.
- K (4 units): Small decorative caps or end pieces.
- L (8 units): M6x20 bolts, used for securing frame components.
- M (16 units): M6x15 bolts, also for securing frame components.
- N (1 unit): The main canopy fabric, forming the dome roof.
- O (4 units): Small rings or hooks, possibly for attaching the canopy or mesh.
- P (32 units): Small clips or fasteners, likely for attaching the mesh sidewalls.
- Q (8 units): Ground stakes or anchors, for securing the gazebo to the ground.
- R (1 unit): Wrench/tool for assembly.
- Assembly Requirement: A 3-person assembly is explicitly required for this tent, indicating its size and the need for coordinated effort during setup.
- Snow Load Limit: The manual specifies that snow thickness on the roof should not exceed 5cm for safety, highlighting a structural limitation under heavy snow.
Usage Features:
- Shade and Shelter: The primary function is to provide shade and shelter in an outdoor environment.
- Mesh Sidewalls: The visual representation shows mesh sidewalls (implied by parts P and the final assembly image), which typically offer protection from insects while maintaining airflow. The design suggests these can be opened or closed, possibly with a zippered entrance.
- Dome Design: The dome shape is aesthetically pleasing and may offer some structural advantages in shedding light rain.
- Outdoor Application: Suitable for various outdoor spaces like gardens, patios, and yards.
- Temporary/Semi-Permanent Structure: While designed for outdoor use, the warnings about heavy weather conditions suggest it's not intended as a permanent structure and may require disassembly and storage in adverse weather.
Maintenance Features:
- Weather Precautions:
- Heavy Rain, Wind, Snow: Users are advised to take appropriate actions, including disassembling and storing the tent, to prevent damage from heavy rain, wind, and snow. This implies a need for proactive monitoring of weather conditions.
- Snow Clearance: In snowy conditions, the manual explicitly states that snow thickness on the roof should not exceed 5cm and must be cleared as soon as possible for safety. This is a critical maintenance task to prevent structural collapse.
- Water Pockets: For heavy rain, users are responsible for timely and careful removal of any water pockets that may form on the roof.
- Cleaning and Storage:
- Before storing, all parts, especially the canopy, should be cleaned and thoroughly dried.
- The gazebo should be stored in a dry place to prevent mold or material degradation.
- Pre-Assembly Check: Before reassembling, users are advised to check all parts for completeness and functionality.
- Customer Service Support: Costway emphasizes contacting their customer service for missing or damaged parts, indicating a commitment to product support and facilitating maintenance through part replacement.
- Durability Considerations: The metal frame components suggest a degree of durability, but the fabric canopy and mesh walls would require careful handling and protection from extreme elements to prolong their lifespan.