EasyManua.ls Logo

Costway OP70367 - User Manual

Costway OP70367
12 pages
Print Icon
To Next Page IconTo Next Page
Loading...
www.costway
.com
THIS INSTRUCTION BOOKLET CONT
AINS IMPORTANT SAFETY INFORMATION. PLEASE READ AND KEEP FOR FUTURE REFERENCE.
Visit us: www
.costway.com
Follow Costway
Please give us a chance to make it right and do better
Contact our friendly customer service department for help first.
Replacements for missing or damaged parts will be shipped ASAP!
USER’S MANUAL
Retractable Awning
OP70367/OP70368
Question and Answer IconNeed help?

Do you have a question about the Costway OP70367 and is the answer not in the manual?

Summary

Assembly Instructions

STEP 1 Connecting Roller Tubes

Gather, insert, and secure roller tubes B1&B2 using screws L. Use mallet if insertion is difficult.

STEP 2 Connecting Front Bars

Insert and secure front bars D1&D2 using screws L and nuts.

STEP 3 Fabric Assembly

Thread fabric F and valance G with liners H, roll onto tubes, and attach to front bar.

STEP 4 Assembly awning on the wall

Mount brackets A1/A2 to the wall using expansion bolts and tighten.

STEP 5 Assemble Arms

Attach arms C1/C2 to wall brackets and connect to roller bar/front bar using links K, bolts J, washers M.

How to adjust the awning inclination

Step 1: Hold and loosen screws

Hold up the arm and loosen screws (1&2) without letting the arm drop.

Step 2: Adjust inclination screw

Hold arm C1, adjust screw (3) to change awning angle. Check angle and repeat if necessary.

Step 3: Tighten assembly screws

Tighten screws (1&2) after adjusting inclination to prevent damage to screw 3.

Overview

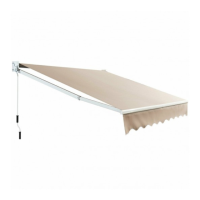
This document provides the user manual for the Costway Retractable Awning, models OP70367 and OP70368. It outlines the assembly process, technical specifications, usage instructions, and important safety information to ensure proper installation and operation of the awning.

Function Description

The Costway Retractable Awning is designed to provide shade and protection from the sun. It features a retractable mechanism, allowing users to extend or retract the awning as needed. The awning is operated manually with a hand crank. Its primary function is to shield outdoor spaces from direct sunlight, making it suitable for patios, decks, or windows. The valance with a scalloped edge adds a decorative touch while providing additional shade. The awning is intended for use in fair weather conditions, specifically when wind is under level 5, and is not suitable for rainy weather or heavy snow loads.

Important Technical Specifications

The awning is constructed from a combination of materials to ensure durability and functionality. The main structural components include steel tubes and aluminum alloy, which provide strength and stability. Plastic parts are also incorporated into the design. The fabric of the awning is made from polyester, treated with PU (polyurethane) and UV coatings. These treatments enhance the fabric's resistance to water and ultraviolet rays, prolonging its lifespan and maintaining its color.

The service treatment for the tubes involves spray paint and oxidation, which contribute to their corrosion resistance and aesthetic appeal. The applicable wall types for installation are reinforced concrete walls and brick walls, ensuring a secure mounting surface. The recommended installation height ranges from 2.5 meters to 3 meters.

The package includes various components for assembly:

  • Roller Tubes (B1, B2): Two long silver tubes that connect to form the main roller for the fabric.
  • Front Bars (D1, D2): Two front bar sections that connect to support the leading edge of the fabric.
  • Awning Fabric (F): The large main fabric piece that provides shade.
  • Valance (G): A smaller fabric piece with a scalloped edge, attached to the front bar.
  • Fabric Liner Cords (H): Three cords used to thread the fabric into the roller tube and front bar.
  • Arm-Bar Links (K): Connect the arms to the front bar.
  • Wall Brackets (A1, A2): Mount the awning to the wall.
  • Arms (C1, C2): Support the awning when extended.
  • Hand Crank (E): Used to manually extend and retract the awning.
  • Fasteners: Includes screws (L), bolts (J), plastic washers (M), screw nuts (N), and a plastic cover (O) for securing various parts. Expansion bolts are provided for reinforced concrete and brick wall installations.

Usage Features

The Costway Retractable Awning offers several user-friendly features:

  • Manual Retraction/Extension: The awning is operated using a hand crank (E), allowing for easy extension and retraction. This manual operation provides control over the amount of shade desired.
  • Adjustable Inclination: The inclination of the awning can be adjusted to achieve the desired angle for optimal shade. This is done by loosening and tightening specific screws on the arms (C1, C2). Users can adjust the left side, right side, or both sides independently to ensure the awning is level.
  • Safety Wrap: A safety wrap holds the awning arms down during shipping and initial setup. It is crucial not to remove this wrap prematurely to prevent serious injury.
  • Wall Mounting: The awning is designed for secure wall mounting on reinforced concrete or brick walls. The manual emphasizes the importance of fastening all mounting brackets to studs, joists, headers, or other major structural components to prevent collapse.
  • Weather Suitability: The awning is primarily designed for sun protection and is suitable for conditions where wind is under level 5. It is not recommended for use in rain or strong winds, nor should it be left open during winter to avoid damage from snow loads.

Maintenance Features

To ensure the longevity and proper functioning of the Costway Retractable Awning, several maintenance guidelines are provided:

  • Regular Inspection: Users should frequently check if the fixed brackets have become loose due to wind. If looseness is detected, professional assistance is recommended for tightening.
  • Fabric Care: The fabric should be kept away from heat and flame. It is advised not to leave leaves or water on the roof of the awning for extended periods, as this can lead to damage or mildew.
  • Seasonal Storage: During winter, the awning should be closed to prevent damage from increased snow loads.
  • Cleaning: While not explicitly detailed, the PU and UV-treated polyester fabric suggests that it can be cleaned with mild soap and water, avoiding harsh chemicals that could damage the coatings.
  • Tightening Screws: After adjusting the awning's inclination, it is critical to tighten all screws (1&2) to prevent damage to screw 3 and ensure the awning's stability.
  • Proper Installation: The manual stresses the importance of correct installation, including drilling bolt holes accurately and securely fastening all brackets. This foundational step is crucial for the awning's long-term stability and safety.
  • Avoid Hanging Items: Users are advised not to hang any clothes or other items on any part of the awning, as this can add undue stress and potentially damage the structure.
  • Fabric Tension Adjustment: If the cloth surface sags when the awning is opened, it should be retracted 3-5 cm to ensure it is in a tight state.

The manual also includes a "Before You Start" section, which outlines general safety precautions such as reading all instructions carefully, retaining instructions for future reference, separating and counting all parts, assembling items near their final placement, placing the product on a flat and stable surface, and keeping small parts away from children to prevent choking hazards. It also recommends having at least two people for installation.

Costway OP70367 Specifications

General IconGeneral
BrandCostway
ModelOP70367
CategoryAccessories
LanguageEnglish

Related product manuals