EasyManua.ls Logo

Costway TQ10165 - User Manual

Costway TQ10165
82 pages
Print Icon
To Next Page IconTo Next Page
Loading...
If you're having difficulty, our friendly
customer team is always here to help.
THIS INSTRUCTION BOOKLET CONTAINS IMPORTANT SAFETY INFORMATION. PLEASE READ AND KEEP FOR FUTURE REFERENCE.
USA:cs.us@costway.com
AUS:cs.au@costway.com
FRA:cs.fr@costway.com
DEU:cs.de@costway.com
ITA:cs.it@costway.com ESP:cs.es@costway.com
POL:sklep@costway.com
GBR:cs.uk@costway.com
DEU office: FDS GmbH, Neuer Höltigbaum 36, 22143 Hamburg, Deutschland
ITA office: Milano
FRA office: Saint Vigor d'Ymonville
POL office: GdańskGBR office: IpswichAUS office: TruganinaUSA office: Fontana
TQ10165
Kids Electronic Toy Motorcycle
Kinder elektronisches Spielzeug-Motorrad
Moto Électronique pour Enfants
Motocicleta Electrónica para Niños
Moto Elettronica per Bambini
Motocykl elektryczny dla dziecka
Question and Answer IconNeed help?

Do you have a question about the Costway TQ10165 and is the answer not in the manual?

Overview

This document is an owner's manual for a Kids Electronic Toy Motorcycle (model TQ10165), providing comprehensive information on its assembly, usage, maintenance, and safety.

Function Description

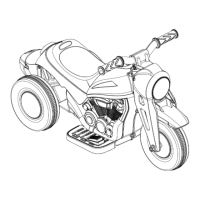
The Kids Electronic Toy Motorcycle is a ride-on toy designed for children aged 3 years and older. It features forward and reverse movement, a stop function, music playback, and a bubble machine. The motorcycle is operated via a pedal switch for acceleration and a handlebar-mounted switch for direction control. The bubble machine can be activated and deactivated via a dedicated switch.

Important Technical Specifications

  • Suitable Age: 3+ years
  • Maximum User Weight: 30kg (66lbs)
  • Speed: 2.5-3 Km/h
  • Battery: DC 6V 4.5AH *1 (Lead-acid, 3FM4.5)
  • Charger Input: As shown on the charger
  • Charger Output: DC 6V
  • Charging Current: DC 0.5A
  • Charging Time: 8-12 hours (maximum 20 hours)
  • Operating Life (Battery): 12 to 18 months
  • Fuse: F 5A, Self-resetting
  • Material: PP (Polypropylene)
  • Optimum Temperature: Below 40°C/104°F (Avoid use under direct sun)
  • Size of Car: 800365430mm (31.5"*14.5"*17")
  • Carton Size: 590250345mm (23"*10"*13.5")
  • Assembly: Adult assembly required.

Usage Features

Before First Use

Before using the motorcycle for the first time, the battery must be charged for 8-12 hours, but no more than 20 hours. Only an adult should handle charging.

Assembly

The motorcycle requires adult assembly, which should take at least 40 minutes. All parts and packaging materials should be identified and retained until assembly is complete to prevent discarding necessary components. Tools required for assembly include a screwdriver, pliers, hammer (not included), and a spanner.

Assembly Steps include:

  1. Installing the back wheel: Involves passing the axle through the car body, attaching footrests (A and B) with screws, installing fixings, and securing the capping board. The gear box is placed on the left, and the wire connector plug is butt-connected. Washers and nuts are used to secure the driving wheel and other wheels, with wheel hubs fixed on both sides.
  2. Installing the fork: The headlight line plug is butt-connected, and a bolt is passed through the fork and tightened with a nut.
  3. Installing the mudguard: The mudguard is installed in its corresponding place and fastened with screws.
  4. Installing the front wheel: The front axle is passed through the fork, and sequentially installed with a washer, front wheel, and another washer. Washers are then installed on both sides and fastened with nuts.
  5. Installing the handlebar: The handlebar is passed through the fork and fastened with screws.
  6. Connecting the power supply: The seat knob is rotated to open the seat. The power connector is plugged into the battery terminal. The seat is then installed, and the knob is rotated to secure it.
  7. Installing the Bubble Machine and Bubble Solution Container: The line plug is butt-connected. The bubble machine is installed and fastened with screws. The bubble solution container is unpacked and installed in its corresponding place.

Operating the Motorcycle

  • Power On: Turn on the general power switch to play music.
  • Forward: Press the "Forward and Stop and Reverse switch" to the "Forward" position and press the pedal.
  • Stop: Press the "Forward and Stop and Reverse switch" to the "Stop" position and remove the foot from the accelerator pedal.
  • Reverse: Press the "Forward and Stop and Reverse switch" to the "Reverse" position and press the pedal.
  • Music: Turn on the general power switch and press any music button.
  • Bubble Machine: Turn the Bubble Machine Switch ON to activate the bubble feature, and OFF to deactivate it.

Safety Rules

  • Use with protective equipment (helmet, gloves, knee pads, elbow pads).
  • Do not use in traffic.
  • Children should use under parental supervision.
  • Always stop the vehicle when changing speed or direction to avoid damage to the gearbox and motor.
  • Never leave the child unattended. Direct adult supervision is required.
  • Never use on roads, near motor vehicles, on steep slopes or stairs, near swimming pools or other bodies of water.
  • Always wear shoes and sit on the seat.
  • Do not modify the electric circuit system.
  • Periodically inspect cables and connections.
  • Do not allow children to touch wheels or moving parts when the vehicle is in motion.

Charging the Vehicle

  • Only an adult can charge and recharge the battery.
  • Non-rechargeable batteries are not to be recharged.
  • Do not mix different types of batteries or new and used batteries.
  • Batteries must be inserted with correct polarity.
  • Exhausted batteries must be removed from the toy.
  • Supply terminals are not to be short-circuited.
  • Rechargeable batteries are only to be charged under adult supervision and removed from the toy before charging.
  • Transformers or battery chargers must be regularly examined for damage.
  • The charging input socket is below the seat.
  • The POWER SWITCH must be in the OFF position when charging.
  • Charge for 8-12 hours after each use, or once a month if not used regularly, but no more than 20 hours.
  • The product has a charging protection feature that cuts off all functions during charging.

Troubleshooting

  • Vehicle does not run: Possible causes include low battery (recharge for 8-12 hours, max 20 hours), tripped thermal fuse (self-resetting, located under the seat, resets in 5-20 seconds), loose wheel nuts (tighten with spanner), loose battery connectors/wires (ensure firm connection), dead battery (replace if old or not maintained), or damaged electrical system/motor (professional repair needed for motor).
  • Battery will not recharge: Possible causes include loose battery/adapter connector (ensure firm connection), charger not plugged in (ensure plugged into live outlet), or faulty charger (replace if not warm during charging).
  • Vehicle does not run very long: Possible causes include undercharged battery (recharge for 8-12 hours, max 20 hours after each use or monthly), or old battery (replace if 1-3 years old).
  • Battery buzzes/gurgles when charging: This is normal.
  • Charger feels warm when recharging: This is normal.

Maintenance Features

  • Regular Inspection: Parents are responsible for regularly checking main parts (battery, charger, cable, plug, screws, fixings) for potential hazards before use. Do not use if damaged.
  • Plastic Parts: Ensure plastic parts are not cracked or broken.
  • Lubrication: Occasionally use lightweight oil to lubricate moving parts like wheels.
  • Storage: Park indoors or cover with a tarp to protect from wet weather. Keep away from heat sources (stoves, heaters) to prevent plastic parts from melting.
  • Cleaning: Do not wash with a hose, soap, or water. Do not drive in rainy or snowy weather. Clean with a soft, dry cloth. Use non-wax furniture polish for shine; do not use car wax or abrasive cleaners.
  • Driving Surface: Do not drive in loose dirt, sand, or fine gravel to prevent damage to moving parts, motors, or the electrical system.
  • Power Off: Turn off the power switch and disconnect the battery connection when not in use.

Battery Disposal

  • The sealed lead-acid battery must be recycled or disposed of in an environmentally sound manner.
  • Do not dispose of in fire (may explode/leak) or regular household trash (incineration, landfill, or mixing with household trash is prohibited by law).
  • Return exhausted batteries to a local approved lead-acid battery recycler or automotive battery seller.
  • Contact local waste management officials for more information on recycling and disposal.
  • The battery contains lead acid and other toxic/corrosive materials. Do not open the battery or charger. Wash hands after handling.

Compliance

The product is suitable for ASTM F963; GB6675, GB19865; EN71 and EN62115 standards.

Costway TQ10165 Specifications

General IconGeneral
BrandCostway
ModelTQ10165
CategoryMotorized Toy Car
LanguageEnglish

Related product manuals