GREAT BRITAIN • CUSTOMER SERVICE
tel 020 8247 9300 e-mail customerservice@clasohlson.co.uk internet www.clasohlson.co.uk postal 10 – 13 Market Place, Kingston upon Thames, Surrey, KT1 1JZ
Ver. 20180615
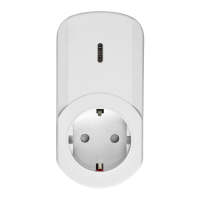
Remote Switch, 3-Pack
Art.no 18-1255 Model 3 x 51058GBX10 + 50074
36-6010 3 x 51058X10 + 50074
Please read theentire instruction manual before using
theproduct and then save it for future reference. We reserve
theright for any errors in text or images and any necessary
changes made to technicaldata. In theevent of technical
problems or other queries, please contact our Customer
Services.
Safety
• This product is suitable for switching products such as
lights on andoff.
• Make sure that thelight is turned off before connecting it
to theproduct.
• Never connect alight with ahigher power rating than
1000 W.
• This product is intended for indoor use, do not expose it
to rain or moisture.
• Make sure that theelectrical socket that theremote
control switch is plugged into is easily accessible in
case theswitch and connected product need to be
disconnected from themains electricity quickly.
• Do not connect after each other.
• Do not cover theproduct.
Operating instructions
Installation
In order to use theremote switches, thereceivers and
theremote control must first be wirelessly connected (paired).
Thisis where you get to decide which receiver is to be
controlled by which button on theremote control.
7. Repeat steps 2 to 5 for theother receivers.
Tip:
• You can connect more than one receiver to thesame
button,e.g. [ A ], on theremote control. Thiscould
be useful if you like switching several lights on at
thesametime.
• You can connect multiple remote controls to thereceivers.
Eachreceiver has amemory for up to 6 different remote
controls or transmitters.
Switching on/off
2. TheLED in thebutton will start flashing slowly.
Thereceiver is now ready to delete theremote control.
3. Pressin theoff-button on theremote control (make sure
to choose thecorrect off-button). Theremote control will
now be deleted from thereceiver.
Note: Thelight can still be switched on/off manually by
pressing thebutton on thereceiver.
Deleting all paired remote controls
1. Holdin thebutton on thefront of thereceiver for 6seconds
until theLED in thebutton starts flashing quickly.
2. WhentheLED stops flashing, all theremote controls
which were paired with thereceiver will have been deleted.
Changing the batteries
1. Pryoff thebattery cover using acoin or screwdriver.
2. Remove thebattery and replace it with anew CR2032
battery. Thepositive terminal (+) of thebattery should face
upwards as shown in thepicture.
Responsible disposal
This symbol indicates that this product
should not be disposed of with general
householdwaste. Thisapplies throughout
theentire EU. Inorder to prevent any harm to
theenvironment or health hazards caused by
incorrect waste disposal, theproduct must
be handed in for recycling so that thematerial
can be disposed of in aresponsible manner.
Whenrecycling your product, take it to your
local collection facility or contact theplace of
purchase. Theywill ensure that theproduct is
disposed of in anenvironmentally sound manner.
1. Remove theplastic
tab from theback of
theremote control to
activate thebattery.
3. Holdin thebutton on
thefront of thereceiver
for at least 3 seconds and
then releaseit.
2. Plugthereceiver into
awall socket.
4. TheLED button will
start flashing slowly.
Thereceiver is now
in learning mode and
ready to be paired with
theremote control.
5. Single-press one of
theon-buttons on
theremote control (A,
B, C or D). TheLED on
thereceiver will shine
steadily once theremote
control has been paired.
6. Connect alight to
thereceiver and
check that thelight is
switchedon.
Use thebuttons in theleft-
hand “ON” row to switch
thepaired light on and
thebuttons in theright-
hand “OFF” row to switch
thelightoff.
Deleting a paired remote control
You might need to delete aremote control from thememory
of thereceiver in case you wantto:
• control thereceiver using another button on theremote
control.
• pair anadditional remote control, but all 6 memory slots
are occupied.
1. Holdin thebutton on
thereceiver you wish to
delete theremote control
from for 3 seconds and
then releaseit.
Care and maintenance
• Unplug thereceiver from thewall socket and remove
thebattery from theremote control if they are not to be
used for anextended period.
• Clean theunits by wiping them with adrycloth.
Troubleshooting guide
Theremote
switch set is
not working.
• Has thereceiver been paired with
aremote control as describedabove?
Trypairing themagain.
• Check thebattery of theremote control.
• Is theremote control too far away from
thereceiver (25m)?
• Check that thelight is properly
connected to thereceiver and that it is
switched on and not faulty.
• Try plugging thelight into another
electrical outlet to make sure that
itworks.
• Is there electricity in theoutlet
thereceiver is pluggedinto?
Specifications
Frequency 433.92 MHz
Receiver
Power supply 220–240V AC, 50 Hz
Maxrange 25m
Max load 1000 W (resistive load)
Memoryslots 6
Remote control
Battery 1×CR2032, 3 V DC (included)
Number of channels 4