Do you have a question about the COVER VALET Cover Rx and is the answer not in the manual?
| Category | Lifting Systems |
|---|---|
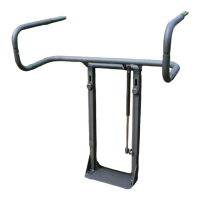
| Material | Powder-coated aluminum |
| Clearance Required (Rear) | 6 inches |
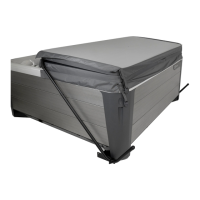
| Maximum Cover Size | Up to 96" |
| Operation | Manual |
Ensure adequate space and proper surface for installation.
Spa must be drained; avoid waterlogged covers to prevent product failure.
Attach base plate to support legs using bolts, washers, and nuts.
Connect pivot arm to main body using hex cap screws and spacers.
Slide main body over support legs and loosely fasten with hex bolts and washers.
Assemble U-arms using long/short elbows and optional spacers.
Insert U-arms into pivot arm, ensuring spring buttons click into place.
Insert keyring pins and attach ball studs to the lifter assembly.
Connect gas shock, position lifter, adjust height, and tighten bolts.
Rotate and swing U-arms to the raised, horizontal position.
Fold cover, slide into U-arms, and lift to vertical position.
Lower U-arms to vertical and rotate inward until flush with spa.