Do you have a question about the Coziwow CW12F0507 and is the answer not in the manual?
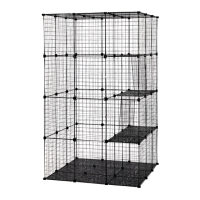
Lists main components like resin plates, doors, mesh, and iron frames with quantities.
Details various fasteners and tools required for assembly, including quantities and types.
Clip the buckles into the four corners of the resin plate (A) for initial base setup.
Splice the resin plates (A) together to form larger surfaces as illustrated.
Assemble the door (B), mesh (C), and iron frame (D) to form the cage walls.
Assemble the resin plate (A) to create shelves or terraces within the cage structure.
Continue assembling door (B), mesh (C), and iron frame (D) for cage structure.
Assemble more resin plates (A) to create additional shelves or terraces.
Continue assembling door (B), mesh (C), and iron frame (D) for cage structure.
Assemble resin plates (A) for terraces and iron frame (D) for the top structure.
Assemble the mesh (C) and resin plates (A) to form the top layer of the pet cage.
Complete the assembly of the top layer of the pet cage as shown.
Use the buckle (3) to fix the door to the adjacent mesh securely.
Fix adjacent meshes using cable ties (2) for increased firmness and trim ends.
Use plastic buckles (9), U-shaped fasteners (6), and screws (7) to fix the cage to the wall.
Final assembly check, potentially involving item (10) for securing the structure.
| Material | Not available |
|---|---|
| Product Dimensions | 11.81 x 7.87 x 5.91 inches |
| Item Weight | 1.76 Pounds |
| Dimensions | 11.81 x 7.87 x 5.91 inches |
| Weight | 1.76 pounds |