Do you have a question about the CPC Raspberry Pi and is the answer not in the manual?
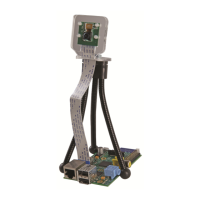
Peel off the plastic protective sleeving from the camera mount.
Feed the Pi camera cable through the slot and place the camera through the mount's cutout hole.
Turn over the assembly and place the back plastic cutout over the camera and ribbon cable connector.
Insert M2 Nylon screws through the plastic mount and camera, ensuring they pass through all layers.
Place and tighten M2 Nylon nuts onto the screws to fasten the Pi camera to the mount.
Insert the stainless steel nut into the cutout at the base of the camera mount and press firmly.
Thread the tripod screw through the base nut on the camera mount and tighten to the desired level.
Bend the tripod legs to achieve the desired camera angle and attach to your Raspberry Pi.
This document provides assembly instructions for a Raspberry Pi Camera Mount, designed to enhance Raspberry Pi camera projects by providing a stable and adjustable platform for capturing still shots.
The Raspberry Pi Camera Mount is a portable and compact accessory that allows users to securely attach a Raspberry Pi camera module to a mini tripod. This setup enables precise positioning and stability for the camera, facilitating the capture of still images at optimal angles. The mount is designed to be easily assembled and integrated with existing Raspberry Pi setups, making it a valuable tool for various photography and videography projects where a stable camera platform is required. Its primary function is to provide a physical support structure that holds the camera module steady and allows for flexible adjustment of its orientation, thereby improving the quality and versatility of camera-based applications on the Raspberry Pi.
| Brand | CPC |
|---|---|
| Model | Raspberry Pi |
| Category | Digital Camera |
| Language | English |