Do you have a question about the CPI TALOS T700 and is the answer not in the manual?
Highlights key features like four-way bill acceptance, coupon and bill configuration, and support for credit card reader bezels.
Details the MDB interface operation and where to find operating voltage information on the device.
Provides a step-by-step guide for physically installing the Talos bill validator into a vending machine.
Explains the process for enabling or disabling specific bills or vend coupons using a configuration coupon.
Details how to use a configuration coupon to set parameters like bill acceptance direction and bill enablement.
Describes different acceptance modes (0-3) that define how the validator handles potential fraud and idle states.
Lists bezel LED flash patterns and their corresponding problems and solutions for diagnosing errors.
Addresses common installation problems such as the unit not powering up or failing to accept bills.
Provides guidance on cleaning the Talos bill validator using a soft cloth and mild detergent.
States compliance with FCC rules and outlines copyright and liability disclaimers for the document.
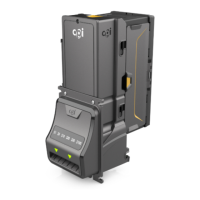
The Talos™ T700 is a bill validator designed for use in vending machines, offering a robust and user-friendly solution for accepting currency and vend coupons. Its primary function is to validate and accept bills, converting them into credit for vending machine purchases, and to process vend coupons.
The Talos T700 is engineered to fit into standard bill acceptor openings found in most vending machines. It can be mounted using existing studs or a dedicated mounting bracket, ensuring broad compatibility and ease of integration. The device supports four-way bill acceptance, meaning bills can be inserted in any orientation (face up/down, either direction), which significantly enhances user convenience. It also features configurable options for both bills and vend coupons, allowing operators to tailor the acceptance criteria to their specific needs. The validator is designed to support High Visibility and Credit Card Reader Bezels, offering flexibility in machine design and additional payment options.
The Talos T700 operates via an MDB (Multi-Drop Bus) interface, a standard communication protocol in the vending industry, ensuring seamless integration with existing vending machine controllers. A 24VDC MDB harness is included with the device for immediate connectivity. The operating voltage information is located on a label on the side of the device.
Installation is a straightforward process. First, ensure the vending machine's power is off. The Talos T700 is then mounted through the front opening of the vendor, secured with the included hardware. Connecting the device to the MDB harness requires gentle pressure to avoid bending the pins. After connection, power is restored to the vending machine. The device's front LEDs should flash, indicating proper operation (in some cases, the machine door may need to be closed first). A functional test involves inserting a $1 bill to confirm it stacks and credit is given, repeating for other enabled bills. Once testing is complete, any test bills should be removed from the bill magazine.
The Talos T700 allows operators to enable or disable specific bills or vend coupons. This is done by removing the bill magazine and pressing a configuration button (using a pencil or screwdriver). After reattaching the bill magazine, the desired bill or vend coupon is inserted. The bezel LEDs will flash upon return of the bill/coupon, and the number of flashes indicates the outcome:
The unit comes pre-configured to accept $1 bills and four-way acceptance. More advanced settings can be adjusted using a specially designed coupon. This coupon, once carefully cut out and filled with an HB or #2 pencil, allows for changes in various sections:
After inserting a configuration coupon, the bezel flashes indicate the result:
The manual provides solutions for common issues:
When the unit is ready and enabled, the bezel LEDs flash continuously. If the LEDs are off, it indicates an error. To diagnose, partially insert and hold a bill in the bill path until the bezel lights flash, then count the flashes:
The Talos T700 is designed to require less frequent cleaning than magnetic sensing bill acceptors. When cleaning is necessary, a soft cloth moistened with a mild, non-abrasive detergent should be used.
| Brand | CPI |
|---|---|
| Model | TALOS T700 |
| Category | Vending machines |
| Language | English |