Do you have a question about the Craftsman 24A-060 and is the answer not in the manual?
Secure the lower handle to the main unit's brackets using provided hardware.
Connect the upper handle and route the starter rope correctly for operation.
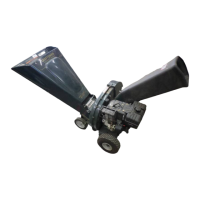
Attach the hose adapter to the base adapter, aligning the pin for secure connection.
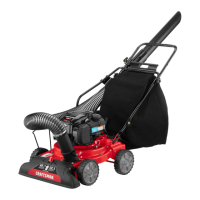
Mount the hose handle onto the upper and lower handle brackets for stability.
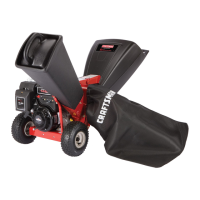
Mount the collection bag securely onto the discharge opening and handle.
Use the lever to set the desired nozzle height for effective debris collection.
Fill the engine with the specified oil and fresh gasoline before starting.
Confirm the safety switch is fully engaged before attempting to start the engine.
This document provides a "Fast Start Guide - Assembly" for a CRAFTSMAN® Yard Vacuum, outlining the initial setup and basic operation of the device. The guide emphasizes the importance of reading and understanding all instructions, warnings, and danger labels, as well as the operator's manual and engine manual, before operation.
The CRAFTSMAN® Yard Vacuum is designed for outdoor clean-up, primarily for vacuuming leaves and debris, and features a chipper chute for processing larger material. It is a gasoline-powered device, indicated by the "Gasoline Fill" and "Recoil Starter" components. The device appears to be a walk-behind model, given the handle assembly instructions and the "Nozzle Height Adjustment Lever" which suggests ground-level operation.
The assembly process is broken down into several key steps:
The guide provides essential initial maintenance steps for the engine:
The CRAFTSMAN® Yard Vacuum is presented as a robust and user-friendly outdoor cleaning tool, designed for efficient debris collection and chipping. The detailed assembly instructions, combined with clear diagrams and safety warnings, aim to ensure a smooth setup and safe operation for the user. The emphasis on reading the full operator's manual and engine manual underscores the complexity and potential hazards associated with power equipment, promoting responsible usage.
| Brand | Craftsman |
|---|---|
| Model | 24A-060 |
| Category | Chippers/Shredders |
| Language | English |