EasyManua.ls Logo

Craftsman 320 Series - User Manual

Craftsman 320 Series
19 pages
Print Icon
To Next Page IconTo Next Page
Loading...
Owner’s Manual
Green Rotary Laser Level
Model No.
320. XXXXX
CAUTION: Before using this product, read this
manual and follow all its Safety Rules and
Operating Instructions.
Safety
Operation
Maintenance
Trouble shooting
Sears, Roebuck and Co., Hoffman Estates, IL 60179, USA
www.craftsman.com
Question and Answer IconNeed help?

Do you have a question about the Craftsman 320 Series and is the answer not in the manual?

Summary

Safety Instructions

General Safety Rules

Covers essential safety precautions for using the laser level, including avoiding eye exposure and proper handling.

Product Description

Overview of the Green Rotary Laser Level

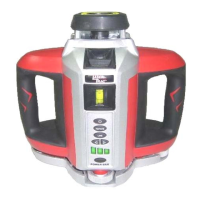
Details the Craftsman green rotary laser level's features, versatility, and projection capabilities.

Technical Specifications

Operation

Install Batteries for Rotary Laser

Step-by-step guide for inserting D-size batteries into the main laser level unit.

Connect AC;DC Adapter

Instructions on how to connect the AC/DC adapter for continuous power supply.

Turn On;Off the Rotary Laser

Procedure for powering the laser level on and off, including sleep mode.

Operation Panel Controls

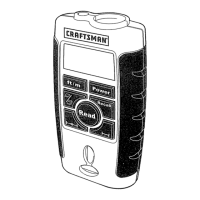
Explanation of buttons and indicators on the laser level's main operation panel.

Power Bar Indicator

Details on how the power bar indicator shows battery capacity status.

Use Laser-Enhancing Glasses

Guidance on using special glasses to improve laser line visibility.

Center Bubbles with X&Y Wheels

Instructions for leveling the tool by adjusting the X and Y bubble vials.

Marking Level Points

Method for marking a series of level points using the laser beam.

Adjust Laser Rotating Speed

How to select different rotation speeds for the laser beam.

Making a Chalk Line

Procedure for projecting and aligning a chalk line with the laser.

Remote Control Operation

Using the Remote Control

Guide to operating the laser level using the wireless remote control.

Install Battery for Remote Control

Instructions for installing the battery in the remote control unit.

Laser Detector

Using the Green Laser Detector

How to use the detector to locate the green laser line in various conditions.

Laser Detector Description

Overview of the laser detector's components and functions.

Install Battery for Detector

Steps for inserting the battery into the laser detector.

Locate Green Laser Line with Detector

Detailed process for using the detector to find and align with the laser line.

Detector Mount Base

Detector Mounting Base Description

Description of the detector mount base and its parts.

Use Detector Mount Base

Instructions on how to mount and use the detector mounting base.

Wall Mount Base

Wall Mount Base Description

Details the parts and functions of the wall mount base.

Use the Wall Mount Base

Guidance on mounting the laser level using the wall mount base.

Mount Laser on Wall Mount Base

Steps for securely attaching the rotary laser to the wall mount base.

Applications

Using the Green Rotary Laser Level

Various ways the laser level can be used for marking and alignment tasks.

Obstructions and User Interference

How obstructions affect the laser line projection and user visibility.

Referencing Across Surfaces

Using the laser for alignment on multiple adjacent surfaces.

Maintenance

General Maintenance Instructions

Routine care and upkeep procedures to maintain the laser level's performance.

Troubleshooting

Laser Dot;Line Weak or Hard to See

Solutions for a dim or faint laser projection.

Laser Dot;Line Not Projected

Troubleshooting steps when the laser beam is not visible.

Tool Cannot Be Calibrated to Level

Resolving issues with calibrating the laser level for accuracy.

Laser Dot;Line Not Level

Fixing problems where the projected laser line is not horizontal or vertical.

Detector Cannot Find Laser

Solutions when the laser detector fails to detect the laser beam.

Remote Control Cannot Operate Tool

Troubleshooting for the remote control not functioning.

AC;DC Adapter Not Providing Power

Resolving issues with the AC/DC adapter not powering the laser.

Overview

The Craftsman Green Rotary Laser Level is a highly versatile tool designed for various applications, from simple home decorating projects to complex home construction. It projects a bright, pulsed green laser "dot" that forms a 360° horizontal or vertical line, accurate to ±1/4-inch at 100 feet. The recommended usable range is 50 feet. As a 2-beam level, it can accurately determine square alignment for tasks like laying concrete foundations, squaring off decks or porches, and aligning fence and rail constructions.

Function Description

The primary function of this device is to project a level horizontal or vertical laser line for various alignment and leveling tasks. It can be operated in several modes, including continuous rotation for a 360° line, or as a "chalk line" with adjustable lengths. The laser beam is a pulsed green laser "dot" that creates the appearance of a continuous line.

Usage Features

The Craftsman Green Rotary Laser Level offers multiple ways to be used, enhancing its versatility:

  • Hand-held: For point marking and simple alignment tasks.
  • Horizontal Surface: Can be placed directly on a level surface for operation.
  • Wall-mounted: An included wall-mount base allows for secure attachment to beams or walls, with adjustable height and direction.
  • Tripod Stand (sold separately): For more stable and precise positioning.

Operation Panel and Controls:

The device features an intuitive operation panel with several buttons:

  • Power Button: Turns the tool on and off. When turned on, the bright green laser beam illuminates, and the backlights of the vials light up for easier visibility during leveling or calibration. Pressing it again turns the device off, with vial backlights winking twice quickly before shutting down.
  • Rotation Button: Adjusts the rotation speed of the laser. Pressing it once sets "fast" speed, twice for "medium," three times for "slow," and a fourth time stops rotation. This allows users to choose the best scan speed for different work environments and visibility requirements.
  • Chalk Line Button: Adjusts the length of the projected chalk line. Pressing it once projects the longest chalk line, twice for a medium line, and three times for the shortest line.
  • Left/Right Buttons: Move the chalk line or laser dot to the left or right positions, allowing for alignment to a target without physically moving and re-leveling the tool.
  • Power Bar Indicator: Shows the battery capacity with three LEDs. Pressing the "POWER BAR" button illuminates the LEDs for about five seconds. All three LEDs lit indicate full capacity, while the rightmost LED winking indicates low battery, prompting replacement or AC/DC adapter use.

Automatic Sleep Mode:

To conserve power, if the laser is not operated for rotating or chalk line for one hour after being turned on, it automatically enters "Sleeping mode." In this mode, the laser temporarily shuts off, and the vial backlights flash every two seconds as a reminder. The level can be woken up within two hours by pressing any button on the tool (except the power button) or using the remote control. After two hours in sleep mode, the tool will automatically shut off completely, requiring the power button to be pressed again to turn it on.

Leveling the Device:

The device uses bubble vials for accurate leveling:

  • Horizontal Position: Adjust the "X" and "Y" wheels to center the bubbles in their respective vials.
  • Vertical Position: Adjust the "Y" wheel to center the bubble in the "Z" vial. When mounting on a tripod or wall mount base, it's recommended to level the mounting plate as closely as possible first, then perform the fine adjustments using the wheels after securing the tool.

Remote Control:

A wireless remote control allows convenient operation of the rotary laser from up to 100 feet away. The remote's buttons mirror the functions of the operation panel buttons, except for the power button. The remote's power button puts the level into "sleeping mode," while the tool's power button turns it completely off.

Green Laser Detector:

The included green laser detector helps locate the laser position up to 200 feet away, even in bright surroundings, where the laser line might be difficult to see with the naked eye. It is specifically designed for green laser lines and will not detect red laser lines.

  • Receiving Window: Detects laser signals.
  • LCD Display: Shows detection results and the laser line's position. There are two LCDs (front and back) for convenient viewing.
  • Power Button: Turns the detector on and off.
  • Coarse/Fine Detection Button: Allows switching between coarse and fine detection modes for varying levels of accuracy.
  • Buzzer Button: Turns the audible buzzer on or off. The buzzer sounds discontinuously to indicate direction and continuously when the laser line is aligned.
  • Lineation Slot: Used for marking the target line once the laser is located.
  • Mounting Hole (1/4"): For installation on a mounting base or tripod.
  • Distance Indicator: Shows that the lineation slot is 2 inches from the top of the detector.

Detector Mounting Base:

A special mounting base is provided to easily fix the detector onto a vertical pillar. It features a tightening knob, release buttons for a quick clamp, and a round vial to ensure the base is vertical and level.

Wall Mount Base:

The wall mount base allows the laser level to be attached to beams or walls.

  • Trough: For attaching to beams.
  • Lock Screw: For fixing the mount base to beams.
  • Mounting Hole: For hanging the base from a nail or screw.
  • Secure Screw: For fixing the platform.
  • Handle: Quick release or clamp for the platform.
  • Inch/Centimeter Scale: For precise measurements.
  • Platform Pivots: For easy storage.
  • 5/8" Mounting Thread Screw: For fixing the rotary laser.
  • Balance Screw: For adjusting the balance of the base.
  • Platform: Supports the rotary laser. The base can be hung from nails or screws (using three holes for safety) or clamped onto a level beam. The height of the platform is adjustable up to 7 1/2 inches.

Working with Obstructions:

The pulsed nature of the laser "dot" means that obstructions in front of the device will not affect the laser line projected on either side of the user or obstruction.

Referencing and Leveling Across Multiple Surfaces:

The laser level is useful for aligning objects across two or more adjacent surfaces, such as aligning electrical outlets on stud work with adjoining walls or aligning pictures on multiple room walls.

Maintenance Features

The Craftsman Green Rotary Laser Level is designed to be a low-maintenance tool, but following these simple directions will help maintain its performance:
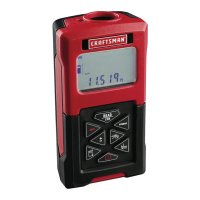
  • Careful Handling: Always handle the tool with care, treating it as a fine optical device similar to a camera or binoculars.
  • Avoid Shock and Vibration: Do not expose the tool to shock, continuous vibration, or extreme hot or cold temperatures.
  • Indoor Storage: Always store the tool indoors in its protective case when not in use.
  • Power Off: Always ensure the tool is turned off after use.
  • Cleanliness: Keep the tool free of dust and liquids. If cleaning is necessary, use only a soft cloth or cotton swab with glass cleaner to clean the laser emitting window.
  • Drying: Thoroughly dry the tool after each use.
  • Battery Management: Regularly check batteries to avoid deterioration. Always remove batteries from the tool if it will not be used for an extended period. Replace batteries when the power bar indicator goes out.
  • No Disassembly: Do not attempt to disassemble the green rotary laser level, as this will void the warranty and could expose the user to hazardous radiation.
  • No Lens Modification: Do not attempt to change any part of the laser lens.
  • Authorized Service: All tool service and maintenance must be performed by an authorized Sears Parts and Repair Center. Unqualified personnel attempting repairs could result in injury.

Craftsman 320 Series Specifications

General IconGeneral
CategoryMeasuring Instruments
Model320 Series
TypeLaser Distance Measurer
DisplayLCD
UnitsInches

Related product manuals