EasyManua.ls Logo

Craftsman 875.62828 User Manual

Craftsman 875.62828
5 pages
To Next Page IconTo Next Page
Page #1 background imageLoading...
Page #1 background image
I CRAFTSMAN°I
WORKSHOP STOOL
WITH ARMS
Model 875.62828
One-Year Full Warranty
For one year from the date of purchase, if
this Craftsman Workshop Stool fails due to
defect in materials or workmanship, return it
to any Sears store or other Craftsman outlet
in the United States for free repair or re-
placement.
This warranty gives you specific legal rights,
and you may also have other rights that vary
from state to state.
Sears, Roebuck and Co., Dept. 817WA,
Hoffamn estates, IL
SAFETY INSTRUCTIONS:
WEAR SAFETY GLASSES when assem-
bling this product.
BE CAREFUL of possible sharp edges.
DO NOT stand on this product. You may
fall which may cause personal injury.
PARTS
See illustration on back of page.
NOTE: The stool seat and backrest are pre-
assembled prior to shipment.
ASSEMBLY and OPERATION
INSTRUCTIONS
For assembly hex key (19) and a mini wrench (20)
are supplied.
1. Remove all parts from shipping carton. Remove all
packaging material from parts. Check parts
against parts list before beginning assembly. If any
parts are missing, call 1-800-290-9054.
2. Insert upper end of each backrest support bar (2)
into backrest (1) so that one of the two spring
locks snaps into place.
Be sure to snap each support bar into backrest at
same height.
3. Loosen lock knobs (18) on underside of seat (5)
enough so that you can insert the lower end of
each support bar into the seat bracket. Insert
support at least 4 inches to ensure seat stability.
Tighten lock knobs (18) securely.
4. Loosen lock knobs (18) on underside of seat (5)
enough so that you can insert the lower end of
each arm rest support (4) into the seat bracket on
either side. Insert support at least 1.5 inches to
ensure arm rest stability. Tighten lock knobs (18)
securely.
5. Unscrew nylon lock nuts (10) from hex bolt (7).
Place hex bolts through holes in top of leg fixture
(8). Invert connector and lay it on floor. Position
each leg (11) into connector so that hex bolt goes
through leg hole. Place strength plate (9) over legs
so that hex bolt goes through holes in strength
plate. Finger-tighten lock nuts, nylon ring up, onto
ends of hex bolts.
6. Place square foot rest (14) around legs. Remove
lock nuts from leg screws (13). Insert a leg screw
into each corner of square and through hole in
related leg. Finger-tighten lock nut. When all leg
screws and lock nuts are in place, securely tighten
them. Then securely tighten the lock nuts on the
strength plate (9).
7. Stand leg assembly upright. Insert air cylinder (6),
white button up, through hole in top of leg connec-
tor until cylinder comes to rest in the leg fixture (8).
8. Place seat on top of cylinder. Apply weight to seat
to lock it to the cylinder. CAUTION: To avoid injury,
be sure that seat is securely locked to cylinder
before sitting on stool.
9. Raise or lower seat by lifting up on the seat
adjustment lever beneath seat. Lower the lever to
lock seat at desired height.
10.If necessary, you may adjust the leg feet (15)
slightly so that the stool rests perfectly flat on the
floor. Do not unscrew the leg foot so far as to
make the connection between foot and leg un-
stable.
Sears, Roebuck and Co., Hoffman Estates, IL 60179 USA
www.sears.com
Question and Answer IconNeed help?

Do you have a question about the Craftsman 875.62828 and is the answer not in the manual?

Craftsman 875.62828 Specifications

General IconGeneral
Product TypeCeiling Fan
Blade Span52 inches
Number of Blades5
Reversible MotorYes
WarrantyLifetime

Summary

Assembly and Operation Instructions

Parts Check and Preparation

Remove all parts from the carton and check against the parts list. Call for missing items.

Attaching Backrest Supports

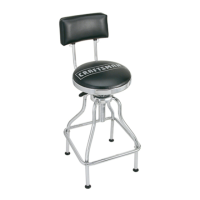
Insert backrest support bars into the backrest, ensuring spring locks engage at the same height.

Securing Backrest to Seat

Loosen lock knobs, insert support bars into the seat bracket, and tighten knobs securely.

Attaching Armrests

Loosen lock knobs, insert armrest supports into the seat bracket, and tighten knobs securely.

Assembling Leg Structure

Assemble legs to the connector and strength plate using hex bolts and lock nuts.

Installing Foot Rest

Attach the square foot rest to the legs using screws and nuts, then tighten all connections.

Installing Air Cylinder

Stand the leg assembly upright and insert the air cylinder into the leg fixture.

Mounting Seat to Cylinder

Place the seat onto the air cylinder and apply weight to lock it securely.

Adjusting Seat Height

Lift the adjustment lever to raise or lower the seat, then lower to lock.

Stabilizing Stool on Floor

Adjust leg feet to ensure the stool rests flat on the floor without compromising stability.

Safety Instructions

Protective Eyewear and Edge Caution

Always wear safety glasses during assembly and be cautious of potentially sharp edges.

Fall Hazard Warning

Do not stand on the product to avoid potential falls and personal injury.

Warranty Information

One-Year Full Warranty Details

Offers free repair or replacement for defects in materials or workmanship within one year.

Service and Support

In-Home Repair Services

Contact for repair of major appliances, lawn equipment, and systems in your home.

Carry-In Repair Services

Contact for repair of items like vacuums, lawn equipment, and electronics at service centers.

Protection Agreement Purchase

Contact numbers for purchasing a protection agreement on products serviced by Sears.

Related product manuals