23
SERVICE AND MAINTENANCE
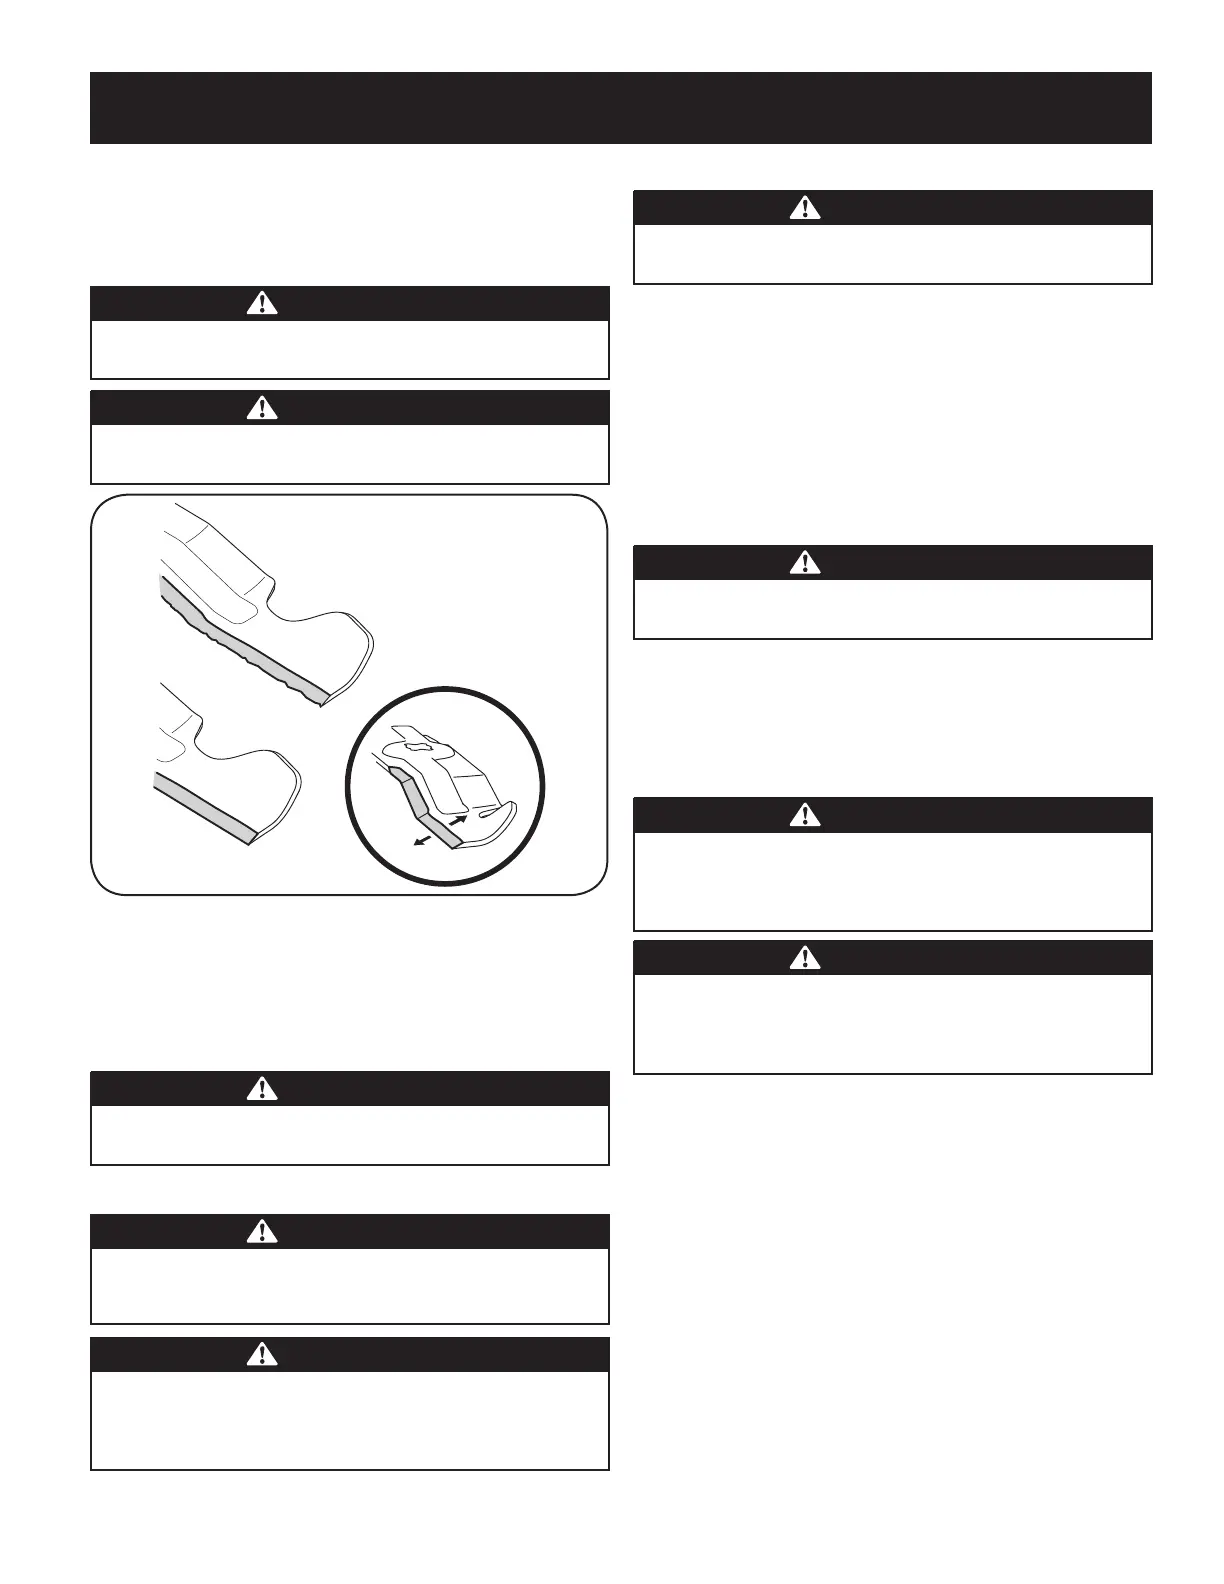
To properly sharpen the cutting blades, remove equal amounts 4.
of metal from both ends of the blades along the cutting edges,
parallel to the trailing edge, at a 25° to 30° angle. Always grind
each cutting blade edge equally to maintain proper blade balance.
See Figure 19.
CAUTION
If the cutting edge of the blade has previously been sharpened, or if
any metal separation is present, replace the blades with new ones.
WARNING
A poorly balanced blade will cause excessive vibration, may cause
damagetothetractorand/orresultinpersonalinjury.
Test the blade’s balance using a blade balancer. Grind metal from 5.
the heavy side until it balances evenly.
NOTE: When replacing the blade, be sure to install the blade with the
side of the blade marked ‘‘Bottom’’ (or with a part number stamped in
it) facing the ground when the mower is in the operating position.
CAUTION
Use a torque wrench to tighten the blade spindle hex flange nut to
between 70 ft-lbs and 90 ft-lbs.
BATTERY
WARNING
Battery posts, terminals, and related accessories contain lead and
lead compounds, chemicals known to the State of California to cause
cancer and reproductive harm. Wash hands after handling.
CAUTION
If removing the battery, disconnect the NEGATIVE (Black) wire
from its terminal first, followed by the POSITIVE (Red) wire. When
reinstalling the battery, always connect the POSITIVE (Red) wire to its
terminal first, followed by the NEGATIVE (Black) wire.
Jump Starting
WARNING
Neverjumpstartadamagedorfrozenbattery.Becertainthevehicles
do not touch and ignitions are off. Do not allow cable clamps to touch.
Connect positive (1.
+) cable to positive (+) post of your tractor’s
discharged battery.
Connect the other end of the positive cable to the positive (2.
+) post
ofthejumperbattery.
Connect the negative (3.
–) cable to the negative (–) post of the
jumperbattery.
Connect the other end of the negative cable to the engine block of 4.
the tractor, away from the battery. Attach to an unpainted part to
assure a good connection.
CAUTION
Ifthejumperbatteryisinstalledonavehicle(i.e.car,truck),doNOT
startthevehicle’senginewhenjumpstartingyourtractor.
Start the tractor (as instructed in the Operation section of this 5.
manual).
Setthetractor’sparkingbrakebeforeremovingthejumpercables.6.
Remove cables in reverse order of connection.
Charging
WARNING
Batteries give off an explosive gas while charging. Charge the battery
in a well ventilated area and keep away from an open flame or pilot
light as on a water heater, space heater, furnace, clothes dryer or
other gas appliances.
CAUTION
When charging your tractor’s battery, use only a charger designed for
12V lead-acid batteries. Read your battery charger’s Owner’s Manual
prior to charging your tractor’s battery. Always follow its instructions
and heed its warnings.
If your tractor has not been put into use for an extended period of time,
charge the battery as follows:
Set your battery charger to deliver a max of 10 amperes.1.
If your battery charger is automatic, charge the battery until the 2.
charger indicates that charging is complete. If the charger is not
automatic, charge for no fewer than eight hours.
Figure 19






 To Next Page