EasyManua.ls Logo

Creative Sound Blaster K3+ - User Manual

Creative Sound Blaster K3+
4 pages
Print Icon
To Next Page IconTo Next Page
Loading...
BACK
PANEL
Auto-tune creates special electric voice e󽗈ect by intentionally setting the key to a di󽗈erent
key.
A, b, c, d, e, f, 9 represent the A, B, C, D, E, F, G keys.
Select Minor/Major by sliding the switch accordingly.
represents 󽗊at tone
The auto-tune keys ranging from C Major B Minor are represented as follows:
Reverb/Delay Amount
Control reverb amount using knob and reverb delay amount using knob respectively.
Below are the reverb/delay amount ranging from 0. –
+48V Phantom Power Switch
Press down to enable +48V phantom
power supply to the XLR connectors.
Refer to Phantom Power & Microphone
Connectivity section for details.
Important: When +48V phantom power
is enabled, both XLR connectors will be
supplied with +48V. Phantom power is
applicable to condenser microphones
which support phantom power, applying
+48V on microphones that do not support
phantom power may cause damage to such
microphones.
Line In/Mobile
In Volume Knob
Rotate to control the volume of Line In or
Mobile In.
SoundBoard Switch
Press to enable soundboard clips selection.
LED and will display and and -.
brie󽗊y to indicate Soundboard mode.
Reverb Amount Knob becomes sound
clip selector, LED display options I-6,
I-Entrance, 2-Cheers, 3-Baby, 4-Laughter, 5
-Gunshots, 6-Crow.
Rotate Knob to select desired sound clip,
press knob to playback selected sound
clip.
Press SoundBoard switch to exit and return
to Reverb Select and Auto-tune Select mode,
LED and will display and brie󽗊y to
indicate control is back to Reverb Select and
Auto-tune mode.
Microphone 2 & Guitar
Volume Knob
Rotate to control the gain of Microphone
2 and Guitar input.
Microphone 1 Volume Knob
Rotate to control the gain of Microphone 1
input.
Bass & Treble Knob
Rotate to control the amount of Bass and
Treble for Microphone inputs.
Voice-Over Switch
Suppress background music when speaking
through the microphones. Return to
original music volume when there is no
microphone input. Press to enable
Voice-Over, press again to disable.
Reverb Select & Reverb
Amount Knob
Rotate to select between di󽗈erent types of
reverbLED display on the right indicates
the reverb selected (
-
, 1
-
), (
-
) indicate
Reverb is OFF.
To adjust Reverb Amount and Reverb Delay,
press down this button, LED and will
display and brie󽗊y to indicate control is
switch to Reverb Amount and Reverb Delay
mode. LED subsequently display 0.- (with
a at the bottom of the number). Use the
Reverb Select & Reverb Amount Knob
and Auto-tune Key & Reverb Delay Knob
to adjust reverb amount and reverb delay
accordingly.
Press knob again to switch back to
Reverb and Auto-tune Select function.
LED and will display and brie󽗊y
to indicate control is back to Reverb and
Auto-tune Select mode. LED subsequently
display the current selected Reverb number
and Auto-tune key.
Reverb Select/Amount
Display
Displays the selected reverb type or amount
respectively.
Auto-tune/Reverb
Delay Display
Displays the selected Auto-tune key or
Reverb Delay amount respectively.
Minor/Major Switch
Switch between Minor and Major key.
Auto-tune Key & Reverb
Delay Knob
Rotate to select from 24 base key tunes,
LED display on the left indicates the key
selected -, A
-
9 from A G, - indicate
Auto-tune is OFF, at the bottom of
character represents 󽗊at key. Refer to
Auto-tune Keys section for details.
To control Reverb Delay amount, press
down Reverb Select & Reverb Amount
knob , the LED display on the left
switches to 0.
-
(with a at the bottom of
the number). Press Reverb Select & Reverb
Amount knob again to switch back to
Auto-tune Select function.
Mixing ON/OFF
Mixes microphone and other inputs (Line
In, USB, Guitar) and output to internet or
computer for recording.
Monitoring ON/OFF
Press to hear your own voice through the
headphone.
Monitoring FX ON/OFF
Press to hear your own voice with e󽗈ects
through the headphone.
Mixing FX ON/OFF
Enable microphone with e󽗈ects and output
to internet or computer for recording.
Mobile Out Volume Knob
Rotate to control the output of output to
mobile device.
Headphone 1, 2
Volume Knob
Rotate to control the output volume of
Headphone 1 and Headphone 2.
Monitor O󽗈 +
Monitor Fx O󽗈
Monitor On +
Monitor Fx O󽗈
Monitor O󽗈 +
Monitor Fx On
Monitor On +
Monitor Fx On
Mixing
O󽗈 +
Mixing Fx
O󽗈
Record: Original
mic only
Monitor: No mic,
only other inputs
Record: Original
mic only
Monitor: Original
mic, with other
inputs
Record: Original
mic only
Monitor: Mic
with e󽗈ects, with
other inputs
Record: Original
mic only
Monitor: Original
mic + e󽗈ects, with
other inputs
Mixing
On +
Mixing Fx
O󽗈
Record: Original
mic, with other
inputs
Monitor: No mic,
only other inputs
Record: Original
mic, with other
inputs
Monitor: Original
mic, with other
inputs
Record: Original
mic, with other
inputs
Monitor: Mic
with e󽗈ects, with
other inputs
Record: Original
mic, with other
inputs
Monitor: Original
mic + e󽗈ects, with
other inputs
Mixing
O󽗈 +
Mixing Fx
On
Record: Mic with
e󽗈ects only
Monitor: No mic,
only other inputs
Record: Mic with
e󽗈ects only
Monitor: Original
mic, with other
inputs
Record: Mic with
e󽗈ects only
Monitor: Mic
with e󽗈ects, with
other inputs
Record: Mic with
e󽗈ects only
Monitor: Original
mic + e󽗈ects, with
other inputs
Mixing
On
+ Mixing
Fx On
Record: Mic with
e󽗈ects, with
other inputs
Monitor: No mic,
only other inputs
Record: Mic with
e󽗈ects, with
other inputs
Monitor: Original
mic, with other
inputs
Record: Mic with
e󽗈ects, with
other inputs
Monitor: Mic
with e󽗈ects, with
other inputs
Record: Mic with
e󽗈ects, with
other inputs
Monitor: Original
mic + e󽗈ects,
with other inputs
2. CONNECTIVITY
3. DESCRIPTION OF FUNCTIONS
Ground Terminal
Connect a ground cable (not provided) from this terminal to the metal surface at the back of
the computer to eliminate humming noise.
FRONT
PANEL
1. FUNCTIONS LABELLING
Model No: SB1720
PN 03SB172000001 Rev B
© 2018 Creative Labs Pte. Ltd. All rights reserved. Creative, the Creative logo, Sound Blaster and the Sound Blaster logo are trademarks or registered
trademarks of Creative Technology Ltd in the United States and/or other countries. All other trademarks are the property of their respective owners and are
hereby recognized as such. All specifications are subject to change without prior notice. Actual product may differ slightly from images shown. Use of this
product is subject to a limited warranty. The software included in this packaging may not be used separately from the hardware. Before using the software,
you must agree to be bound by the terms and conditions of the end user license agreement.
PRODUCT REGISTRATION
Registering your product ensures you receive the most appropriate service and
product support available. You can register your product during installation or at
register.creative.com.
Please note that your warranty rights are not dependent on registration.
TECHNICAL & CUSTOMER SUPPORT SERVICES
Go to support.creative.com to resolve and troubleshoot technical queries at Creatives
24-hour self-help Knowledge Base. You can also 󽗉nd Customer Support Services and
other helpful information here.
OTHER INFORMATION
Supplementary documentation for this product includes a detail
and safety and regulatory information. These documents can be
the support.creative.com site.
KEEP THIS DOCUMENT FOR FUTURE REFERENCE
5. OPERATION MODE
6. MIXING/MONITORING OPERATION BEHAVIOR
4. PHANTOM POWER & MICROPHONE
CONNECTIVITY
8. REVERB SETTING
Sound Blaster K3 supports 6 modes of operation:
The above behaviour assumes that the Reverb Select or Auto-tune is enabled, if not, no e󽗈ects
can be heard even if Monitor FX and Mixing FX are turned on.
The Sound Blaster K3 supports both dynamic and condenser microphones that are di󽗈erent
in various operating voltages (XLR +48V, TRS +1.5V) and connectors, therefore it is paramount
to ensure proper connection and usage of microphones. Below table illustrates the possible
microphone usage scenarios:
Reverb Select
Below are the reverb settings ranging from 1-9.
Important: +48V should be On ONLY when condenser mic requires 48V phantom power,
applying +48V on microphones that do not require 48V phantom power may cause permanent
damage to the microphone. Always ensure that +48V power is OFF before inserting or
removing phantom power condenser mic.
Music Playback
Normal playback/streaming without e󽗈ects and no monitoring. As Mic Monitoring is not
turn on, microphone input will not be heard, however microphone input signal can still be
captured by computer.
Control: Monitor and Mixing buttons at O󽗈 position.
Chat
Voice communication without e󽗈ects.
Control: Monitor button at On position.
Wet Monitor-Dry Record
Vocal monitoring with e󽗈ects & other inputs, internet/computer recording is dry (vocal
without music).
Control: Monitor Fx at On position.
Wet Monitor-Wet Record, Karaoke
Vocal monitoring and internet/computer recording are with e󽗈ects and music (wet).
Control: Monitor Fx, Mixing, Mixing Fx at On position.
Voice-Over
During singing session, music volume is suppressed automatically when there is vocal input,
music level will be restored when there is no vocal input. This feature is important for room
host or DJ/KJ when they need to intervene during the session.
Control: Voice-Over switch, Monitor Fx, Mixing and Mixing Fx at On position.
Host
This is for station/channel broadcasting host. User can chose to apply reverb/broadcasting
e󽗈ect during the session.
Control: Mixing, Mixing Fx, Monitor Fx, Voice-Over and Soundboard switch at On position.
Voice-Over Mixing On Mixing Fx Monitor On Monitor Fx
Music
Chat
Wet Monitoring,
Dry Recording
Wet Monitoring,
Wet Recording
(Karaoke)
Voice-Over
Host
8
9
13
14
17
19
18
20
15
16
6
6
6
6
7 7 7
7
8 8 8
8
9
9
9
9
Mic 2
+48V
Condensor Mic
Dynamic Mic
Mic with built-in
battery
Mic
1
+48V
Condensor Mic
Mic 1: XLR
Mic 2: XLR
Mic 1: XLR
Mic 2: TRS
Mic 1: XLR
Mic 2: TRS
Dynamic Mic
Mic 1: TRS
Mic 2: XLR
Mic 1: XLR or TRS
Mic 2: XLR or TRS
Mic 1: XLR or TRS
Mic 2: XLR or TRS
Mic with built-in
battery
Mic 1: TRS
Mic 2: XLR
Mic 1: XLR or TRS
Mic 2: XLR or TRS
Mic 1: XLR or TRS
Mic 2: XLR or TRS
2
1
1
2 3
5
3
1
1
1
7
2
3
4
5
6
1
5
Reverb
-
Reverb OFF
1
Room
4
Stadium
7
Reverb + Delay
2
Hall
5
Concert
8
Echo
3
Plate
6
Chorus Cathedral
Reverb Amount/Delay Amount
0.
0% (Min) 100% (Max)
7. AUTO-TUNE KEYS
10. STATUS/MODE DISPLAY
10
11 12
Press and hold Reverb Adjust button until LED and display and
1 2 3
11. RESET TO FACTORY SETTINGS
Below are the soundboard settings.
9. SOUNDBOARD SETTING
LED LED
Electronic
Tone
-
Auto-tune OFF
-
Auto-tune OFF
c
C Major
c
C Minor
d
D-Flat Major
d
D-Flat Minor
d
D Major
d
D Minor
e.
E-Flat Major
e.
E-Flat Minor
e
E Major
e
E Minor
f
F Major
f
F Minor
(A-Flat Major)
9.
G-Flat Major
9.
G-Flat Minor
9
G Major
9
G Minor
a.
A-Flat Major
(F Minor)
a.
A-Flat Minor
a
A Major
a
A Minor
b
B-Flat Major
b
B-Flat Minor
b
B Major
b
B Minor
2
2
1
1
1
2 3
3
LED 22 LED 22
Reverb Amount Reverb Delay
Reverb Select Auto-tune
Sound Board
-
2
3
14
13
1
18
15
19
16
20
8
11
10
9
12
17
2 3 4 5 6 7
1
Entrance
3
Baby
5
Gunshots
2
Cheers
4
Laughter
6
Crow
Question and Answer IconNeed help?

Do you have a question about the Creative Sound Blaster K3+ and is the answer not in the manual?

Summary

Sound Blaster K3+ Functions and Controls

Reverb Select & Reverb Amount Knob

Adjusts reverb type and amount. LED display shows selected reverb or amount.

Auto-tune Key & Reverb Delay Knob

Selects Auto-tune keys or adjusts Reverb Delay amount.

Mixing ON;OFF

Mixes mic and other inputs for recording.

Monitoring ON;OFF

Enables monitoring of your own voice through headphones.

Monitoring FX ON;OFF

Monitors your voice with effects through headphones.

Mixing FX ON;OFF

Enables mic with effects for output to internet/computer.

+48 V Phantom Power Switch

Enables +48V phantom power for XLR connectors.

Voice-Over Switch

Suppresses background music when speaking.

Sound Blaster K3+ Connectivity

Front Panel Connectivity

Details the input and output ports on the front panel.

Back Panel Connectivity

Details the input and output ports on the back panel.

Sound Blaster K3+ Operation Modes

Mixing and Monitoring Operation Behavior

Auto-Tune Keys Explained

Reverb Settings

Resetting to Factory Settings

Factory Reset Procedure

Instructions to reset the device to factory default settings.

Overview

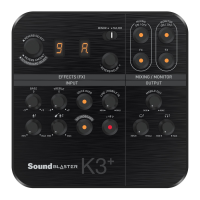
The Sound Blaster K3+ is a versatile audio interface designed for various recording and monitoring applications, offering a comprehensive set of functions for both novice and experienced users. Its front panel features a clear layout of controls, while the back panel provides a range of connectivity options.

Function Description:

The device's core functionality revolves around its audio input and output capabilities, coupled with a robust suite of effects and mixing controls.

Inputs and Gain Control:

The K3+ features two microphone inputs, each with independent gain control. Microphone 1's volume is adjusted via the Microphone 1 Volume Knob (17), while Microphone 2's and the Guitar input's gain are controlled by the Microphone 2 & Guitar Volume Knob (16). For condenser microphones requiring power, a +48V Phantom Power Switch (13) is available, enabling +48V phantom power to the XLR connectors. It's crucial to ensure that +48V phantom power is only activated for microphones that support it, as applying it to incompatible microphones can cause permanent damage. The device also includes Bass (19) and Treble (18) knobs to fine-tune the tonal characteristics of the microphone inputs.

Reverb and Auto-tune Effects:

A significant feature of the K3+ is its Reverb Select & Reverb Amount Knob (1), which allows users to choose from various reverb types (e.g., Room, Hall, Plate, Stadium, Concert, Chorus, Echo, Cathedral) and adjust the reverb amount. The LED display (2) indicates the selected reverb type or amount. This knob also facilitates the adjustment of Reverb Delay when in the appropriate mode. The Auto-tune Key & Reverb Delay Knob (5) enables the selection of 24 base key tunes for an "electric voice" effect, with the LED display (3) showing the selected key. This knob also controls the Reverb Delay amount. A Minor/Major Switch (4) allows users to toggle between minor and major keys for auto-tune.

Mixing and Monitoring:

The K3+ provides extensive mixing and monitoring capabilities. The Mixing ON/OFF button (6) mixes microphone and other inputs (Line In, USB, Guitar) and outputs the combined signal for internet or computer recording. The Monitoring ON/OFF button (7) allows users to hear their own voice through headphones, while the Monitoring FX ON/OFF button (8) enables monitoring of their voice with effects. The Mixing FX ON/OFF button (9) enables microphone effects and outputs the processed signal for internet or computer recording. Dedicated volume knobs are provided for Mobile Out (10) and Headphones 1 & 2 (12), allowing precise control over output levels.

Soundboard Functionality:

The Sound Board Switch (15) activates the soundboard mode, allowing users to select and play various sound clips (e.g., Entrance, Cheers, Baby, Laughter, Gunshots, Crow). The Reverb Amount Knob (1) acts as the sound clip selector in this mode, and pressing it plays the selected clip.

Voice-Over Feature:

The Voice-Over Switch (20) is designed to suppress background music automatically when vocal input is detected through the microphones. The music volume is restored when there's no microphone input, making it ideal for hosts or DJs who need to speak over music.

Connectivity:

The back panel of the K3+ offers a comprehensive array of connections. It includes a Ground Terminal for eliminating humming noise by connecting to a computer's metal surface. Audio outputs consist of Line Out (Left and Right) and Mobile Out. Inputs include Mobile I/O, Line In (Left and Right), and a USB port for computer connection.

Usage Features:

The Sound Blaster K3+ supports various operation modes, catering to different user needs:

  • Music Playback: For normal playback/streaming without effects or monitoring. Microphone input is captured by the computer but not heard. Both Monitor and Mixing buttons should be "Off."
  • Chat: For voice communication without effects. The Monitor button should be "On."
  • Wet Monitor-Dry Record: For vocal monitoring with effects and other inputs, while internet/computer recording is dry (vocal without music). Monitor FX should be "On."
  • Wet Monitor-Wet Record, Karaoke: For vocal monitoring and internet/computer recording with effects and music (wet). Monitor FX, Mixing, and Mixing FX should be "On."
  • Voice-Over: During singing sessions, music volume is automatically suppressed when vocal input is detected and restored when no vocal input is present. This mode is useful for room hosts or DJs. Voice-Over switch, Monitor FX, Mixing, and Mixing FX should be "On."
  • Host: For station/channel broadcasting hosts who wish to apply reverb/broadcasting effects during sessions. Mixing, Mixing FX, Monitor FX, Voice-Over, and Soundboard switch should be "On."

The device's mixing/monitoring operation behavior varies depending on the status of the Mixing, Mixing FX, Monitor, and Monitor FX buttons, influencing what is recorded and what is heard through the headphones. For example, with Mixing Off and Mixing FX Off, recording is mic-only, and monitoring is silent. With Mixing On and Mixing FX On, recording includes mic with effects and other inputs, and monitoring includes mic with effects and other inputs.

The auto-tune keys are represented by letters and symbols (R, b, c, d, E, F, 9) corresponding to musical notes (A, B, C, D, E, F, G), with a flat tone indicated by a specific symbol. Users can select Minor/Major keys by sliding the switch.

Maintenance Features:

Reset to Factory Settings: To reset the device to its factory default settings, press and hold the Reverb Adjust button (1) until LED 2 and LED 3 display specific symbols (a. and E.).

Ground Terminal: The Ground Terminal on the back panel is crucial for maintenance, allowing users to connect a ground cable (not provided) to the metal surface at the back of their computer. This helps eliminate humming noise, ensuring cleaner audio output.

Phantom Power Management: When using condenser microphones, it is vital to manage the +48V phantom power correctly. Always ensure that +48V power is "OFF" before inserting or removing phantom power condenser microphones to prevent permanent damage to the microphone. The device's manual provides a detailed table illustrating microphone usage scenarios with different types of microphones (condenser, dynamic, built-in battery) and their compatibility with the XLR and TRS inputs, emphasizing the importance of proper connection and phantom power usage.

Creative Sound Blaster K3+ Specifications

General IconGeneral
USB ConnectivityUSB 2.0
Phantom PowerYes (+48V)
Bit Depth24-bit
Channels2
Headphone Output1 x 1/4" TRS
Sampling RateUp to 96kHz
CompatibilityWindows, macOS
Microphone Input1 x XLR