EasyManua.ls Logo

Crimson AU65 User Manual

Crimson AU65
9 pages
To Next Page IconTo Next Page
Page #1 background imageLoading...
Page #1 background image
1
AU65-0001
¡ADVERTENCIA! LA INSTALACIÓN O EL MONTAJE INAPROPIADOS PUEDEN PROVOCAR
LESIONES, DAÑOS MATERIALES O INCLUSO LA MUERTE. ANTES DE COMENZAR, LEA LAS
SIGUIENTES ADVERTENCIAS.
No utilice este producto para ningún n que no sea explícitamente especicado por Crimson
AV. Una instalación inadecuada puede provocar daños materiales o lesiones personales. Si no
entiende las instrucciones de montaje o tiene alguna duda sobre la seguridad de la instalación,
contacte con Crimson AV o llame a un operario cualicado. Crimson AV no es responsable de
daños o lesiones causados por el montaje, ensamblaje o uso incorrectos.
El ferretería que incluye este producto, es exclusivamente destinado a ser instalado en las pare-
des de madera maciza, hormigón, bloques de concreto o columnas de madera sólida con un
máximo de 16 mm de drywall. Para las paredes hechas de otros materiales, por ejemplo, ladrillos
huecos, por favor consulte a su instalador y / o distribuidor especializado.
NO EXCEDA LA CAPACIDAD DE PESO MÁXIMA PARA ESTE PRODUCTO.
iADVERTENCIA!
AVERTISSEMENT! SI CE PRODUIT N’EST PAS CORRECTEMENT INSTALLÉ OU ASSEMBLÉ, IL
RISQUE DE CAUSER DES BLESSURES RAVES, VOIRE MORTELLES, AINSI QUE DES DOM-
MAGES MATÉRIELS IMPORTANTS. AVANT DE COMMENCER, LISEZ LES AVERTISSEMENTS
SUIVANTS.
N’utilisez pas ce produit à une n non spéciée expressément par Crimson AV. Une installation
incorrecte peut entraîner des préjudices corporels ou des dommages matériels. Si vous ne com-
prenez pas ces instructions ou si vous avez des doutes quant à la sécurité de l’installation, veuillez
contacter le service clientèle de Crimson AV ou un installateur qualié. Crimson AV n’est pas re-
sponsable des dommages ou des préjudices causés par un montage, un assemblage ou une
utilisation incorrects.
Le matériel fourni avec ce produit, est exclusivement destiné à être installé sur des murs en bois
massif, en béton, blocs de béton ou des colonnes en bois massif avec un maximum de 16 mm de
plaques de plâtre. Pour les murs faits d’autres matériaux, comme la brique creuse, s’il vous plaît
consulter votre installateur et / ou fournisseur spécialisé.
NE DÉPASSEZ JAMAIS LA CAPACITÉ DE CHARGE MAXIMALE DE CE PRODUIT.
AVERTISSEMENT
! !
WARNING! SEVERE PERSONAL INJURY AND PROPERTY DAMAGE CAN RESULT FROM
IMPROPER INSTALLATION OR ASSEMBLY. READ THE FOLLOWING WARNINGS BEFORE
BEGINNING.
Do not use this product for any purpose not explicitly specied by Crimson AV. Improper installa-
tion may cause property damage or personal injury. If you do not understand these directions, or
have doubts about the safety of the installation, contact Crimson AV Customer Service or call a
qualied contractor. Crimson AV is not liable for damage or injury caused by incorrect mounting,
assembly, or use.
The hardware provided with this product, is exclusively intended for installation on walls made of
solid wood, concrete, concrete block or solid wood columns with a maximum of 16 mm of drywall.
For walls made of other materials, for example hollow bricks, please consult your installer and/
or specialist supplier.
DO NOT EXCEED THE MAXIMUM WEIGHT CAPACITY FOR THIS PRODUCT
WARNING!
Manuel D’instructionsManual de Instrucciones
Instruction Manual
www.crimsonav.com support@crimsonav.com
Ultra Flat Articulating Wall Mount
For 13”-65” TV’s / Weight Capacity: 80 lb
AU65
TM
Question and Answer IconNeed help?

Do you have a question about the Crimson AU65 and is the answer not in the manual?

Crimson AU65 Specifications

General IconGeneral
BrandCrimson
ModelAU65
CategoryRacks & Stands
LanguageEnglish

Summary

Safety Warnings and Precautions

General Safety Warnings

Read warnings before installation to prevent severe injury, property damage, or death from improper assembly.

Product Usage Limitations

Use product only for its explicitly specified purpose to avoid damage or injury.

Mounting Surface Requirements

Hardware is for solid wood, concrete, or concrete block walls. Consult installer for other materials.

Weight Capacity Warning

Do not exceed the maximum weight capacity of the product to prevent damage or injury.

Weight Capacity

Maximum Weight Limit

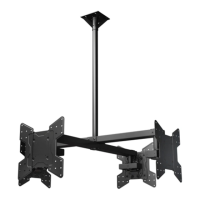
The maximum weight capacity for this product is 80 lbs or 36 kg.

Tools and Package Contents

Tools Required for Installation

Requires wood bits (4mm-5/32"), masonry bits (10mm-3/8"), and a hammer if needed.

Included Hardware and Accessories

Lists all screws, washers, spacers, cable ties, and other hardware included in the package.

Installation Instructions

Wood Stud Installation - Step 1a-1

Locate the center of the wall stud using a stud finder.

Wood Stud Installation - Step 1a-2

Draw a vertical line at the stud center using a level.

Wood Stud Installation - Step 1a-3

Use the wall plate to mark the hole location on the center line.

Wood Stud Installation - Step 1a-4

Drill holes of specified diameter and depth on the marks.

Masonry/Concrete Installation - Step 1b-1

Use a level to make a vertical line on the wall.

Masonry/Concrete Installation - Step 1b-2

Use the wall mount to mark hole locations on the line.

Masonry/Concrete Installation - Step 1b-3

Drill holes of specified diameter and depth on the marks.

Masonry/Concrete Installation - Step 1b-4

Insert anchors into holes and tap with a hammer if needed.

Installing the Wall Plate

Attach the wall plate to the wall using the provided screws.

Covering Screw Heads

Place the screw cover over the middle screw heads for a finished look.

Mounting and Hanging the TV

Adjusting Bracket Arms

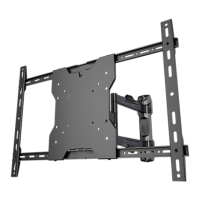
Bracket arms can be adjusted to fit various TV mounting patterns.

Attaching Mount Bracket to TV

Use spacers between the TV and mount if necessary.

Attaching Bracket - Step 5-2

If screws bottom out, use washers to eliminate slack.

Hanging the TV

Hang the TV on the adapter plate and secure with screws and washers.

Securing and Leveling the TV

Level the TV to the desired position and tighten the securing screws.

Final Steps and Warranty

Securing the Power Cord

Use the provided part to attach the power cord to the arm for management.

Securing TV in Fixed Position

Collapse the mount arm until it clicks into a secure fixed position.

Product Warranty Information

Details the 10-year warranty against defects and limitations of liability.

International Warranty Notice

Warranty applies to US purchases; contact country distributor for international details.

Related product manuals