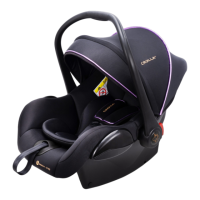
This document provides instructions for the Crolla Air infant child restraint, designed for children weighing 0-13kg (approximately 1.5 years old or under). It is approved according to ECE R44/04 standards.
Function Description
The Crolla Air is a high-quality, fully certified safety Group 0+ infant child restraint. Its primary function is to provide a secure and comfortable environment for infants during travel in a vehicle, minimizing the risk of injury or death in the event of an accident. The restraint is designed to be installed rearward-facing using a vehicle's three-point lap and diagonal seat belt. It features a 3-point retractable safety-belt system to secure the child within the restraint.
Usage Features
The manual emphasizes the importance of proper installation and use for the child's safety.
Installation:
- Vehicle Compatibility: The child restraint is only suitable for use in vehicles equipped with 3-point retractable safety-belts, approved to GB 14166 or UN/ECE Regulation No.16 or other equivalent standards. It must be installed using a lap and diagonal seat belt.
- Airbag Warning: The restraint cannot be installed in a seating position with an active frontal airbag.
- Seat Backs: It should only be used on vehicle seats with seat backs that lock in place; seats without latches that fold forward or pivot freely should not be avoided.
- Placement: When placing the car seat on the vehicle's seat, ensure it is in contact with the vehicle's seat at point C to ensure balance.
- Belt Routing: The lap belt section of the vehicle's seat belt is fed into the lap belt guide, and the diagonal belt section is threaded through the diagonal belt guide at the back of the car seat. After fastening the safety belt, a "click" sound should be heard, and the seat belt should be pulled upwards to check it is correctly fastened.
- Handle Position: For carrying, the handle should be adjusted to Position 3. After installation, the handle should be adjusted to Position 4. Ensure the seat belt is correctly routed, tightened, and not twisted, and that the cover does not impede the belt's movement or fit.
Child Securing:
- Harness System: The restraint includes a shoulder strap, chest pad, buckle, crotch pad, and adjuster.
- Buckle Usage: To fasten the harness, put the two sections of the buckle together and slot the two buckle connectors into the slot in the buckle until they "click" into place. Check the harness is correctly locked by pulling the shoulder straps upwards. To release, press the red button of the buckle inwards, which will cause the two plastic sections to pop up.
- Harness Adjustment:
- Loosening: Press the adjuster (under the adjuster cover) on the front of the seat while gripping the two shoulder straps and pulling them towards you.
- Tightening: Pull the adjuster strap until the harness is fully tightened, ensuring it is as tight as possible without causing discomfort to the child.
- Shoulder Strap Height: Always ensure the shoulder straps are at the correct height for the child. They should be threaded through the slots in the cover and seat shell closest to the top of the child's shoulders. To adjust the height, press the red button of the buckle, pull the strap and buckle connector through the cover and seat shell from the back of the seat, and then re-thread the two plastic sections through the seat shell and cover before fastening the buckle. Both shoulder straps must be at the same height and not twisted.
- Crotch Pad and Buckle Removal: To remove, turn the harness locking clip on its narrowest end and thread it through the slot under the bottom of the seat and then through the slot in the fabric cover. The crotch pad and buckle, as well as the harness straps, can then be removed.
- Child's Attire: Avoid dressing the child in unfitted clothes, as this may prevent proper and secure fastening of the shoulder and thigh harnesses.
- Unattended Child: Never leave the child unattended with the infant child restraint at any time.
- Carrying by Hand: When carrying the infant child restraint by hand, ensure the child is fastened with the safety harness and the handle is correctly locked in a vertical position to avoid the risk of the child falling.
- Elevated Surfaces: Do not use the infant child restraint on tables, chairs, or other elevated surfaces.
Handle Adjustment:
- The handle can be adjusted to 4 positions. Simultaneously press the 2 red buttons on each side of the handle, swing it to the desired position, and release the buttons.
Safety Warnings:
- Modifications: Do not make any alterations or additions to any part of the child restraint or base. Do not use accessories or parts supplied by other manufacturers, as this could alter the function of the restraint and result in serious injury or death.
- Damaged Parts: Do not use the infant child restraint if it has damaged or missing parts.
- Crash Involvement: Do not continue to use the infant child restraint or base after they have suffered any violent crash; replace immediately due to potential invisible structural damage.
- Unsecured Items: Do not put unsecured items in the vehicle, as they can become projectiles in a sharp turn, sudden stop, or collision.
- Underneath Restraint: Do not put anything underneath the infant child restraint, as it could fly out in a crash, making the webbing slack and creating a hazard.
- Soft Goods: Do not use the infant child restraint without the soft goods. The soft goods should only be replaced with those recommended by the manufacturer, as they are an integral part of the restraint's performance.
- Sunlight Exposure: Keep the infant child restraint away from direct sunlight to prevent it from becoming too hot for the child's skin.
- Second-hand Restraint: Never use a second-hand infant child restraint or one with an unknown history, as it may have structural damage.
- Substitutes: Never use ropes or any other substitutes in place of the vehicle belt.
- Load Bearing Points: Only use load bearing contact points described in the instructions and marked on the child restraint.
- Removal from Vehicle: Remove the infant child restraint from the vehicle seat when it is not in use for a long period of time.
Maintenance Features
Daily Maintenance (6.1):
- Regular Checks: Periodically check the child seat. It should be replaced after an accident.
- Storage: Keep the child seat in a dry and ventilated place to avoid damp and mold.
- Cleaning Dust: If the child seat becomes dusty, clean the seat belt and plastic pieces by wiping them with a damp sponge and allowing them to air dry.
- Spills: If food or drink spills on the buckle, disassemble the seat belt from the child seat and rinse it gently with warm water. Allow it to air dry.
- Full Cover Cleaning: For cleaning the entire cover, refer to the washing instructions.
Washing Instructions (6.2):
- Prohibited Substances: Never use any solvent, chemical detergent, or lubricant on any part of the child seat.
- Washing Method: Hand wash only, with water temperature below 30°C.
- Bleaching: Do not bleach.
- Dry Cleaning: Dry clean, using any solvent except trichloroethylene.
- Drying: Do not tumble dry.
- Ironing: Do not iron.
Removing and Assembling the Fabric Cover (6.3):
- Removal: First, remove the crotch pad and buckle (refer to page 4.5), then remove the harness and sleeping pad of the child seat.
- Assembly: To reassemble the fabric cover, repeat the removal procedures in reverse order.
General Maintenance:
- Distributor Consultation: Consult the distributor for issues concerning maintenance, repair, and part replacement.