This document is an instruction manual for the Crosley T400A T400 Turntable. It provides essential information for setup, operation, troubleshooting, and maintenance of the device.
Function Description:
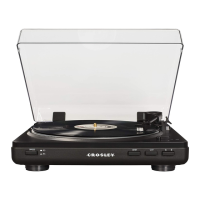
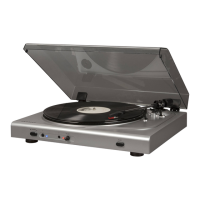
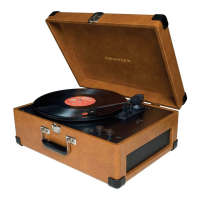
The Crosley T400A is a turntable designed for playing vinyl records. It features both automatic and manual operation modes, allowing users to choose their preferred method of playback. The turntable is equipped with RCA jacks for connecting to external audio systems, such as active/powered speakers or a stereo system. It supports multiple record speeds and sizes, making it versatile for different types of vinyl records. The device is designed with energy-saving features, including an automatic power cut-off when there is no audio input for a specified period.
Important Technical Specifications:
- Model: T400A
- Product Name: T400 Turntable
- Power: AC power adaptor, DC output 12V 200mA
- Power Consumption: 2W
- Turntable Speed: 33 1/3, 45 RPM
- Replacement Needle: Crosley NP5
- Output: Analog line-level signals via RCA Jacks (Red for Right channel, White for Left channel)
- Energy Saving: Complies with ERP energy saving standard; automatic power cut-off after 20 minutes of no audio input.
Usage Features:
- Automatic Operation:
- Set the Size Selector to the appropriate record size (e.g., 12" indicated on the diagram).
- Set the Speed Selector (8) to 33 1/3 or 45 RPM.
- Place the record on the turntable platter (3). Use the 45 RPM Adapter (2) if necessary for 7-inch records.
- Remove the stylus protector from the stylus assembly.
- Release the tonearm Hold Down Clip (7).
- Press the Start Button (9). The turntable will begin spinning, and the tonearm (6) will automatically move to the record.
- Upon completion of the record, the tonearm will automatically return to the tonearm rest, and the turntable will shut off.
- To stop playback prematurely, press the Stop Button (10). The tonearm will lift and return to its rest, and the turntable will shut off.
- To pause playback, press the Lift Button (11). Press it again to resume.
- After use, lock the Hold Down Clip (7) to secure the tonearm.
- Manual Operation:
- Follow steps 1-5 of automatic operation.
- Press the Lift Button (11) to raise the tonearm.
- Gently move the tonearm to the desired starting point on the record.
- Press the Lift Button (11) again to gently lower the tonearm and begin playback.
- After use, lock the Hold Down Clip (7) to secure the tonearm.
- Size Selector (5): Allows selection of the appropriate record size.
- Speed Selector (8): Allows selection of 33 1/3 or 45 RPM playback speed.
- 45 RPM Adapter (2): Used for playing 7-inch records with larger center holes.
- Phone Line Switch (12): (Function not detailed in the provided text, but present on the diagram).
- Power Jack (14): For connecting the AC power adaptor.
- RCA Jack (13): For connecting to external active/powered speakers or a stereo system.
Maintenance Features:
- Needle Replacement:
- Removing Needle: Gently pull down the front edge of the needle, then pull it forward and out.
- Installing Needle: Position the new needle with its tip facing down, align the back with the cartridge, insert the front end at a downward angle, and gently lift the front until it snaps into place.
- Stylus Care:
- Avoid touching the stylus tip with fingers.
- Prevent bumping the stylus on the turntable mat or record edge.
- Clean the stylus frequently with a soft brush, using a back-to-front motion only.
- Record Care:
- Clean records to remove dust or grease using a record cleaning brush and solution.
- Turntable Cleaning:
- Clean the turntable lid and cabinet with a slightly damped microfiber cloth.
- Caution: Do not use cleansers containing alcohol, benzene, or other harsh chemicals, as they may damage the paint and finish.
- Crosley Cleaning Accessories: Crosley offers a product line of cleaning accessories, available through retailers or their website (www.crosleyradio.com).
Safety Instructions:
- Do not use near water.
- Operate only with the specified power source.
- Do not defeat the safety purpose of the polarized plug.
- Protect the power cord from damage.
- Avoid overloading wall outlets or extension cords.
- Do not insert objects into openings or spill liquids.
- Do not attempt to service the product yourself; refer to qualified personnel.
- Unauthorized modifications void user authority.
- Use only manufacturer-recommended attachments.
- Move product and cart combinations with care.
- Do not block ventilation openings.
- Unplug during lightning storms or prolonged disuse.
Troubleshooting:
- No power: Check power adaptor connection, power outlet, and ensure the unit is turned on after an automatic power cut-off.
- Power on, but platter not turning: Ensure turntable mode is selected and the drive belt has not slipped off.
- Turntable spinning, but no sound or low sound: Check if the stylus protector is still on or if headphones are plugged in.
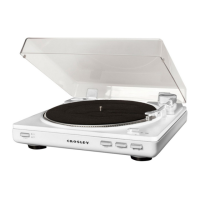
The manual also includes a detailed product description with labeled diagrams of the turntable's components, such as Hinges (1), 45 RPM Adapter (2), Turntable Platter (3), Turntable Spindle (4), Size Selector (5), Tonearm (6), Hold Down Clip (7), Speed Selector (8), Start Button (9), Stop Button (10), Lift Button (11), Phone Line Switch (12), RCA Jack (13), and Power Jack (14).