EasyManua.ls Logo

Crossfire DG3 - User Manual

Crossfire DG3
2 pages
Print Icon
To Next Page IconTo Next Page
Loading...
Please read to adjust DG3 Frame Back length.
It is important that the DG3 is correctly adjusted to fit you, so that you benefit
from the many excellent features of the pack.
Adjustment is relatively easy and only has to be done once to get maximum
comfort and benefit from your new pack.
Body Armour
When wearing body armour. You can create more space by releasing the back mesh to the desired
range.
There are 2 webbing straps attached to buckles up under the top of the frame. Reach up and release
the webbing strap to the desired length.
BODY LENGTH
Top adjustment
On the back mesh there are 2 webbing straps attached to the bottom of the mesh. On this webbing
are 3 settings for length. Simply release the tension on the webbing strap then adjust the length to
suit you and then tension the strap again.
Adjustment at bottom of frame. There are 3 settings for body length.
Centre Lumbar pad has a flap which rolls over the frame, pull this and the Velcro will release.
Pull the Lumbar pad forward, then pull the end of the hip pad up so the Velcro releases.
Question and Answer IconNeed help?

Do you have a question about the Crossfire DG3 and is the answer not in the manual?

Summary

Body Armour Fit Adjustment

Creating Space with Body Armour

Release webbing straps under the frame top to create more space when wearing body armour.

Adjusting Pack Body Length

Top Body Length Adjustment

Adjust webbing straps on the back mesh for desired body length and re-tension.

Bottom Body Length Adjustment

Adjust body length using bottom frame settings by releasing lumbar and hip pad Velcro.

Removing the Hip Fin

Overview

This document outlines the adjustment procedures for the DG3 Frame Back, emphasizing the importance of proper fit for optimal comfort and benefit from the pack.

Function Description

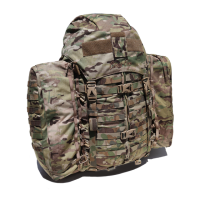
The DG3 Frame Back is designed to be a comfortable and functional pack, with various adjustment features to customize its fit to the user's body and specific needs, such as wearing body armor. The primary function of these adjustments is to ensure the pack sits correctly on the user's back, distributing weight effectively and maximizing comfort during use.

Usage Features

General Adjustment Philosophy: The manual stresses that adjustment is relatively easy and typically needs to be done only once to achieve maximum comfort and benefit. This suggests a "set it and forget it" approach once the initial fitting is complete.

Body Armour Adjustment: When wearing body armor, the DG3 allows for increased space to accommodate the additional bulk. This is achieved by releasing the back mesh.

  • Mechanism: There are two webbing straps attached to buckles located under the top of the frame. The user needs to reach up and release these webbing straps to the desired length, thereby creating more space between the pack and the user's back. This feature is crucial for military personnel or individuals who require protective gear, ensuring the pack doesn't interfere with the armor or cause discomfort.

Body Length Adjustment: The DG3 offers comprehensive body length adjustment, both at the top and bottom of the frame, to cater to different torso lengths.

  • Top Adjustment:

    • Mechanism: On the back mesh, there are two webbing straps attached to the bottom of the mesh. These straps have three distinct settings for length.
    • Procedure: To adjust, the user simply releases the tension on the webbing strap, selects the desired length setting, and then re-tensions the strap. This allows for fine-tuning the upper part of the pack's fit against the user's back.
  • Bottom Adjustment (Lumbar Pad and Hip Pad):

    • Mechanism: The adjustment at the bottom of the frame also offers three settings for body length. This involves the center lumbar pad and the hip pad.
    • Procedure:
      1. Lumbar Pad Release: The center lumbar pad has a flap that rolls over the frame. Pulling this flap releases the Velcro, allowing for adjustment.
      2. Hip Pad Release: Pull the lumbar pad forward. Then, pull the end of the hip pad upwards to release its Velcro.
      3. Hip Pad Rotation and Installation: Rotate the hip pad until its fitting releases from a keyed slot in the frame. Once released, the hip pad can be installed at the user's desired height. After positioning, rotate the hip pad again to lock it into position. This process needs to be repeated for the other side of the hip pad. This intricate adjustment allows the user to position the hip belt correctly on their hips, which is vital for transferring weight from the shoulders to the hips, a key ergonomic principle for carrying heavy loads.

Hip Fin Removal: The manual also provides instructions for removing the hip fin, which might be necessary for maintenance, replacement, or specific carrying configurations.

  • Procedure:
    1. First, remove the hip pad using the method described above (releasing it from the keyed slot).
    2. Then, undo the three "LA's" (likely referring to specific fasteners or attachment points).
    3. Once these are undone, the hip fin will slide off the waist strap.

Important Technical Specifications (Inferred)

  • Adjustment Settings: The pack features multiple adjustment settings:
    • Body armor adjustment: Variable length via two webbing straps.
    • Top body length adjustment: Three distinct settings via two webbing straps.
    • Bottom body length adjustment: Three distinct settings via lumbar and hip pad manipulation.
  • Attachment Mechanisms: The pack utilizes a combination of webbing straps, buckles, Velcro, and keyed slots for secure and adjustable attachment of its components.
  • Frame Integration: The design clearly indicates an integrated frame structure, as adjustments involve releasing components from "keyed slots in the frame."

Maintenance Features (Inferred)

While the document doesn't explicitly detail maintenance, the ability to remove the hip fin suggests that components might be replaceable or allow for easier cleaning of specific parts. The use of Velcro implies that these areas might need occasional cleaning to maintain optimal adhesion. The "set it and forget it" nature of the adjustments also implies a robust design that doesn't require frequent re-adjustment once properly fitted.

In summary, the DG3 Frame Back is a highly adjustable pack designed for user comfort and adaptability, particularly for those who may need to wear body armor or carry heavy loads over extended periods. Its detailed adjustment mechanisms for body length and hip support underscore its ergonomic focus.

Crossfire DG3 Specifications

General IconGeneral
BrandCrossfire
ModelDG3
CategorySafety Equipment
LanguageEnglish