Do you have a question about the CRUSSIS e-City 1.13 and is the answer not in the manual?
This document serves as a user manual for Crussis e-bikes, providing essential information on their function, usage, and maintenance.
An e-bike is a bicycle equipped with an electric motor, which can be located in the middle, rear, or front hub. The motor has an output of up to 250 W and its maximum speed is limited to 25 km/h. Once this speed is reached, the motor automatically turns off and reactivates when the speed drops below 25 km/h. E-bikes are also fitted with a battery, which can be integrated into the frame or placed on a rear rack. The battery's voltage and capacity are crucial, as higher values translate to a longer range. Lithium-ion (Li-ion) batteries are commonly used due to their low weight and long lifespan. Regular charging is vital to extend battery life.
The e-bike's electrical components communicate via a control unit that processes data from various sensors to regulate the electric motor's power. The control panel provides information on battery status, support level, and remaining range, along with time, speed, and distance traveled. The motor activates when the rider pedals, a motion detected by a special sensor in the pedal center. This means the rider must still pedal, with the motor providing assistance. The pedal sensor, either magnetic or torsion-based, informs the control unit whether the rider is pedaling and at what frequency. Magnetic sensors, installed on the center axis, monitor pedaling frequency but do not activate when pedaling backward. Torsion sensors, found on more advanced bikes, detect both pedaling frequency and the force applied to the pedal, making them ideal for off-road riding where pedaling frequency varies. When more force is applied, the motor provides greater assistance; conversely, less pressure on the pedal (e.g., downhill) limits motor function, conserving battery power. The e-bike can also move at up to 6 km/h (e.g., for walking assistance) by pressing a dedicated button, without requiring pedal input.
According to European standard EN 15194-1, an electric bicycle is legally considered a normal bicycle. This means it can be ridden on cycle paths, does not require a driver's license, and a helmet is only mandatory for riders under 18 years old, though its use is recommended for all ages. Local laws and regulations regarding e-bikes may vary, so it is advisable to check these.
The e-bike system is controlled via an LED panel, which allows selection of various assistance modes from 0 to 5. Mode 0 provides no motor assistance, while modes 1-2 offer low assistance, mode 3 medium assistance, and modes 4-5 high assistance. The panel also includes a "walking assistant" function, which moves the bike at 6 km/h without pedal assistance, aiding in pushing or starting the bike. This function is not intended for continuous riding.
The battery status is indicated by LEDs on the control panel. Five lit LEDs mean 100-80% capacity, four LEDs mean 80-60%, three LEDs mean 60-40%, two LEDs mean 40-20%, and one red LED means less than 20%. This display is for reference only. If the motor runs intermittently, the battery capacity is too low, requiring the electric drive system to be switched off and the battery charged.
Before riding for the first time, it is crucial to ensure the e-bike is the correct size, as improper wheel size can affect maneuverability. The seat height should be adjusted for comfortable riding and handling, ensuring the seat tube is not pulled out beyond its maximum height groove to prevent damage and injury. The saddle's correct position is usually indicated by a scale on its skids, and the stem and handlebars should also be set to the correct height.
The e-bike is turned on by holding the MODE button for 2 seconds. The same action turns it off. If the e-bike is idle for more than 10 minutes, the system automatically shuts down. The brake lever should not be pressed when turning on the e-bike. The walking assistance function is activated by holding down the "-" button, moving the bike at 6 km/h. Releasing the button turns off this function. This feature is only for pushing the e-bike and not for riding, as using it while the rear wheel is off the ground poses an injury risk.
Assistance levels (PAS) are adjusted using the "+/-" buttons. Level "0" means no motor assistance, while "1" is minimum and "5" is maximum power. It is important not to use modes 4-5 on extreme or long inclines, especially with high loads and low speeds, as this can lead to overheating and damage to the motor.
Batteries should be stored in a dry place at room temperature, away from direct sunlight. They should not be exposed to temperatures below 10°C or above 40°C for extended periods. The battery should never be immersed in water or other liquids, stored in a humid environment, or disassembled.
For frame-integrated batteries, the button at the bottom is pressed and held for approximately 2 seconds to turn it on or off. The LED lights briefly after activation. Pressing the button again displays battery capacity: blue for 100-75%, green for 75-60%, and red for less than 60%. The diodes turn off after a short period. If the motor runs intermittently, the battery capacity is too low, requiring the electric drive system to be switched off and the battery charged.
For rear rack batteries, the red button at the bottom turns the battery on or off. The battery indicator is on top. Pressing the button shows capacity: five LEDs (four green, one red) for 100-80%; four LEDs (three green, one red) for 80-60%; three LEDs (two green, one red) for 60-40%; two LEDs (one green, one red) for 40-20%; and one red LED for less than 20%. This display is for guidance only. The battery has a temperature sensor that automatically shuts it off if it overheats due to excessive use. Once cooled, riding can resume. It is recommended to lock the battery with a key when leaving the e-bike in public places and to keep the battery keys separate. Before each ride, ensure the battery is properly seated and locked. To unlock, turn the key to the right.
When charging, connect the charger to the battery first, then to the power outlet. A red LED on the charger indicates charging has started, and a green LED indicates a full charge. Disconnect from the outlet first, then from the battery. Charging takes 5-9 hours, depending on the discharge state. Interrupting the process does not harm the battery. Charge the battery at room temperature (approx. 20°C). Charging outside the 10°C to 40°C range can severely damage the battery. Only use the charger provided with the e-bike. Using a different charger may damage the battery or other e-bike parts. Never connect a damaged charger or power cord to the power supply. Always switch off the battery and the e-bike system before charging.
The range of the e-bike is influenced by several factors:
Regular inspection of the e-bike is crucial to prevent technical problems and extend its lifespan. Qualified professionals should perform inspections, but riders can also perform visual and tactile checks before each ride. Ensure all bolts, nuts, the pedal center, and pedals are correctly tightened.
Wheels and tires: Check tire inflation against manufacturer's recommended maximum and minimum pressures. Under- or over-inflated tires can impair handling. Inspect tires for wear, bumps, or cracks, replacing them if necessary. Turn the wheels to ensure they are centered and spokes are not loose or missing. Confirm that the front and rear wheels are securely fastened.
Brakes: Verify brake function by pressing both levers and pushing the wheel forward. Brake pads should contact the rim. Adjust brakes if necessary and check cables for fraying. Brake cables, pads, and rims wear out and require regular adjustment and timely replacement.
Gear shifter and chain: Regular chain maintenance is essential for lifespan. Clean and lubricate the chain and sprockets using appropriate tools. The chain stretches over time, and its endurance depends on quality, mileage, riding style, and terrain. Regular chain replacement is necessary, and a special gauge can check its condition. A stretched or damaged chain can harm the chain wheel and pinions. When riding, select gears to minimize chain crossing. During gear changes, cables wear and stretch, requiring regular adjustment for correct shifting.
Fork: Regular maintenance is vital for proper fork function. Before each ride, inspect for cracks, wedges, abrasions, deformations, or oil leaks. Check wheel attachment and ensure cables do not restrict handlebar movement. After each ride, clean dirt from the fork, avoiding high-pressure cleaners that can force water into the duster. Lubricate dust seals and fork legs with oil specifically designed for forks. Every 20 hours of use, check the torque of fork holders and other components, and perform cleaning/inspection and oil bath replenishment/replacement. Every 100 hours, perform a complete cleaning of the fork, including dust caps and rings, oil change in the damping system, and tightening check. The fork is not designed for extreme terrain, jumps, downhill, freeride, or dirt jumps. Such use can damage the fork, void the warranty, and lead to accidents. Avoid using oils with plastic sleeves containing Teflon, as this can etch the case.
Frame: Replace bent or cracked frames immediately. Do not attempt to straighten or repair the frame yourself; consult your supplier for damaged frames.
General cleaning: Keep all components clean. When washing the e-bike with water, always remove the battery and avoid high-pressure cleaners. Dry all parts, especially electrical components, after riding. In winter, pay special attention to cleaning components from salt and moisture. Perform bike maintenance at regular intervals. Tire pressure information is on the tire's sidewall.
Wheel assembly/disassembly with engine: For transport or service, disconnect the motor connector (approx. 20 cm from the motor inlet) by gently pulling. Loosen the brake (if applicable) and shift to the smallest wheel. Remove the rubber nuts from the wheel. Loosen the engine nut with a No. 18 wrench and remove the wheel from the frame. Reassemble in reverse order, ensuring arrows on the connector face each other. Switch on the drive unit and check its functionality. When mounting the wheel, ensure it is in the correct position on the central axis of the hub, with the cable entering the motor from below to prevent water damage.
Storage: Never immerse the battery, charger, or other electrical components in water. Store the battery and e-bike in a well-ventilated, dry place, away from direct sunlight and other heat sources. The optimal storage temperature for e-bikes, especially the battery, is 20°C. Do not transport the e-bike on a car carrier in heavy rain, as high water pressure can cause damage. Use transport packaging.
Problem Solving: If the e-bike malfunctions, first try to resolve the issue yourself. Never interfere with the motor, battery, or electrical connection; visit a service center if problems persist.
Environmental Protection: Dispose of the product according to local laws and environmentally friendly practices at a scrapyard when its lifespan expires or repair is uneconomical. This protects the environment and natural resources and helps prevent negative effects on human health. Do not dispose of batteries with household waste; hand them in for recycling.
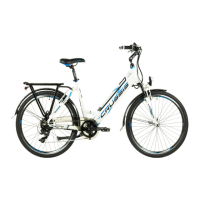
| Type | Electric City Bike |
|---|---|
| Frame Material | Aluminum |
| Gearing | Shimano Tourney |
| Max Speed | 25 km/h |
| Weight | 22 kg |
| Load Capacity | 120 kg |
| Motor | 250W |
| Battery | Li-Ion 36V |
| Battery Capacity | 468 Wh |
| Brakes | V-Brake |
| Wheel Size | 28" |
| Gears | 7 |
| Tires | KENDA |