Direct acting PRV Mod. VRCD
11
For further information please consult us at: www.comeval.es
Do not remove the nuts (17) holding the cover without having completely relieved the spring by
turning the screw (9) anticlockwise. Inattention may cause severe damages and injuries to the
personnel .
1) Disassembly
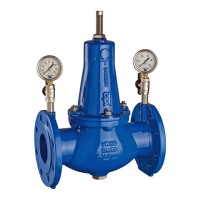
In order to carry out the proper maintenance of VRCD proceed as follows, ref drawing picture 1 on
page 7, for further info consult our technical support :
1. slowly close the upstream and downstream gate valves;
2. if the VRCD is installed in a location not suitable for maintenance, please remove it from
the pipe ;
3. turn the screw (9) anticlockwise to relief the spring (4)
4. remove the nuts holding the cover (17)) and take out the cover (2) and spring (4)
5. be sure not to loose the spring guide (7) when the spring is removed
6. push the upper piston (3) downwards
7. remove the driving tap (15), the hexagonal part of the guiding screw (11) will be visible
8. set the hexagonal part with a wrench and keep it steady while unscrewing the first nut
(6) holding the piston tight
9. push up the guiding screw (11) remove the second nut too (6)
10. pull out the upper piston (3) separating it from the lower piston (14), during this phase
make sure not to damage the o-ring (25), check the latter and replace it if necessary
11. check the lip gasket (21) for possible dirt or sign of wear , clean and replace it if
necessary
12. check the guiding ring (5) and the upper piston surface making sure no sign of ear,
scratches are present
13. pull out the lower piston (14) and check for the lip gasket (22) making sure there is no
sign of dirt, foreign materials or damages, clean or replace it if necessary.
14. remove the spacer (12)
15. drop down the remaining driving screw (11) with the obturator (20-28-29) block laying
on the bottom of the valve
16. push the driving screw (11) downwards through the hole where the tap was (15) , the
obturator block (20-28-29) remaining inside the body
17. extract the obturator block from the downstream side
18. paying attention to the o-ring (25), check it and replace if necessary
19. remove the gasket support (29) from the obturator guide (20) and check the status of
the plane gasket (28) for possible sign of cavitation, scratches, dirt. Clean and replace it
if necessary
20. check the downstream side of the reducer for possible sign of cavitation, holes
21. check the surface of the upper ring (5) , lower ring (18) and seat (19) for possible
scratches, dirt. Clean it and replace if necessary. If so make sure not to damage the
o.rings present for the water tightness of all of them.
 Loading...