Press and hold LEFT and RIHT buttons for 2 seconds or after the
replacement of battery, the unit is switched to wheel size input
mode. ultiply wheel diameter, d (Fig. 2) in millimeters by 3.1416
to determine wheel factor, c. Press the LEFT button to select digit
to be input and the RIHT button to adjust the digit to the desired
number (hold for fast advance). Press the LEFT button again to K/
ILE selection. (Note: removing battery will erase Wheel Size Input)
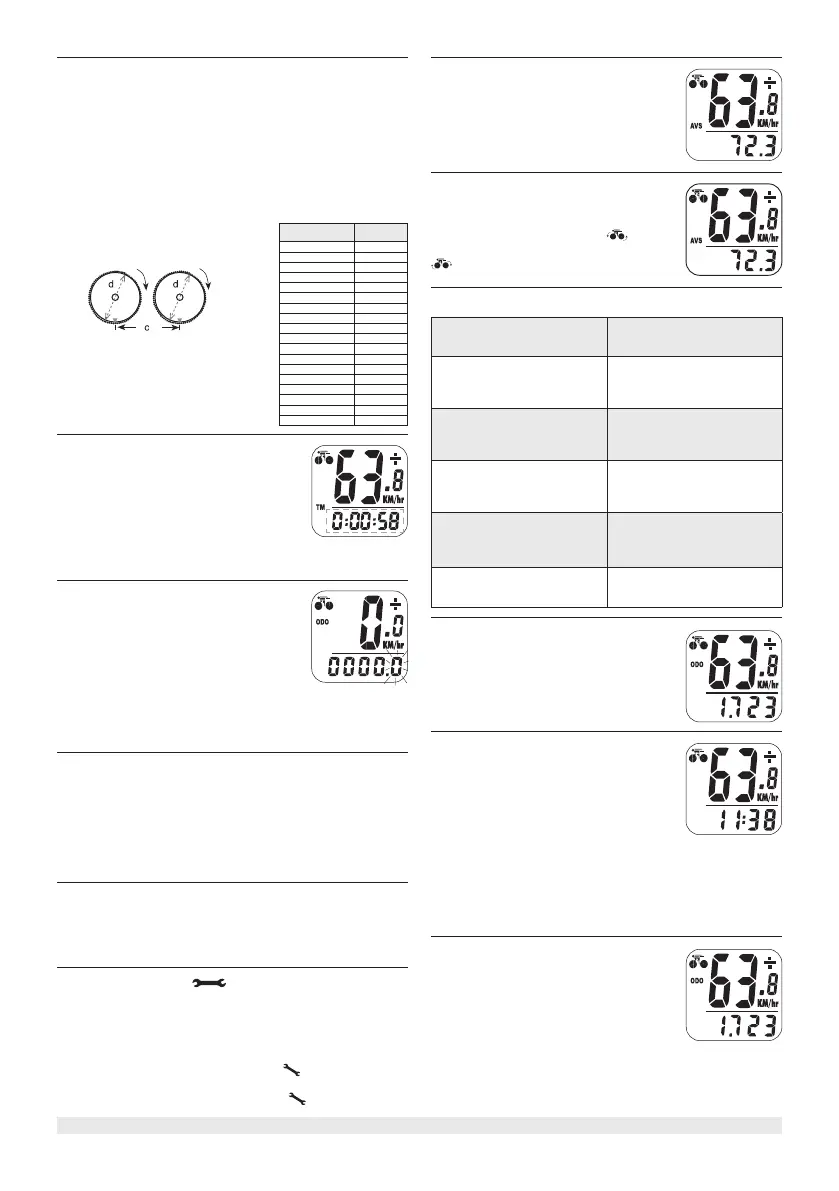
For convenience you can refer to the chat of wheel diameter
size factor inputs.
Press the LEFT button, Freeze Frame emory
can lock the display at the end of a ride seg-
ment and information T, ST and AVS which
will beflashing, can be read at a later time
by pressing the RIHT button. To release the
memory press the LEFT button until the display
digit is static again. This is paticularly useful when crossing the
finish line of a time trial, since the T cannot be stopped manually.
The SAVE function allows you to keep the im-
potant data of total distance () even af-
ter replacement of battery. To set , after
battery replacement and wheel size setting,
press RIHT button to mode and then
press and hold LEFT button for 2 seconds un-
til the last digit flickering. To adjust number,
press the RIHT button. Press the LEFT button to confirm. Repeat
above sequence to reach the desired odometer value. Press the
LEFT button again to retum to normal mode.
The EL backlight can be turned on either as follows: 1. Holding the
RIHT bullon for 2 seconds, the EL light will be turned on for 8 sec-
onds and the computer will then go to fast scan mode with trip
distance, maximum speed, average speed and trip timer displayed
once. / 2. Press once on the LEFT Button, Iha EL light will ba turned on
for 4 seconds and the comuter will go to the freeze frame menory
mode as well.
After the wheel size input, the following function is selection of
kilometers or miles as the measurement for distance. Press the
RIHT button to choose between kilometer (K) and ile (), press
the LEFT button to confirm.
lt is used to remind you for the pats replacement or to lubricate
the chains and wheels after the peset distance is reached. Right
after K/ ILE selection, the preset total distance of 600km (or
miles) will flash, press the RIHT button to select between 200, 400,
600 & 800km (or miles) and press LEFT button to confirm . For ex-
ample, if 600 km is selected, the spanner ( ) will flash whenever
the tolal distance () reach 600, 1200, 1800km (or miles). Press
the LEFT button to stop flashing of spanner ( )
FI. 2
lnstantaneous Speed is indicated on the top
line. The range of measurement is from 0 to
99 K/hr ( to 99 /hr) and accuracy is ± 0.5
K/hr (/hr).
A 12 or 24-hour digital clock is indicated by the
flickering colon on the bottom line. To switch
between the 12 and 24 hour format or to ad-
just time, press the LEFT button for 2 seconds.
"24H" will stat to flicker. Use the RIHT button
to select "12H" for 12-hour format or ''24H" for
24-hour format. Press the LEFT button to confirm. Next the hour
digits will stat to flicker. Use the RIHT button to select the hour.
To change minutes, press LEFT button again. The minutes will stat
to flicker. Use the RIHT button to select the minutes. Press the LEFT
button once more to retum to LK ode. Press the RIHT button
to enter mode.
Total distance travelled is indicated by
and display on the bottom line. To reset ,
press and hold LEFT and RIHT buttons for
2 seconds or remove the battery. Press the
RIHT button to enter ST mode.
A "+" or"-" sign appears to the right of the
speed. "+" indicates you are travelling faster
than your average speed (AVS). A "-" indicates
you are riding slower than your average speed.
A cyclist symbol appears to the left of the
speed. The wheel turns forward ( ), to indi-
cate acceleration. The wheel turns backward (
) to indicate deceleration.
distance in millimeter per one turn
WHEEL
IAETER
WHEEL
FATR
20' 1596
22' 1759
24" 1916
26" (650A) 2073
26.5" (tubulaire) 2117
26.6" (700×25) 2124
26.8" {700×28) 2136
27" (700×32) 2155
28" (700B) 2237
(w/tire)
ATB 24"x1.75 1888
ATB 26"x1.4 1995
ATB 26"x1.5 2030
ATB 26"x1.75 2045
ATB 26"x2 (650B) 2099
27"x1 2136
21"x1 1/4 2155
lnaccurate maximum
speed reading
Unknown atmospheric
or RF inteference
No speedometer reading
lmproper magne/transmitter
alignment. heck battery and
correct installation
Slow display response
Temperature outside of operat-
ing limits (0-55 ˚ )
Black display
Temperature too hot, or display
exposed to direct sunlight
too long
No trip distance
reading alignment
heck correct transmitter /
magnet. heck battery and
correct installation
isplay shows
irregular figures
Take out computer battery and
install again
 Loading...