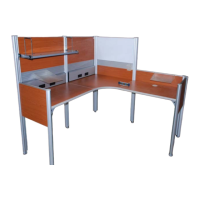
This document outlines the assembly instructions and packing list for the "CUBE in-a-box V3.series - Standard cubicle 72"W x 72"D," a ready-to-work office cubicle system. The cubicle is designed for easy assembly and provides a functional workspace.
Function Description:
The CUBE in-a-box V3.series is a modular office cubicle system designed to create individual or collaborative workspaces. It provides a structured environment with various panels, work surfaces, and storage options to support office tasks. The system is intended for quick and straightforward assembly, making it suitable for businesses needing flexible and efficient office solutions. The cubicle includes features for wire management, display, and organization, aiming to enhance productivity and comfort within the workspace.
Important Technical Specifications:
Dimensions:
- Overall Cubicle: 72"W x 72"D (Standard size)
Components (Packing List):
-
Posts:
- (2) Post A: End-post 37"H
- (2) Post B: 2-way 57"H
- (2) Post C: Linear 57"H
- (1) Post D: 2-way 37"H
- These posts form the structural frame of the cubicle, supporting panels and accessories at different heights.
-
Panels:
- (2) Panel 24W (1T): 24" wide, with aluminum (alu) top cap. The "T" indicates a pre-installed alu cap.
- (1) Panel 36W (3): 36" wide.
- (2) Half-panel 36W (2): 36" wide, used for lower sections of the cubicle.
- (3) Panel 36W (3T): 36" wide, with aluminum (alu) top cap.
- (3) Rail-panel 36W (5): 36" wide, designed with hooks facing up to hold paper and pencil trays.
- (2) Raceway-panel 36W (4): 36" wide, designed for wire management.
- (1) Whiteboard 36W (6T): 36" wide, with aluminum (alu) top cap, serving as a marker board.
- Panels come in various widths and heights to create different configurations and functionalities within the cubicle.
-
Caps and Fillers:
- (3) 2-way metal-cap and (3) 2-way plastic cap: For 2-way posts.
- (2) Linear metal-cap and (2) Linear plastic-cap: For linear posts.
- (2) End-post metal-cap and (2) End-post plastic cap: For end posts.
- (2) Filler for post: Used to hide empty spaces at the ends of posts B and C.
- These caps provide a finished look and protect the top of the posts.
-
Work Surfaces:
- (2) Laminated work top 36W: 36" wide laminated work surfaces.
- (1) Corner top 36W x 36W: A corner work surface for L-shaped configurations.
- These provide the primary desk space within the cubicle.
-
Storage and Accessories:
- (5) Bracket: Used for supporting worktops and other components.
- (2) Cantilever: Used for supporting worktops, specifically on linear posts C.
- (1) Shelf 36W with (2) shelf-support and (2) book-holder: A 36" wide shelf with supports and book holders for overhead storage.
- (1) Pencil box: For small item storage.
- (2) Paper tray for rail tiles: Designed to hang on rail-panels for paper organization.
- These components enhance the functionality and organization of the workspace.
-
Hardware:
- ALL SCREWS INCLUDED: The system comes with all necessary screws for assembly, including big chromed-screws for brackets/cantilevers and shelf-supports, and flat self-tapping metal-screws for metal caps. Black wood-screws are used for securing worktops.
Usage Features:
- Modular Design: The cubicle system is highly modular, allowing for flexible configurations to suit different office layouts and needs.
- Easy Assembly: The "in-a-box" concept emphasizes ease of assembly, with clear step-by-step instructions provided. No specialized tools are required beyond a rubber hammer, a leveler, and a screwdriver (an electric drill is optional for worktop installation).
- Wire Management: Raceway-panels (4) are integrated into the design to facilitate organized cable routing, keeping the workspace tidy and safe. Two wire-guides are included and can be adjusted into posts, preferably under worktop level, for further cable management.
- Display and Organization: Rail-panels (5) are designed with hooks to hold paper and pencil trays, offering convenient access to frequently used items. A whiteboard panel (6T) provides a surface for notes and collaboration.
- Adjustable Components: Shelf-supports and worktops can be adjusted to the desired height, allowing users to customize their workspace ergonomics. Brackets and cantilevers are adjusted to a marked level (dot) on each post for consistent alignment.
- Durable Construction: Panels with aluminum top caps (indicated by "T") suggest enhanced durability and a professional finish. Metal and plastic caps for posts provide protection and a clean aesthetic.
- Integrated Storage: The system includes a shelf with book holders, a pencil box, and paper trays, providing various storage solutions to keep the workspace organized.
Maintenance Features:
- Robust Materials: The use of laminated worktops, aluminum top caps, and metal/plastic post caps suggests materials chosen for durability and ease of cleaning.
- Component Replacement: The modular nature of the system implies that individual components could potentially be replaced if damaged, extending the lifespan of the cubicle.
- Simple Cleaning: Laminated surfaces and metal components are generally easy to wipe clean with standard office cleaning supplies.
- Included Hardware: All necessary screws are included, simplifying initial assembly and potentially future adjustments or minor repairs.
Assembly Process Overview:
- Unpacking and Inventory: Verify all parts against the packing list.
- Initial Post and Panel Setup: Slide panel 1T between End-post A and 2-way post B. Slide half-panel 2 between post B and linear-post C.
- Expanding the Structure: Continue sliding half-panel 2 between post C and a second 2-way post B. Slide panel 3 between 2-way post B and a second linear-post C.
- Completing the Frame: Slide panel 3T between linear-post C and 2-way post D. Slide another panel 1T between 2-way post D and the other End-post A.
- Securing Panels: Use a rubber hammer to ensure all panels are fully seated and pushed down into the posts.
- Raceway Installation: Slide raceway-panels 4 on top of the half-panels 2 for wire management.
- Rail-Panel Installation: Install rail-panels 5 on top of the raceway-panels, ensuring hooks face up for accessories.
- Upper Panel Installation: Slide panels 3T on top of the rail-panels 5.
- Whiteboard Installation: Slide whiteboard-panel 6T on top of the last rail-panel 5.
- Wire Guide Assembly: Assemble and slide wire-guides into posts where needed, ideally below worktop level.
- Bracket and Cantilever Assembly: Assemble brackets and cantilevers using big chromed-screws.
- Adjusting Supports: Adjust brackets and cantilevers to the marked level (dot) on each post. Cantilevers are specifically for linear posts C, while brackets are used on all other posts.
- Finalizing Supports: Repeat the adjustment and tightening process for all brackets and cantilevers.
- Post Fillers: Insert fillers into the empty spaces at the ends of posts B and C.
- Raceway Caps: Display raceway-caps by adjusting them into the black plastic molded piece at the bottom and pressing them into the frame at the top.
- Worktop Installation: Use a leveler to adjust worktops and brackets. Secure worktops from underneath using black wood-screws (an electric drill can be used).
- Shelf Assembly: Assemble shelf-supports with big chromed-screws and slide them into posts at the desired height.
- Shelf Display: Display the shelf on top of the supports, pushing it vertically into the black plastic brackets.
- Accessory Placement: Push the shelf against the panel. Display book-holders as per the holes. Adjust shelf-support height with a leveler.
- Post Caps: Place metal-caps on top of each post and tighten with flat self-tapping metal-screws.
- Finishing Touches: Place magnet plastic-caps on top of each post and the grommet-cap on the work-top hole.
The CUBE in-a-box V3.series offers a comprehensive and user-friendly solution for creating functional and organized office cubicles, emphasizing ease of assembly and practical features for modern workspaces.