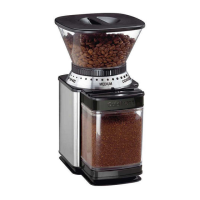
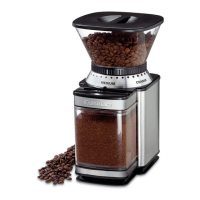
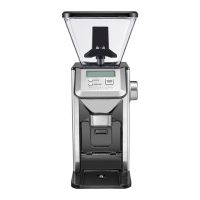
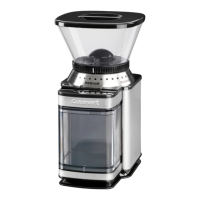
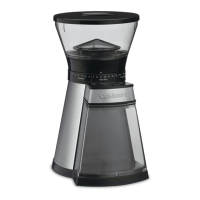
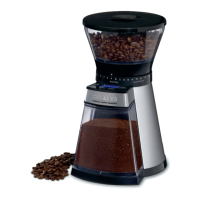
1. Hopper Lid
2. Bean Hopper
3. Burr Grinding Plates
(not shown)
4. Grind Selector
5. Power Bar
6. Slide Dial
7. Housing Base
8. Grind Chamber
9. Grind Release Area
(not shown)
10. Cord Storage
11. BPA Free
(not shown)
SAVE THESE INSTRUCTIONS
FOR HOUSEHOLD USE ONLY
NOTICE:
This appliance has a polarized plug (one blade is wider than the
other). To reduce the risk of electric shock, this plug will fit in a
polarized outlet only one way. If the plug does not fit fully in the
outlet, reverse the plug. If it still does not fit, contact a qualified
electrician. Do not modify the plug in any way.
OPERATING INSTRUCTIONS:
1. Remove Bean Hopper lid.
2. Fill Bean Hopper to top, making sure that the lid closes
securely. [Max fill is 8 ounces (227 g)].
3. Plug Cord into outlet.
4. Set Grind Selector. Note: Use coarse grind for percolator/
French press, medium grind for automatic drip, and fine grind
for espresso.
5. Position Slide Dial to desired number of cups: 4 - 18. (590 ml
- 2.6 L) Take into account that, based on personal preference,
you can make your coffee stronger or weaker by adjusting
cup selection.
6. Press and release Power Bar to begin grinding.
Please note: A safety feature of the grinder does not allow it
to operate unless the hopper and grind chamber are properly
in place.
7. Grinding will automatically stop upon completion.
8. To manually stop the operation, slide the Slide Dial all the way
to the left to the “OFF” position and the unit will stop. To
restart, repeat steps 5 & 6 above.
9. Remove Grind Chamber, make coffee, and enjoy!
Please note: If the grind chamber is over filled the chute can get
clogged and the unit will not work. To unclog, use the scoop brush
to clear out the chute of excess grounds. Should the grinder stop
at any point, the motor has likely overheated. Wait for your grinder
to cool off (up to 30 minutes) then resume use.