EasyManua.ls Logo

Cuisinart Juice Fusion User Manual

Cuisinart Juice Fusion
2 pages
To Next Page IconTo Next Page
Page #1 background imageLoading...
Page #1 background image
PG-39291-ESP ©2020 Cuisinart
ASSEMBLY INSTRUCTIONS
MORE JUICE minus the mess.
Juice Fusion EasyClean Slow Juicer
QUICK REFERENCE GUIDE
BEFORE FIRST USE
OPERATING INSTRUCTIONS
Remove all packing materials and any promotional labels or stickers from your Cuisinart
®
Slow Juicer.
Be sure all parts (listed in Parts and Features) of your new appliance have been included before
discarding any packing materials.
You may want to keep the box and packing materials for use at a later date.
Before using your Cuisinart
®
Slow Juicer for the rst time, remove any dust from shipping by wiping
the base with a damp cloth.
Thoroughly clean cover, pusher, feed tube with hopper, pulp container, juice container and plastic
juice strainer assembly by hand or on top rack of dishwasher.
Never place the motor housing in the dishwasher or immerse it in water. Always use a damp cloth to
wipe it clean.
1. Make sure your Slow Juicer is properly assembled. (See Assembly Instructions, below.)
2. Plug the power cord into a 120V electrical outlet.
3. Wash all selected fruits and vegetables.
4. Place fruits and vegetables into the feed tube with use of the pusher. Larger items can be added to
the feed tube by lifting the hopper cap and placing directly on the plate hopper to juice.
5. While many fruits and vegetables will not need cutting, any item with a diameter larger than 2¾
inches will need to be cut.
6. Press ON when ready to begin.
REVERSE: Use this when needing to clear the auger to avoid clogging of the juicing area.
7. The juice will ow into the juice container and the pulp will accumulate in the pulp container.
8. When nished juicing, press the STOP switch to stop the motor.
9. If the machine suddenly shuts down while operating, press the STOP switch rst and then press
the REVERSE button. To make the food in the auger come up, release and then press the ON
switch. Repeat 3 times.
a) When the machine is in reverse, gently press the lid to prevent the lid from becoming loose.
b) If the machine is still not working, disassemble it and then wash before trying again.
1
Place motor base
on a clean, flat
surface. Make
sure the motor base is
unplugged from the
power outlet (not
shown).
2
Close the pulp
spout. Cap will
be securely
closed when you hear
a click.
3
Coloque el
recolector de
jugo, alineando
las columnas fijas
en el recipiente
para jugo.
4
Inserte el
recolector de
jugo en el punto
fijo de la carcasa.
5
Coloque el
colador de jugo
interno en el
colador de jugo
externo (juntos, esto
se conoce como el
conjunto colador).
6
Coloque el
conjunto
colador en el
recolector de
jugo, presionando
firmemente las
orillas del filtro
hasta que quede
firme en su sitio.
7
Coloque la
barrena en el
conjunto colador,
presionando
firmemente hacia
abajo hasta que
quede firmemente en
su puesto.
8
Coloque la tapa
sobre el
recolector de
jugo. Alinea la flecha
en la tapa con el
símbolo de candado
abierto en el bol. La
tapa debe estar
asentada
uniformemente en el
recolector de jugo.
Gire la tapa en
sentido horario hasta
que se bloquee.
9
Coloque el
recipiente para
jugo en el centro
delantero de la unidad y
coloque el recolector
de pulpa en el centro
delantero del surtidor
de pulpa.
10
Introduzca el
empujador
en la boca de
alimentación,
alineando las
muescas en el
empujador con la
pequeña ranura en el
interior de la boca de
alimentación.
IMPORTANT!
Do not discard. Read before operating your Slow Juicer.
Keep for future reference.
These helpful hints are intended to be a supplement to the
Instruction Booklet. In order to ensure proper operation
and optimum performance, please read the entire
Instruction Booklet.
Question and Answer IconNeed help?

Do you have a question about the Cuisinart Juice Fusion and is the answer not in the manual?

Cuisinart Juice Fusion Specifications

General IconGeneral
BrandCuisinart
ModelJuice Fusion
CategoryJuicer
LanguageEnglish

Summary

Important Operation and Safety Guidance

Read Before Operating Your Slow Juicer

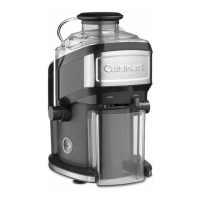
Essential operational and performance guidance for the slow juicer.

Hints Supplement Instruction Booklet

Hints supplement the main instruction booklet for optimal performance.

Before First Use Preparation

Remove Packing and Labels

Remove packing materials and promotional labels before initial use.

Retain Packaging Materials

Advised to keep original packaging for future storage or transport needs.

Clean Shipping Dust

Wipe the motor base with a damp cloth to remove shipping dust before first use.

Thoroughly Clean Removable Parts

Clean all removable parts thoroughly by hand or in the dishwasher.

Motor Housing Cleaning

Do not immerse or dishwash the motor housing; wipe clean with a damp cloth.

Operating Instructions

Ensure Proper Assembly

Ensure the slow juicer is correctly assembled before operation.

Connect Power

Connect the power cord to a standard 120V electrical outlet.

Prepare Ingredients

Prepare ingredients by washing all fruits and vegetables before juicing.

Feed Ingredients

Insert fruits and vegetables into the feed tube using the pusher.

Cut Large Items

Cut items larger than 23/4 inches in diameter before feeding into the juicer.

Start Juicing

Activate the juicer by pressing the ON switch to start the juicing process.

Use Reverse Function

Use the REVERSE function to clear the auger and prevent clogging.

Juice and Pulp Collection

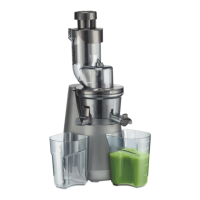
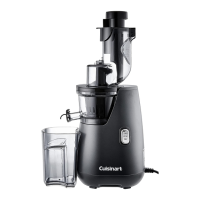
Juice collects in the container; pulp is automatically separated into its container.

Stop Juicer

Press the STOP switch to halt the motor after completing the juicing task.

Troubleshoot Sudden Shutdown

In case of shutdown, press STOP, then REVERSE, then ON to clear the auger.

Secure Lid During Reverse

Gently press the lid during reverse operation to ensure it remains secure.

Assembly Instructions

Place Motor Base

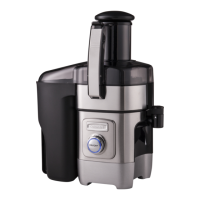
Place motor base on a clean, flat surface and ensure it is unplugged.

Close Pulp Spout

Close the pulp spout; the cap is secure when a click is heard.

Assembly Steps

Attach Juicing Bowl

Place the juicing bowl aligning fixed columns on the juice container.

Insert Juicing Bowl

Insert the juicing bowl into the fixed point of the housing.

Assemble Juice Strainer

Place inner juice strainer into outer strainer to form the assembly.

Secure Juice Strainer Assembly

Insert strainer assembly firmly into juicing bowl until it nests securely.

Insert Auger

Place the auger into the juice strainer assembly, pressing firmly.

Install and Lock Cover

Install cover, aligning arrow with unlock symbol, then twist to lock.

Position Juice and Pulp Containers

Place juice container under spout and pulp container under pulp spout.

Insert Food Pusher

Insert pusher into feed tube, aligning groove with internal indent.

Related product manuals