INSTALLATION INSTRUCTIONS
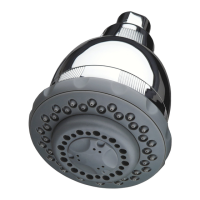
Filtered Showerhead Wall-Mount with Massage
Installs on any standard 1/2" threaded shower arm.
Functions only with shower filter car tridge in place.
1. Remove existing showerhead from shower ar m by turning
counterclockwise.
2. Clea n any debris that may b e present on the threaded
pipe.
3. Wrap include d Teflon tape tightly around
shower pipe threads.
4. Place showerhead o n shower arm and
tighten by hand, turning clockwise.
5. If additional tightening is necess ary, use a
soft cloth on the nut to protect the finish and
then tighten with a wren ch.
6. Check for leaks and tighten as needed.
CARTRIDGE CHANGE PROCEDURE
Shower Filter Replacement Cartridge
1. Hold the body of the showerhead firmly in
one hand. With other ha nd, turn the ribbed
ring behind the fac e counterclockw ise to
un sc re w.
2. Grasp white filter cartridge and pull cartridg e
up and to the side to remove.
3. Remove sticker from both sides of
new cartridge before installing. Place
new filter cartr idge into position by pushing
cartridge down into cavity u ntil seated.
4. Align threads until faceplate clicks into cavit y,
then turn entire faceplate clockwise until
secu re.
5. Check for leaks and tighten as needed. Flus h
the cartr idge for 5 minutes to remove carbon fines.
ITEMS INCLUDED
Filtered Showerhead Wall-Mount
with Massage
a. Showerhead
b. Filter Cartridge (1)
c. Teflon Tape
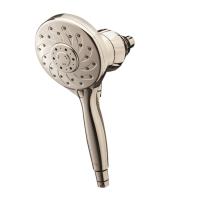
Filtered Showerhead Hand-Held
with Massage
a. Showerhead
b. Filter Cartridge (1)
c. Teflon Tape
d. Metal Hose
e. Bracket
TROUBLE-SHOOTING continued
Filtered Showerhead Wall-Mount with
Massage Flow Restrictor Removal
The flow restrictor is located in the threading
connection, under a black gasket. Remove your
showerhead from the shower arm and locate the white disk
in the connection.
Using a tweezer, small scissor or needle-nose pliers, first
remove the black gasket and reta in. Next, pop the white
disk out of its location. Note the small black O-ring un der
the white disk. The small O-ring and the w hite disk can be
discarded. Replace the large black gasket and th en re-attach
your showerhead to the shower arm, tightening and checking
for leaks according to the original installation instructions
contained in this manual.
Filtered Showerhead Hand-Held with
Massage Flow Restrictor Removal
The flow restrictor is located in the handle of
the showerhead within the hose connection.
Remove the hose from the s howerhead, retaining the large
black gasket located in the hose connection. Nex t, locate
the white disk in the han dle. Using a tweezers, small scissor
or needle-nose plier s, pop the white disk out of its lo cation.
Note the small black O-ring under the white disk. The small
O-ring and the white disk can be discarde d. Re-attach the
hose to the showerhead, tightening and checking for leaks
according to the original installation instructions contained in
this manual.
Caution: Filter must be protected against freezing which
can cause cracking of the filter and water leakage. Do not
use harsh chemic als or abrasives suc h as chlorine bleach,
cleaning fluids or ab rasive pads to clean the showerhead.
Warning: Do not use with water that is microbiologically
unsafe or of unknown quality without adequate disinfection
before or after the unit. Do not pull on showerhead or u se
showerhead or shower arm for suppor t. The contaminants
or other substances removed or reduced by this water
treatment device may not ne cessarily be in your water.
Congratulations on your purchase of a Culliga n
®
Filtered
Showerhead! A refreshing shower is something we all look
forward to every day and sometimes more than once a day.
Now that you’ll be showering in filtered water, your shower
experience will be even more enjoyable!
Here’s why:
• Chlorineisanirr itant.Yourlteredshowerheadreduc es
chlorine that may be present in your water.
• Dependingonyourwatersou rce,youmaynoticethe
odor of sulfur in your shower water. We can all agree that
the smell of “rotten eggs” is not something we hope to
experienceinou rdailyshower!Yourlteredshowerhead
reduces this odor for a fresher shower.*
• T hepatentedltermediausedinyou rlteredshowerhead
reduces the build-up of scale.*
• Yourlteredshower headhelpstopreventdr y,itchyskin
and scalp by reducing the impurities found in some water.
It also helps prevent chlorine damage to hair texture and
helps color-treated hair retain the color longer.**
• Yourshowerltercontains5spraysettingssoyoucan
enjoy the shower of your choice. Clear, filtered water
leaves you refreshed and cleaner than ever!
*As tested by KDF Fluid Treatment, Inc.
**Not tested or certified by NSF.
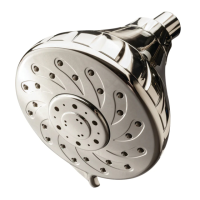
5 SPRAY SETTINGS
FILTERED SHOWERHEAD
Wall-Mount with Massage
FILTERED SHOWERHEAD
Hand-Held with Massage
SHOWER FILTER
Replacement Cartridge
Installation Guide and
Owner’s Manual
WSH-C125
HSH-C135
WS H -BN 125
HS H -B N13 5
WHR-140
(Replacement
Cartridge)
INSTALLATION INSTRUCTIONS continued
Filtered Showerhead Hand-Held with Massage
Installs on any standard 1/2" threaded shower arm.
Functions only with shower filter car tridge in place.
1. Remove existing showerhead from shower ar m by turning
counterclockwise.
2. Clea n any debris that may b e present on the threaded
pipe.
3. Wrap include d Teflon tape tightly around
shower pipe threads.
4. Place mountin g bracket on shower arm and
tighten by hand turning clockwise.
5. If additional tightening is necess ary, use a
soft cloth on the nut to protect the finish and
then tighten with a wrench.
6. Inser t one black rubb er washer (include d)
into the smaller threaded end of the shower
hose and attach hose to the mounting
bracket.
7. Insert rema ining black rubb er washer
(included) into the large r threaded end of the
shower hose and at tach to the threaded en d
of the showerhead ha ndle.
8. Position showerhead in mounting bracket,
test system for leaks and tighten fit tings as
needed.
CARTRIDGE CHANGE PROCEDURE
Shower Filter Replacement Cartridge
1. Hold the handle of the s howerhead firm ly in
one hand. With other ha nd, turn the ribbed
ring behind the fac e counterclockw ise to
un sc re w.
2. Grasp white filter cartridge and pull cartridg e
up and to the side to remove.
3. Remove sticker from both sides of
new cartridge before installing. Place
new filter cartr idge into position by pushing
cartridge down into cavity u ntil seated.
4. Align threads until faceplate clicks into cavit y,
then turn entire faceplate clockwise until secure.
5. Check for leaks and tighten as needed. Flush the cartr idge
for 5 minutes to remove carbon fines.
TROUBLE-SHOOTING
Symptom: The water flow from my filtered showerhead has
been fine but has suddenly change d and less water seems
to be flowing from the shower head.
Remedy: When water pressure drops suddenly, follow these
Filter Cartridge Back Flush Instructions: Occasionally, you
may notice reduced water flow through your shower filter.
This is normal in areas with high levels of sediment in the
water supply or if your water is supplied by private well. This
reduced flow is easily remedied.
YourShowerFilterCartridgehasalifeof10,000gallons,
estimated to be 6 months depending on household usage.
If you notice a flow reduction within this perio d of time,
open your showerh ead according to the Car tridge Change
Procedure contained in this manual.
With the showerhead open, remove the filter car tridge, rotate
the cartr idge 180 degrees and then flip th e cartri dge front
to back. Replace the car tridge in this new orientation and
then replace the faceplate and tighten. Move out of the path
ofthewaterandthentur ntheshoweron.Youmaynotice
discolored water coming f rom the showerhead for a brief
time. This is the built up sediment that was clogging the
screens in the car tridge and causing the flow reduction.
The filter car tridge is reversible a nd may be used in either
direction. Once you have comp leted this procedure, your
cartridge will continue to suppl y clear, clean water for the full
10,000 g all ons.
Symptom: Upon installation of my filtered showerhe ad, the
water pressure is not sufficient to provide adequate water
flow or a comfortable shower experience.
Remedy: In areas of low water pressu re, follow these Flow
RestrictorRemovalInstructions:Yourproductcontainsa
water-saving flow restrictor which restricts th e flow to a
maximum 2 gallons per minute (gpm). If your water flow is
below 2 gpm, you may remove the flow restr ictor easily to
improve your flow rate and enjoy a bet ter shower experien ce
by coming up to the recommended flow rate.
Culligan
®
International Company
Rosemont, IL 60018
Customer Service:
M-F 8:00am - 4:30pm CST
Phone: (800) 721-7360
Fax: (920) 457-7366
International Phone: (920) 457-2726
International Fa x: (920) 457-7366
E-Mail: customerservice@culligan.com
PERFORMANCE DATA SHEET
FILTERED SHOWERHEA D Wall-Mount with Massag e
FILTERED SHOWERHEA D Hand-Held with M assage
Replacement Car tridge Model: SH-R140
Specifications and Operational Limits
Rated service F low: 2.0 gpm (7.6 lpm)
Capacity: 10,000 gallons (38,000 liters)
Operating pressure range: 40-100 psi (280-690 kPa)
Operating temperatu re range: 40O-120OF (4O-49OC)
This system has been tested acco rding to NSF/ANSI 177 for
reduction of free available chlorine. The concentration of free
available chlorine in water entering the system was reduced
to a concentration less than or equal to the per missible limit
for water leaving the system, as specifie d in NSF/ANSI 177.
The system has not been evaluated for free available chlorine
reduction performance in the presence of chloramines. Free
available chlorine reduction performance may be impacted
by the presence of chloramines in the water suppl y. Please
contact your local water utility to determine if ch loramines are
used in treating your water.
Notes on NSF Test Protocol
Minimum chlorine reduction per NSF/ANSI 177 shall be
listed as >50% free available chlorine (FAC) when used
with an influent challenge water of 2 mg/L FAC. Average
concentrations shall be the arithmetic mean of all reported
influent challenge of product water concetrations (th e
detection limit value shall b e used for any nondetectable
concentration). The specified average percent reduction
shall not be greater than th e reduction calculated using the
arithmetic mea ns of the influent challenge and the product
water concentrations respectively.
General Installation / Operation / Maintenance
Requirements
• At tachesquicklyandeasilytothebathroomshowerpipe,
after removal of existing showerhead. Installs in minutes
with no tools required.
• Installincomplianc ewithstateandlocallaws
and regulations.
• FilterCartridgeshouldbereplace dwhenratedcapacit y
is reached or when there is a reduction of flow.
• Thissystemisnottobeusedfordrinkingwaterpurposes.
Full Body Spray
for maximum water coverage
Soft Rain Spray
for gentle water delivery
Invigorating Pulse
for an energizing muscle massage
Full Body Spray/Rain Combo
for ultimate relaxation
Full Body Spray/Pulse Combo
for all-over warmth with massage
System Tested an d Certified by NSF In terna-
tional agains t NSF/ANSI Stan dard 117 for the
reduction of f ree available chlorine.
a.
b.
c.
a.
b.
c.
d.
e.
©Culligan International Company.
All Rights Reserved.
ww w.cul lig an.com
U.S. Patent 6,599,428 B1 # 01023667/01023668 08/11