2
D-Link DWP-1010 Quick Install Guide
EN GLISH
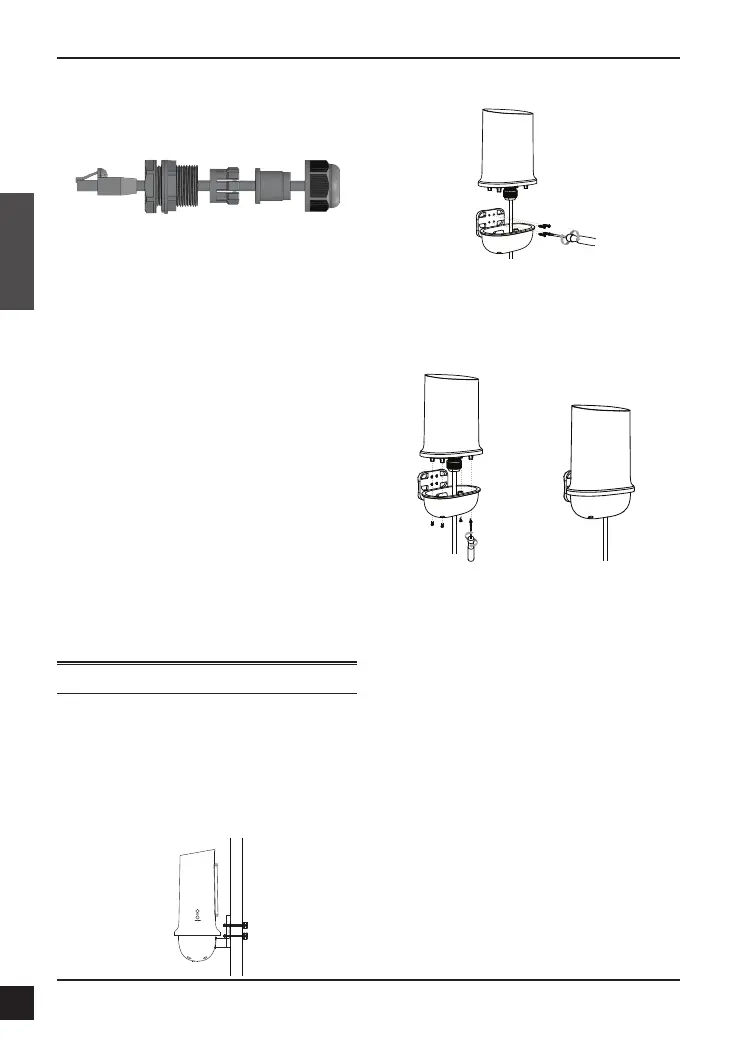
STEP 2: Connect an Ethernet
Cable to the PoE Port on the
DWP-1010
1. Separate the sealing cap and sealing insert
of the waterproof connector.
2. Insert the RJ-45 connector to the PoE port
by threading an Ethernet cable through
each in order: gland, sealing insert, and
sealing cap.
3. Place the water-resistant component back
to the DWP-1010.
4. Attach the sealing insert to the gland and
make sure the assembly is xed on the
bottom of the water-resistant component.
5. Attach the sealing cap and tighten until
snug.
6. Secure the water-resistant component with
the six (M2.5x6 mm) screws. Position it with
the aid of the arrow indicating the front
side on the bottom.
7. Thread the RJ-45 cable through the
protective base.
8. Reinstall the protective base with the four
(M3x4 mm) screws. (Skip this step if wall
mount will be used.)
Mounting
Mount the DWP-1010 to a Pole
Use two stainless clamps to attach the
DWP-1010 to a pole. Do not tighten
rmly until the site survey is completed.
(Refer to Connect the DWP-1010 to Your
Network and Conguration.) To adjust the
installation, loosen slightly and slide.
Mount the DWP-1010 to a Wall
Before xing the DWP-1010 onto a wall,
supply power to the device with the PoE
Injector (refer to Connect the DWP-1010 to
Your Network) and check the signal strength
using the LED indicators (refer to Signal
Strength).
1. Mark the mounting positions with a pencil
following the above alignment guide.
2. Drill holes on the wall no wider than the
anchor.
3. Hammer in the anchors until they are ush
with the wall.
4. Align the protective base over the holes
and secure it tightly with screws.
5. Reassemble the body of the DWP-1010
and the base. Secure them with the four
(M3x4 mm) screws.
Sealing Insert
Sealing Cap
Gland
RJ-45