EasyManua.ls Logo

Daewoo KOR-634R - User Manual

Daewoo KOR-634R
15 pages
Print Icon
To Next Page IconTo Next Page
Loading...
Before operating this oven, please read these instructions completely.
OPERATING
INSTRUCTIONS
MICROWAVE OVEN
KOR-634R
KOR-634R(¿ ) 02.5.20 2:20 PM ˘`2
Question and Answer IconNeed help?

Do you have a question about the Daewoo KOR-634R and is the answer not in the manual?

Summary

Precautions for Microwave Safety

Safe Operation Practices

Avoid operating the oven with the door open and keep sealing surfaces clean from debris.

Warning on Damaged Parts and Service

Do not operate if damaged; service must be performed by trained personnel only.

Installation Guidelines

Technical Specifications and Wiring

Wiring and Earthing Guidelines

Instructions for connecting wires according to color codes (green-yellow, blue, brown) for earthing.

Key Safety Warnings

Prohibited Usage and Storage

Do not use for non-food items, when empty, or for storage; avoid foreign materials on door.

Food Preparation and Heating Safety

Use microwave-approved popcorn, pierce membranes, avoid sealed containers, and check food temperature.

Operational Precautions

Use glass tray, remove lids, handle smoke carefully, and keep interior clean to prevent fire.

Control Panel Functions

Operation Procedures

Oven Controls

Safety and Operation Features

Care and Cleaning

Safety Interlocks and Door Maintenance

Importance of not tampering with interlocks and cleaning door seals regularly.

Door Strain and Damage Precautions

Avoid straining the door; do not operate if damaged, especially hinges or seals.

Professional Servicing

Oven adjustments or repairs should only be performed by a trained service technician.

Troubleshooting and Service

Oven Not Working Checklist

Checks for power cord, door closure, time setting, and circuit breakers if the oven doesn't work.

Sparking in Cavity Checklist

Troubleshooting steps for sparking, checking utensils and metal contact with interior walls.

Overview

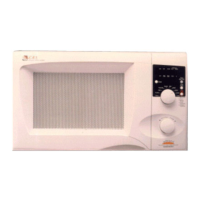
This document provides the operating instructions for the DAEWOO KOR-634R Microwave Oven. It covers essential information for safe and effective use, from initial installation to cooking procedures and maintenance.

Function Description

The DAEWOO KOR-634R is a microwave oven designed for heating, cooking, and defrosting various food items. It utilizes microwave energy, which is produced by high-frequency radio waves that are reflected from metal but pass through most cooking utensils without heating them. As these waves interact with food, they are converted into heat energy, allowing for efficient cooking.

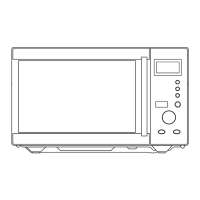
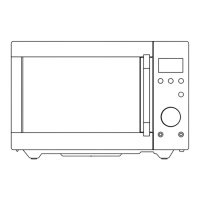
The oven features a control panel with a digital display that shows cooking time, power level, and the current time. It includes dedicated buttons for setting power levels, defrosting by weight or time, setting the clock, and accessing auto-cook programs. A dial knob allows for precise adjustment of time and weight settings. The "Start/Easy Cook" button initiates oven operation and can also be used to quickly add 30 seconds of reheating time. The "Stop/Clear" button halts operation or clears all entries.

The microwave operates on a 230V AC 50Hz single-phase power supply with earthing. It offers multiple power levels, allowing users to select the appropriate intensity for different types of food and cooking requirements. Lower power levels are recommended for delicate foods like cheese, milk, and for slow cooking meats, as they increase the cooking time.

Usage Features

Installation: The oven should be placed on a steady, flat surface, designed for countertop use. Adequate clearance around all air vents is crucial to prevent overheating and potential oven failure. To avoid interference, it should be positioned away from radio and TV sets. It should also be kept away from heating appliances and water taps to prevent adverse effects on insulation. Before operation, the oven should be examined for any damage such as a misaligned or broken door, or dents in the cavity. If any damage is visible, the oven should not be installed, and the dealer should be notified immediately. If the oven is colder than room temperature (e.g., after delivery in cold weather), it should be allowed to reach room temperature before operation. A minimum free space of 100mm above the top surface is required.

Setting the Clock: Upon plugging in, the display will flash ":0" and emit a tone. The clock can be set to either a 12-hour or 24-hour system. Pressing the "Clock" button once selects the 12-hour system, and pressing it again selects the 24-hour system. The dial knob is then used to adjust the hour, followed by another press of the "Clock" button. The dial knob is then used to adjust the minute, and a final press of the "Clock" button sets the time.

Defrosting: The oven offers two defrosting methods:

  1. Weight Defrosting: This feature simplifies defrosting by eliminating the need to guess defrosting times. Users press the "Defrost" button, and then use the dial knob to set the weight of the food (between 200g and 3000g). Pressing "Start" begins the defrosting cycle. The oven will beep during the cycle to prompt the user to turn or rearrange the food.
  2. Time Defrosting: This method allows users to set a specific defrosting time, up to 59 minutes and 00 seconds. Pressing the "Defrost" button twice, then using the dial knob to set the desired time, and finally pressing "Start" initiates the process. Similar to weight defrosting, the oven will beep to indicate when food needs to be turned or rearranged.

Cooking:

  1. One-Stage Cooking: To cook in one stage, the user presses the "Power" button to select the desired power level (e.g., three presses for P-60, which is 60% power). If the "Power" button is not pressed, the oven will cook at full power. The dial knob is then used to set the cooking time, up to 59 minutes and 00 seconds. Pressing "Start" begins the cooking process.
  2. Two-Stage Cooking: This feature allows for automatic defrosting followed by cooking. First, the "Defrost" button is pressed, and the defrosting weight is set using the dial knob. Next, the "Power" button is pressed to select the desired cooking power level, and the dial knob is used to set the cooking time. Pressing "Start" initiates the two-stage process. The oven will first defrost, then beep, and automatically proceed to cook.

Easy Cook: This function provides quick reheating for 30 seconds at 100% power by simply pressing the "Easy cook" button. Repeatedly pressing this button can extend the reheating time up to 5 minutes, adding 30 seconds with each press.

Auto Cook: The "Auto cook" feature offers pre-programmed settings for common foods. Pressing the "Auto cook" button cycles through four menu options: Dinner Plate (AC-1), Soup (AC-2), Beverage (AC-3), and Fresh Vegetable (AC-4). Once a menu is selected, the dial knob is used to adjust the quantity. Pressing "Start" begins the auto-cook program. Specific instructions for each auto-cook item, such as covering food or stirring, are provided in the manual.

Child Safety Lock: To prevent unintended operation, especially by children, a child safety lock can be activated. This is done by pressing and holding the "Stop/Clear" button for 3 seconds until a beep sounds and a "Lock" indicator appears. To deactivate, the "Stop/Clear" button is pressed and held again for 3 seconds until the "Lock" indicator disappears and a beep sounds.

Stopping the Oven: The oven can be stopped during operation by pressing the "Stop/Clear" button or by opening the door. If "Stop/Clear" is pressed, the oven pauses, and cooking can be resumed by pressing "Start." Pressing "Stop/Clear" again will erase all instructions. If the door is opened, the oven automatically shuts off, and cooking can be resumed by closing the door and pressing "Start."

Cooking Utensils: Utensils must be suitable for microwave use. Glass or ceramic heat-proof dishes are excellent. China dishes and plates without metal trim can be used. Wood or straw items should only be used for short periods. Aluminum foil can be used in very small pieces for shielding, but must be at least 2.5cm from oven walls. Most heat-resistant plastic dinnerware is suitable, but polyethylene, melamine, and phenol are not. Wax paper can be used as a cover. Metal utensils should generally not be used as they cause sparking.

Maintenance Features

Care and Cleaning: Regular cleaning is essential for maintaining the oven's performance and safety.

  • It is crucial not to tamper with safety interlocks.
  • The sealing surfaces between the oven front face and the door should be kept clean. Residue accumulation can lead to microwave energy leakage. These areas should be wiped frequently with a mild detergent, rinsed, and dried. Abrasive powders or pads should never be used.
  • The oven door should not be subjected to strain when open (e.g., a child hanging on it), as this can cause injury and damage the door. If the door is damaged (bent, broken hinges/latches, or damaged seals), the oven should not be operated until repaired by a trained service technician.
  • The waveguide cover must be kept clean at all times. The oven interior should be wiped with a soft damp cloth after each use. Grease or fat left in the cavity can overheat, smoke, or even catch fire during subsequent use.
  • The oven should not be adjusted or repaired by anyone other than a properly trained service technician.

Troubleshooting (Before Calling for Service):

  • If the oven doesn't work, check if the power cord is securely plugged in, the door is firmly closed, the cooking time is set, and if there's a blown circuit fuse or tripped main circuit breaker.
  • If sparking occurs in the cavity, check that metal containers or dishes with metal trim are not being used, and that metal skewers or foil do not touch the interior walls.

Common Questions and Answers:

  • Running the oven empty for a short time will not damage it, but is not recommended.
  • The glass tray and roller guide must always be in place during cooking.
  • Opening the door during operation instantly switches off microwave energy, and the time setting is retained until the door is closed and "Start" is touched.
  • Moisture inside the oven after cooking is normal, caused by steam from food hitting the cool oven surface.
  • Microwave energy does not pass through the viewing screen in the door; the metal screen reflects the energy back into the cavity, and the holes allow light to pass through without letting microwave energy escape.

Daewoo KOR-634R Specifications

General IconGeneral
TypeSolo
Control TypeMechanical
Weight12 kg
TurntableYes
Frequency50 Hz
Capacity23 L

Related product manuals