This document is an operation manual for a Daikin Wireless Remote Controller Kit, specifically for models BRC4C61, BRC4C62, BRC4C63, and BRC4C64. It provides instructions on how to use the wireless remote controller for Daikin air conditioners, emphasizing the importance of reading it carefully for proper usage and troubleshooting. The manual also advises consulting the operation manuals for the indoor and outdoor units for comprehensive safety and maintenance information.
Function Description
The Daikin Wireless Remote Controller Kit allows users to control various functions of their Daikin air conditioner wirelessly. It serves as the primary interface for operating the air conditioning system, enabling users to adjust settings such as operation mode, temperature, fan speed, and air flow direction. The remote controller transmits signals to the indoor unit, which then executes the commands.
The remote controller supports several operation modes:
- Cooling Operation: Used to cool the room to a desired temperature.
- Heating Operation: Used to warm the room to a desired temperature.
- Automatic Operation: In this mode, the system automatically selects between cooling and heating based on the present indoor temperature. This feature is typically available with Heat Recovery systems.
- Fan Operation: Allows the user to operate only the fan, circulating air without heating or cooling.
- Program Dry Operation: Designed to decrease humidity in the room with minimal temperature reduction. The microcomputer automatically determines the optimal temperature and fan speed for this mode. This operation will not start if the room temperature is below 16°C.
The remote controller also includes a Program Timer Operation function, allowing users to set specific start and/or stop times for the air conditioner up to 72 hours in advance. This feature provides convenience and energy savings by automating the system's operation.
For systems with multiple indoor units or specific configurations (Group Control System or Two Remote Controller Control System), the manual outlines how to designate a "master" remote controller, which has the ability to select heating, cooling, or automatic operation. Slave controllers in such systems have more limited control options.
An Emergency Operation Switch is provided on the main unit for situations where the remote controller is not working due to battery failure or other issues. This switch allows basic operation of the air conditioner in its previous mode, with previously set air flow direction and rate.
Usage Features
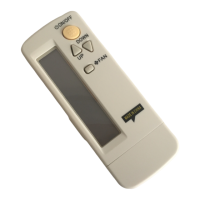
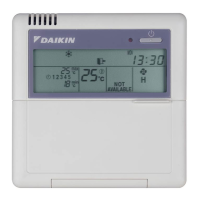
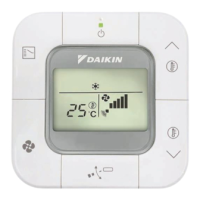
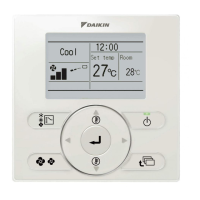
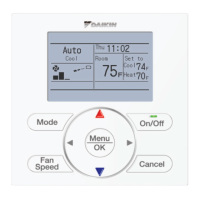
The remote controller is designed for ease of use with clearly labeled buttons and a digital display.
Basic Operation:
- ON/OFF Button: Starts or stops the air conditioning system.
- Operation Mode Selector Button: Cycles through available operation modes (Cooling, Heating, Automatic, Fan, Program Dry). For systems with a separate COOL/HEAT CHANGEOVER REMOTE CONTROL SWITCH, this switch is used to select between cooling and heating, while the mode selector button refines the operation within those categories.
- Temperature Setting Buttons (UP/DOWN): Adjusts the desired room temperature in 1°C increments.
- Fan Speed Control Button: Selects between high or low fan speeds.
- Air Flow Direction Adjust Button (BRC4C61, 63 only): Adjusts the up/down angle of the air flow. It can be set for continuous variation (automatic swing) or fixed at a desired direction. The display shows " " for automatic swing and vanishes when a fixed direction is selected.
Timer Operation:
- Timer Mode Start/Stop Button: Selects the timer mode for programming start or stop times.
- Programming Timer Button: Used to set the specific start or stop times, advancing or going backward by 1 hour with each press.
- Timer Reserve/Cancel Button: Confirms the timer settings or cancels a programmed timer.
Remote Controller Handling:
- Transmission: The remote controller must be directed towards the receiving part of the air conditioner. Obstructions like curtains can block the signal. A short beep from the receiver indicates successful transmission.
- Distance: The effective transmitting distance is approximately 7 meters.
- Installation: The remote controller comes with a holder that can be installed on a wall or pillar using an attached screw.
- Battery Installation: Two LR03 dry cell batteries are required. The back cover slides off for battery insertion, ensuring correct (+) and (-) alignment.
Important Notes for Usage:
- Initial Power-Up: After turning on the main power switch, wait 6 hours before operating the unit to protect it.
- Power Interruption: If the main power supply is turned off during operation, the system will automatically restart once power is restored.
- Automatic Operation Temperature Shift: In automatic mode, the setting temperature shifts to "H" (higher) or "L" (lower) with each button press.
- Heating Operation Considerations: Heating capacity decreases as outdoor air temperature drops. It takes some time for the room to warm up after starting heating. The internal fan may operate at low speed until a certain indoor temperature is reached. Using a circulator is recommended if hot air accumulates near the ceiling.
- Defrost Operation: During heating, if frost builds up on the outdoor unit coil, the system enters defrost operation. The fan stops, and the DEFROST lamp on the indoor unit lights up. After 6-10 minutes, heating resumes.
Maintenance Features
The manual provides guidance on maintaining the remote controller and understanding system indicators.
Remote Controller Maintenance:
- Battery Replacement: Batteries typically last about a year under normal use. They should be replaced when the indoor unit does not respond, responds slowly, or the display becomes dim. All batteries should be replaced at the same time, and new and old batteries should not be mixed. For long periods of non-use, batteries should be removed to prevent leakage.
- Cleaning: The manual does not explicitly detail cleaning the remote controller, but general care suggests keeping it free from dust and moisture.
System Indicators and Troubleshooting:
- Filter Sign Reset Button: After cleaning and reinstalling the air filter in the indoor unit, this button on the remote controller should be pressed to turn off the air filter cleaning time indicator lamp on the receiver.
- Operating Indicator Lamp (Red): Stays lit during operation and flashes when the unit is in trouble.
- Timer Indicator Lamp (Green): Stays lit when a timer is set.
- Air Filter Cleaning Time Indicator Lamp (Red): Lights up when it's time to clean the air filter.
- Defrost Lamp (Orange): Lights up when defrosting operation starts during heating.
Troubleshooting Malfunctions:
- Emergency Stop: If the air conditioner stops in emergency and the run lamp blinks, the remote controller can be used to display a malfunction code. The procedure involves pressing the INSPECTION/TEST button to enter inspection mode, then using the PROGRAMMING TIMER button to cycle through unit numbers and malfunction codes until a long beep indicates the correct code. This code should be provided to a dealer for faster repair.
- System Not Operating: Check if the receiver is exposed to strong light, if batteries are present and correctly installed, and if the indoor unit number matches the remote controller number.
- Insufficient Cooling/Heating: Check if the set temperature is appropriate, if the fan speed is set to low, or if the air flow angle is incorrect.
- Delayed Restart: The system may not restart immediately after pressing ON/OFF or adjusting temperature due to safety devices preventing overload. It will automatically restart after approximately 3 minutes.
- Rapid Beeping: If the reception beep repeats rapidly (3 times instead of the normal 2), it indicates that control is set to an optional centralized controller.
- Defrost Lamp at Start-up: If the defrost lamp lights up when heating starts, it's a warning against cold air being blown, not a malfunction.
- Burning Odor: If a burning odor is detected, immediately shut off power and contact the place of purchase, as this could indicate equipment damage, electric shock, or fire.
The manual emphasizes that for any issues beyond basic troubleshooting, especially those involving malfunction codes or unusual smells, the user should contact their Daikin dealer.