13
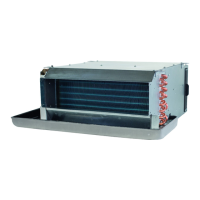
STEP 11 - Assemble the Adaptor Holder and screw the Side Panel to the Heat Exchanger.
ADAPTOR HOLDER
STEP 12 - Assemble the Drain Guide to the unit. STEP 13 - Assemble the Drain Pan. Please make sure the
Drain Pan Pipe is at the same side with the
Adaptor Holder.
STEP 14 - The changing of Heat Exchanger Pipe Direction is
completed.
STEP 10 - Then gently pull the Side Panel outwards to allow
the Hairpin side of the Heat Exchanger enter the
unit.
GENTLY PULL
OUTWARDS
MOVING
INWARDS
STEP 9 - Start assembles the Heat Exchanger back into the
unit by entering the Heat Exchanger Distributor into
the Side Panel.
WATER INLET
WATER OUTLET
 Loading...