Do you have a question about the Daikin Perfera CTXM15R2V1B and is the answer not in the manual?
Details the purpose of the document and its intended audience for future reference.
Specifies the intended users of the appliance and documentation, including experts and trained users.
Lists the components of the complete documentation set, including safety precautions and installation manuals.
Information on accessing technical data, including public and authenticated sources.
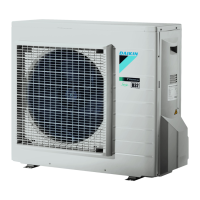
References the unit installation section, directing users to relevant details for safe installation procedures.
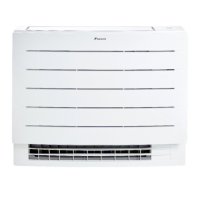
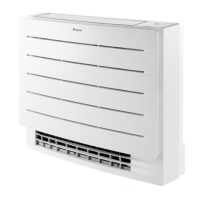
Focuses on the indoor unit and its components.
Instructions on how to remove accessories and stickers from the indoor unit packaging.
Warns about the mildly flammable nature of the refrigerant used in the unit.
Guidelines for selecting and preparing a suitable installation location for the indoor unit.
Specifies requirements for the installation site, including sound pressure, airflow, and drainage.
Steps to open the indoor unit for access to internal components.
Detailed instructions on how to safely remove the front panel of the indoor unit.
Procedure for opening the service cover to access internal parts of the unit.
Instructions for removing the front grille, including safety precautions.
Instructions for physically mounting the indoor unit onto the wall.
Steps for installing the mounting plate securely on the wall.
Procedure for drilling the correct size wall hole for piping and wiring.
Caution regarding wall construction and the use of embedded pipes for safety.
Notice about sealing gaps to prevent water leakage after drilling.
Instructions for removing the pipe port cover to allow for piping connections.
Warning against using nippers to remove the pipe port cover to avoid damage.
Guidance on connecting the drain hose for proper water evacuation.
Detailed steps for connecting drain piping to the right side, back, or bottom of the unit.
Information about default piping configuration and how to switch sides.
Instructions for connecting drain piping to the left side, back, or bottom of the unit.
Information on the default right-side piping and how to switch to left-side configuration.
Caution against applying oil to the drain plug to prevent deterioration.
Procedure to test the drain system for any leaks after installation.
Steps and requirements for preparing the refrigerant pipes before connection.
Specifies material, diameter, and thickness requirements for refrigerant piping.
Notice regarding piping materials and foreign material limits.
Table detailing recommended pipe diameters for different unit classes.
Details the required material and connections for refrigerant piping.
Specifies temper grade and thickness requirements for piping based on diameter.
Guidance on selecting and applying insulation material for refrigerant piping.
Instructions for connecting the refrigerant pipes to the indoor and outdoor units.
Safety warning concerning the risk of burns or scalding during piping connection.
Detailed steps for connecting refrigerant pipes to the indoor unit, including insulation.
Reiteration of the warning about the mildly flammable nature of the refrigerant.
Notice to ensure all refrigerant piping is insulated to prevent condensation.
Details specifications for the interconnection cable used between indoor and outdoor units.
Step-by-step instructions for making electrical connections to the indoor unit.
Critical safety warning regarding the risk of electrocution during electrical work.
General safety warnings for electrical installation, including cable types and precautions.
Instructions for insulating and bundling drain, refrigerant, and interconnection cables.
Steps for guiding pipes and hoses through the prepared wall opening.
Notices regarding bending refrigerant pipes and avoiding contact with unit frames.
Procedure for securely attaching the indoor unit to the previously installed mounting plate.
Instructions for reassembling the indoor unit after installation.
Steps to reinstall the front grille and secure it with screws.
Instructions for putting the service cover back in place and securing it.
Steps to reinstall the front panel and close the unit.
A checklist of essential items to verify before starting the unit's operation.
Notice regarding the necessity of operating with sensors and switches for compressor protection.
Instructions for conducting a test run to verify unit functionality.
Conditions and requirements that must be met before performing a test run.
Step-by-step guide on how to initiate and execute a test run via the user interface.
Information on accessing and interpreting the unit's wiring diagram.
Explanation of symbols and codes used in the unit's wiring diagram.
| Brand | Daikin |
|---|---|
| Model | Perfera CTXM15R2V1B |
| Category | Air Conditioner |
| Language | English |