EasyManuals Logo

Daikin R410A Split Series User Manual

Daikin R410A Split Series
40 pages
To Next Page IconTo Next Page
To Previous Page IconTo Previous Page
Page #17 background imageLoading...
Page #17 background image
13
English
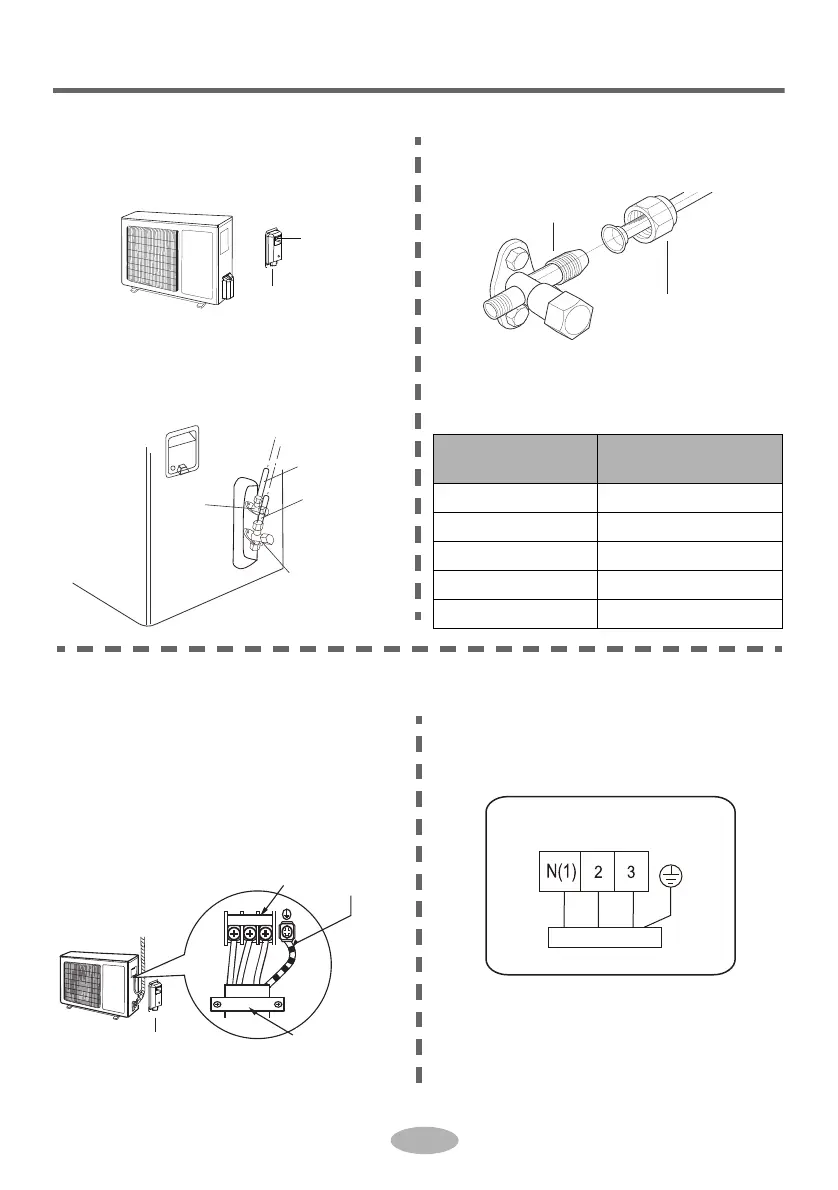
Installation of outdoor unit
Step four: connect indoor and outdoor pipes
1. Remove the screw on the right
handle of outdoor unit and then
remove the handle.
2. Remove the screw cap of valve and
aim the pipe joint at the bellmouth of
pipe.
screw
handle
gas valve
gas pipe
liquid pipe
liquid
valve
3. Pretightening the union nut with
hand.
4. Tighten the union nut with torque
wrench by referring to the sheet
below.
Hex nut diameter Tightening torque
(N·m)
Ø 6 15~20
Ø 9.52 30~40
Ø 12 40~55
Ø 16 60~65
Ø 19 70~75
yellow-
green
pipe joint
union nut
1. Remove the wire clip; connect the
power connection wire and signal
control wire (only for cooling and
heating unit) to the wiring terminal
according to the color; fix them with
screws.
2
N
(
1
)
3
wiring board
grounding
wire
wire clip
handle
Indoor unit connection
(for reference)
blue black brown
yellow-
green
Step five: connect outdoor electric wire

Other manuals for Daikin R410A Split Series

Questions and Answers:

Question and Answer IconNeed help?

Do you have a question about the Daikin R410A Split Series and is the answer not in the manual?

Daikin R410A Split Series Specifications

General IconGeneral
RefrigerantR410A
Cooling CapacityVaries by model
Heating CapacityVaries by model
Energy Efficiency Ratio (EER)Varies by model
Coefficient of Performance (COP)Varies by model
Indoor Unit Noise LevelVaries by model
Outdoor Unit Noise LevelVaries by model
Indoor Unit Dimensions (HxWxD)Varies by model
Outdoor Unit Dimensions (HxWxD)Varies by model
Indoor Unit WeightVaries by model
Outdoor Unit WeightVaries by model

Related product manuals