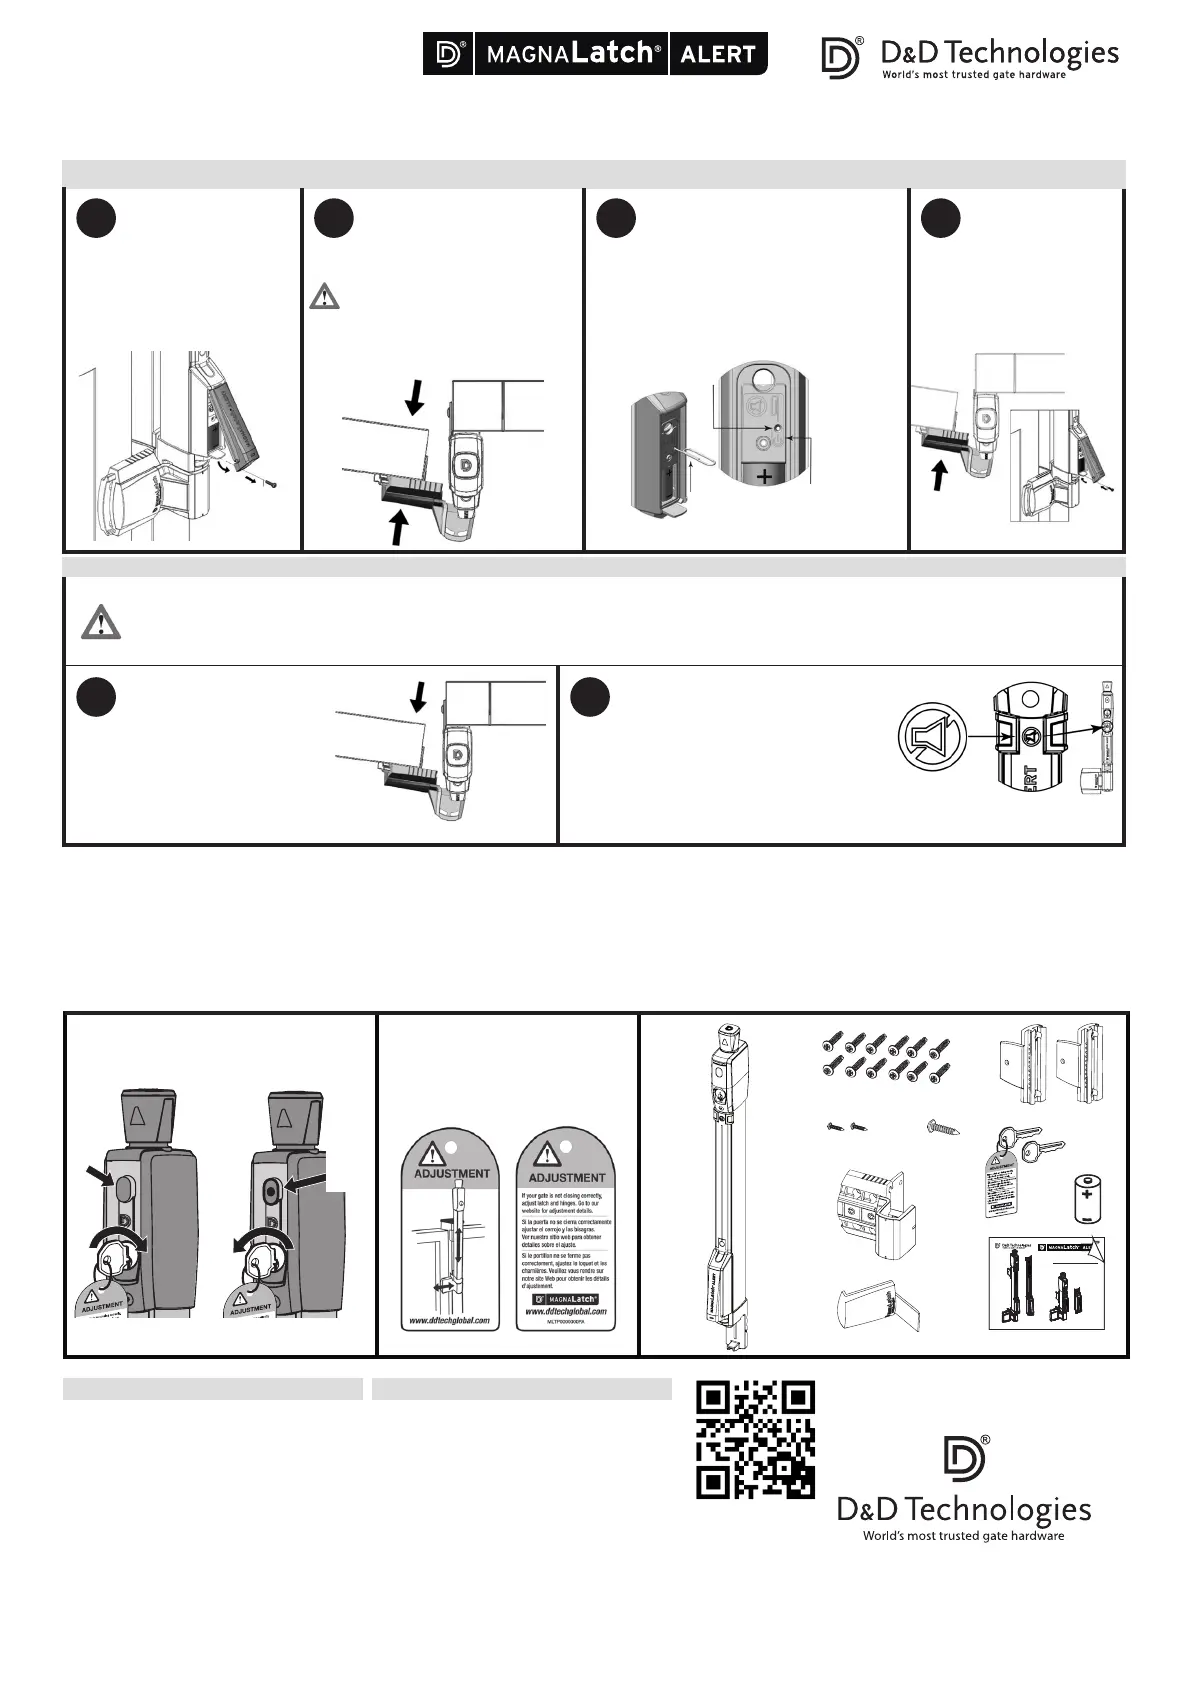
Top Pull
Remove screw and front cover
by using a #1 Phillips-head
screwdriver. Extra screw
included if lost.
Retirar el tornillo y cubierta
frontal usando un destornillador
#1 Phillips. En caso de pérdida
hay un tornillo adicional.
Open the gate. Gate must be open in
order to activate the Disarm feature.**
Abrir la puerta. La puerta debe estar
abierta para activar la función de
Desarmado.**
NOTE: The ALERT comes from the factory
with the Disarm feature de-activated.
OBSERVACIÓN: ALERTA se presenta de
fábrica con la función de Desarmado
desactivada.
Close the gate and
re-attach the front cover
with screw using a #1
Phillips-head screwdriver.
21 3 4
To temporarily disarm the ALERT for a
maximum of 15 minutes, open the
gate and hold open until the second
beep sounds.
Place finger on top of the Disarm Sensor and hold
for 5 seconds. You will then hear 4 beeps followed
by a “ramp-up” sound.
See page 12 of owner’s manual for DISARM MODE (Silence Cycle).
Ver la página 12 del manual del propietario para la MODALIDAD DESARMADO (ciclo de silencio).
21
WARNING: DO NOT disarm the ALERT on a pool or spa gate. Activating the Disarm feature and using it is the sole responsibility of the user and not the manufacturer.
STOPPING THE ALARM - Closing and latching the gate will silence the alarm.
ADVERTENCIA: NO desarmar ALERT en una piscina o puerta de spa. La activación de la función de Desarmar y su uso es exclusiva responsabilidad del usuario y no del fabricante.
PARAR LA ALARMA- El cierre y trabado de la puerta silenciará la alarma.
AUSTRALIA: Unit 6, 4-6 Aquatic Dr, Frenchs Forest NSW 2086
USA: 7731 Woodwind Drive, Huntington Beach, CA 92647
EUROPE: Niasstraat 1, 3531 WR Utrecht, The Netherlands.
www.ddtechglobal.com
ESPANIOLENGLISH
Las cercas, portones y pestillos de las piscinas no sirven como
substituto de la supervisión por parte de adultos. Si se usa este
pestillo en un portón de piscina, consulte a todas las autoridades
locales correspondientes con respecto a los requisitos de
seguridad. El pestillo funcionará debidamente sólo si se instala y
mantiene de acuerdo a estas instrucciones.
MANTENIMIENTO: RETIRAR LA LLAVE DE LA CERRADURA DESPUÉS
DE USAR. No lubricar el cerrojo con lubricantes a base de petróleo
en ningún momento; usar grato en polvo únicamente. Asegurarse
de que todos los tornillos se encuentren rmemente ajustados y
que MagnaLatch® no contenga arena, hielo ni otros desechos que
podrían impedir su funcionamiento.
Para bajar una versión en Adobe Acrobat (PDF) de nuestar
GARANTÍA DE POR VIDA limitada dirigirse a nuestro sitio web www.
ddtechglobal.com
Swimming pool fences, gates and latches cannot substitute for
adult supervision.
If using this latch on a swimming pool gate, consult all appropriate
local authorities for safety requirements.
The latch will operate properly only if installed and maintained in
accordance with these instructions.
MAINTENANCE: REMOVE KEY FROM LOCK AFTER USE. Do not
lubricate the latch with petroleum-based lubricants at any time;
use only powdered graphite. Ensure all screws are tightened firmly
and that the MagnaLatch® is kept free of sand, ice and other
debris which could impair performance.
For warranty information, see owner’s manual or go to
www.ddtechglobal.com
H
Refer to Owner’s Manual for more detailed instructions and important information about your ALERT alarm system.
Ver el Manual del propietario para las instrucciones de uso más detalladas e información importante sobre su sistema de alarma ALERT
ML3INSTR006PA • 31 08 15
• NOTE: A false sounding of a low battery (ramp down) may occur during the calibration process. If this continues, replace with new battery or contact D&D Technologies. • NOTE: Ensure battery is properly inserted with (+) symbol on top
and (-) on bottom. • NOTE: The gate must be open whenever activating or de-activating the Disarm feature and when using the disarm feature itself. • NOTE: Do not wear gloves when disarming. The Disarm Sensor is touch-sensitive to
skin only. NOTE: Closing and latching the gate at any time will re-arm the ALERT Module. • NOTE: The ALERT is now de-activated for up to 15 minutes as long as the gate is held open. After 15 minutes, or if closing the gate at any time, the
ALERT Module will re-arm itself. • NOTE: The Disarm Sensor is touch sensitive and does not require to be pushed inward. It responds to contact with your skin and will not operate when wearing gloves.
3
MagnaLatch
®
ALE R T Gate Alarm System
1 INTR ODUCT ION 4
1.1 SC OPE 4
1.2 PU R P OS E 4
2 SYS TEM DE SC RIPT I ON 4
2.1 SPEC IFIC ATIO N 4
2.2 ELECT RICAL DATA 5
2.3 EN V IRO NMEN T 5
2.4 S TANDARD S 5
3.1 AT TACH ING ALE RT TO LATCH BO DY 6
3.2 IN S TALL ATION 7
3.3 POWE RING U P 7
3.3 P OWE R ING UP - CONTINUE D 8
3.4 ACTI VATING THE DI SAR M FE ATU R E O N
ALER T - O PT IONA L 9
3.4 ACTI VATING THE DI SAR M FE ATU R E O N
ALER T - O PT IONAL (C ONT ) 10
CONTENTS
3.5 D ISA RM ING THE AL E RT TEMPO RARI LY -
OPTIO NAL 1 1
3.6 O PE R ATIONAL S E QUENC E 12
3.7 CHANG ING THE B ATTE R Y 13
3.8 D ISP OS AL OF B ATTE RI E S 1 3
3.9 ENV IRO NMEN TAL PRO TECT ION 13
4 STATEMENT S OF C OMPL IANC E 14
5 FR EQUENT LY ASK ED QUE S TIO NS 15
6 TROU B LE S HOOT ING 16
7 POOL S AFET Y I NF ORM ATIO N 17
8 CLEAN I NG & MA INTENANC E 17
9 POOL S AFET Y R E SO UR CE S 18
10 W AR RANT Y
19
CON TACT 22
For a F rench version of this manual, go to
www.ddtechglobal.com
OWNER’S MANUAL
Child Safety Gate Latch With Electronic Alarm System
MANUAL DEL PROPIETARIO
www.ddtechglobal.com
A (x1)
C (x2)
D (x12)
E (x1)
F (x1)
G (x2)
(x1)
(x1)
B (x1)H (x2)
Unlocked
Destrabado
Locked
Trabado
Red
Rojo
Key Tag supplied as reminder to
maintain proper alignment
Placa para llave suministrada para
recordar el mantenimiento de la
alineación correcta
Disarm
Sensor
OPTIONAL - ACTIVATING THE DISARM FEATURE OPTATIVO- ACTIVACIÓN DE LA FUNCIÓN DE DESARMAD
Insert a paper clip into the hole located between
the paper clip image and On/Off symbol. Press
once to activate the Disarm feature. A “ramp-up”
sound will be heard.**
Insertar un sujetapapeles en el agujero ubicado
entre la imagen del sujetapapeles y el símbolo
On/Off. Presionar una vez para activar la función
Desarmado. Se escuchará un sonido de puesta
en marcha. **
Cerrar la puerta y volver a
sujetar la cubierta frontal
con un tornillo usando un
destornillador #1 Phillips.
OPTIONAL - TEMPORARILY DISARMING THE ALARM OPTATIVO- DESARMADO PROVISORIO DE LA ALARMA
Para desarmar provisoriamente ALERT
durante un máximo de 15 minutos, abrir la
puerta y mantenerla abierta hasta el sonido
del segundo pitido (beep).
Colocar el dedo por encima del sensor de
Desarmado y sostener durante 5 segundos.
Entonces escuchará 4 pitidos seguidos por
un sonido de puesta en marcha.
• OBSERVACIÓN: Durante el proceso de calibrado podría producirse un sonido falso de batería baja (pitido bajo). Si esto continuara, reemplazar con una batería nueva o comunicarse con D&D Technologies. • OBSERVACIÓN:
Asegurarse de que la batería se encuentre correctamente insertada con el símbolo (+) en la parte superior y el (-) en la base. • OBSERVACIÓN: La puerta debe permanecer abierta cuando se activa o desactiva la función de Desarmado
y cuando se usa la función de Desarmado propiamente dicha.
• OBSERVACIÓN: No usar guantes durante el desarmado. El sensor de Desarmado es sensible al tacto si bien a la piel únicamente. • OBSERVACIÓN: El cierre y trabado de la puerta en cualquier momento volverá a armar el Módulo
de ALERT. • OBSERVACIÓN: ALERT ahora se encuentra desactivada hasta 15 minutos siempre y cuando la puerta se mantenga abierta. Después de 15 minutos, o si se cerrara la puerta en cualquier momento, el Módulo de ALERT se
volverá a armar por sí mismo. •OBSERVACIÓN: El sensor de Desarmado es sensible al tacto y no requiere ser empujado hacia adentro. Responde al contacto con su piel y no funcionará con el uso de guantes.
Disarm
Sensor
Hole
Agujero
Paper clip
Clip de papel
On/Off icon
Icono de
encendido/apagado
Scan for
installation animation
H
 Loading...