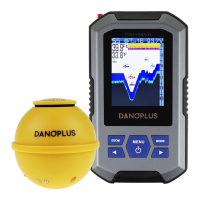
EasyManua.ls Logo

DANOPLUS DP-104 - User Manual

DANOPLUS DP-104
2 pages
Print Icon
To Next Page IconTo Next Page
Loading...
- 3 -- 2 -
FISH FINDER
User Manual
INTENDED USE
This high-quality sonar fish finder is especially designed for both professional and
novice fisherman with trouble-free use in a variety of water areas, to find out the
location of fish, and depth and bottom contour of water. It can be used in ocean,
river, or lake, and is fantastic for detecting schools of fish in any particular area.
OPERATION
Simply attach the wireless sonar sensor to the end of your fishing line and cast it
into the water as you would in a normal float or lure, then power on the main unit
and you are ready to fish. The fish finder uses sonar technology to send sound
waves from the wireless sonar sensor into the water. .
The returned “echoes” are transmitted with wireless technology to the display unit
and plotted on the LCD. New information appears on the right. As this information
moves to the left, a very accurate picture of the underwater world is created,
including the depth of underwater objects such as the bottom, fish, and structures.
WARNING!
1. Shock from the abrupt contact with rocks can damage your sensor and the
erratic readings may occur in shallow water, we recommend to use your
sensor in water deeper than 2 feet (0.7 meters) only.
2. In addition, because of the nature of sonar, this product is not intended to use
in swimming pools or small enclosed bodies of water.
Warning!
Discard the used wireless sonar sensor in compliance with local laws as you
would in any electronic component or battery. .
NOTE: When the wireless sonar sensor supplied in the set is broken and you
have to replace, the new sonar sensor need to re-code before using.
Re-code procedures as below:
.
a. Place the new wireless sonar sensor in
the water to turn on.
b. Press the button to power on the
main unit and enter the normal detection
interface (Wireless mode).
c. Press and hold the button on the main unit, wait for 4 beeps and
then release. The number at the top of the screen starts to count from
1 to 16.
d. When the number stops counting, it indicates that the re-coded is
successfully. The number that stays is the corresponding code of the main
unit and the probe, and the detection information will appear on the screen.
SCREEN DISPLAY DETAILS
SENSOR DETAILS
MAIN UNIT DETAILS
1. USING THE WIRELESS SONAR SENSOR
2. USING THE MAIN UNIT
Working indicator
(Blue LED light)
Charging port
Charging indicator
(Red LED light)
Fish attractive
lamp
Contacts
Charging indicator
(Red LED light)
Hole for fishing line
ZOOM MODE
MENU
FISH FINDER
Water Temperature
Water depth
Sensitivity
Depth upper limit
Water surface
Depth lower limit
Bottom contour
Fish icon with depth
Battery IndicatorSensor connected indicator
• Charging the wireless sonar sensor
a. Please charge the sensor first if it couldn't be turned on when it is put in the
water. The red LED light will be on when it is charging and off after being fully
charged. .
• Powering on and off the wireless sonar sensor
a. Power on: The Advanced Wireless Sonar Sensor has built-in rechargeable
lithium battery and contacts at the bottom that perceive when it is immersed in the
water. These contacts turn on the Wireless Sonar Sensor and its fish attractive
lamp, and begin transmitting the sonar information via RF to the display of main
unit. .
b. Power off: The wireless sonar sensor automatically stop working a few
seconds after being pulled out of the water. .
• Attaching the wireless sonar sensor
a. Lock the cover of the sensor after charging to prevent damage caused by water
leakage. .
b. Insert the fishing line (installed in the rod) into the hole and secure it with a
couple of knots then cast it into the water as you would in a normal float or lure.
Water
Press
and hold
number 1-16 loading
Wireless
Sensor
User mode
Wireless
MENU
ZOOM MODE
MENU
FISH FINDER
ZOOM MODE
MENU
FISH FINDER
Antenna
LCD display
Zoom Button
Mode Button
Left Arrow Button
Right Arrow Button
Power / Menu Button
ZOOM MODE
MENU
FISH FINDER
SCAN THE QR CODE
to download USER MANUAL
in different languages
Need more help?
CONTACT US.
TUTORIAL VIDEO ON HOW TO USE
- 1 -
www.danoplus.com/dp-104
Question and Answer IconNeed help?

Do you have a question about the DANOPLUS DP-104 and is the answer not in the manual?

Summary

Intended Use and Operation Overview

Screen Display Details

Details the various indicators and information displayed on the fish finder's screen.

Wireless Sonar Sensor Operation

Guides on charging, attaching, and powering the wireless sonar sensor for use.

Main Unit Operation

Covers powering the main unit on/off and selecting operating modes.

Main Unit Menu System

Sensitivity Adjustment

Sets the sensitivity level to adjust echo display and filter clutter.

Depth Limit Settings

Configures depth upper and lower limits for display portion.

Alarm and Icon Settings

Adjusts shallow alarm, fish icon display, and fish alarm.

Unit and Display Preferences

Sets measurement units, sonar color, language, and brightness.

Chart Speed Control

Adjusts the speed at which sonar information scrolls across the screen.

Maintenance Procedures

Main Unit Care

Instructions for cleaning and protecting the main unit from damage.

Wireless Sonar Sensor Care

Guidelines for rinsing, cleaning, and maintaining the sonar sensor.

Troubleshooting and Specifications

Signal Loss and Inconsistent Readings

Addresses issues like 'NO SIGNAL' and gaps in bottom readings.

Abrupt Depth Changes

Explains reasons for screen jumps and missing vertical lines.

Product Specifications

Lists technical details including power, display, frequency, and range.

Overview

This document describes a high-quality sonar fish finder designed for both professional and novice fishermen. It's intended for use in various water bodies like oceans, rivers, and lakes to locate fish, determine water depth, and identify bottom contours.

Function Description:

The device operates by attaching a wireless sonar sensor to a fishing line and casting it into the water. Once powered on, the main unit receives sonar data transmitted wirelessly from the sensor. This data, including echoes from underwater objects, fish, and structures, is then plotted on the LCD display, creating a real-time picture of the underwater environment. New information appears on the right of the screen and scrolls to the left, providing a continuous and accurate view.

Important Technical Specifications:

Main Unit:

  • Input Power: 3.7 Volt rechargeable lithium battery
  • Display Type: 2.8 inch color TFT LCD display

Wireless Sonar Sensor:

  • Power Requirement: 3.7 Volt rechargeable lithium battery
  • Sonar Operation Frequency: 125 KHz
  • Sonar Coverage: 90 degrees
  • Depth Capability: 45 meters (147 feet) / 0.7 meters (2 feet)
  • Surface Water Temperature: Built-in transducer
  • Wireless Operational Frequency: 433.92 MHz
  • Wireless Operational Range: 200 meters (656 feet)

Usage Features:

Wireless Sonar Sensor:

  • Charging: The sensor features a red LED indicator that illuminates during charging and turns off when fully charged. It's recommended to charge the sensor if it doesn't turn on when placed in water.
  • Attachment: After charging, the sensor's cover should be locked to prevent water leakage. The fishing line is then inserted into a designated hole and secured with knots before casting.
  • Power On/Off: The sensor automatically powers on when its bottom contacts are immersed in water, activating its fish attractive lamp and beginning sonar data transmission. It automatically powers off a few seconds after being pulled out of the water.
  • Re-coding (for replacement sensors): If a new wireless sonar sensor is used, it needs to be re-coded. This involves placing the new sensor in water, powering on the main unit to the normal detection interface (Wireless mode), then pressing and holding the MENU button on the main unit until 4 beeps are heard and a number from 1 to 16 counts on the screen. Once the count stops, the re-coding is successful, and detection information will appear.
  • Warning: The sensor is susceptible to damage from abrupt contact with rocks and may produce erratic readings in shallow water (less than 2 feet / 0.7 meters). It's not intended for use in swimming pools or small enclosed bodies of water.

Main Unit:

  • Power On/Off: A short press of the POWER button turns on the main unit. Pressing it for 3 seconds turns it off.
  • User Mode Selection: Upon power-on, a user mode menu appears, allowing selection between "Wireless mode" (for actual fishing) and "Simulation mode" (for learning with simulated sonar data). If no selection is made, it defaults to wireless mode.
  • Menu System: The main unit features a simple menu system accessed by pressing the MENU button. Repeated presses cycle through settings. The LEFT and RIGHT arrow buttons adjust settings. Settings are automatically saved to memory and revert to default values only when the unit is turned off.
  • Sensitivity (1-10): Adjusts the detail level of echoes displayed on the screen. Higher sensitivity shows more details, useful in clear, deep water. Lower sensitivity reduces clutter, useful in turbid water.
  • Depth Lower Limit (Auto, 1-45m) and Depth Upper Limit (Off, 1-45m): These settings define the portion of the bottom displayed. "Auto" adjusts the lower range to keep the bottom visible. Manual selection allows focusing on specific depth segments.
  • Shallow Alarm (Off, 1-45m): Sets an alarm to sound when water depth is equal to or less than the set value.
  • Fish Icon (Off or On): Toggles between displaying "raw" sonar returns and "Fish symbols." Fish symbols are generated using advanced signal processing to interpret sonar returns.
  • Fish Alarm (Off, Large, Large/Medium, All): Sets an alarm to sound for different sizes of fish detected.
  • Units (M/°C, M/°F, Ft/°C, Ft/°F): Selects preferred units for measurements.
  • Sonar Color (Blue, Yellow, Red): Chooses the display color scheme.
  • Low Battery Alarm (Off, 3.6V-4.2V): Sets an alarm to sound when the main unit's battery voltage drops to or below the set level.
  • Language: Selects the display language for menus (English, Spanish, German, Russian, Korean, Finnish, French, Bulgarian, Dutch, Greek, Czech, Portuguese, Italian, Chinese, Swedish, Danish, Hungarian, Romanian, Slovak).
  • Brightness (1-9): Adjusts the backlight brightness of the display.
  • Chart Speed (1-9): Controls how fast sonar information moves across the screen, allowing for better image clarity by matching the speed to actual conditions (stationary, drifting, or boating).

Troubleshooting:

  • "NO SIGNAL" appears: This can be due to objects obstructing the line-of-sight wireless signal, the sensor being outside its depth range (2-147 feet), reeling the sensor too fast, an imbalance causing the sensor to submerge (over 0.2 ounce), or rough water reducing the RF range (maximum 656 feet / 200 meters).
  • Gaps in bottom reading/inconsistent depth: Occurs in very shallow water (less than 2 feet / 0.7 meters), or if the sensor is too far from the main unit (over 656 feet / 200 meters), or if rough water causes the sensor to submerge.
  • Screen jumps/abrupt bottom changes/missing vertical lines: This is often due to automatic depth scale changes, where new data doesn't match historical data. Vertical lines can also appear if the radio signal is lost and regained in rough water.

Maintenance Features:

Main Unit:

  • Cleaning: If exposed to salt spray, wipe with a freshwater-dampened cloth. Avoid chemical glass cleaners on the lens to prevent cracking. Use a chamois and non-abrasive, mild cleaner for the LCD lens, avoiding wiping when dirt or grease is present to prevent scratching.
  • Storage: Never leave the unit in a closed car or trunk, as high temperatures can damage the electronics.

Wireless Sonar Sensor:

  • Cleaning: After use in salt water, wipe affected surfaces with a freshwater-dampened cloth. The contact pins at the bottom must be rinsed with fresh water to prevent corrosion.
  • Wetting: If the sensor has been out of water for a long time, it may take time to wet. Small air bubbles clinging to the surface can interfere with operation; wipe the face of the sensor with a wet cloth to remove them.
  • Storage: Never leave the sensor in a closed car or trunk, as high temperatures can damage the electronics.
  • Disposal: Discard used wireless sonar sensors in compliance with local laws for electronic components or batteries.

DANOPLUS DP-104 Specifications

General IconGeneral
BrandDANOPLUS
ModelDP-104
CategoryFish Finder
LanguageEnglish