page 7
Need information or help? Visit www.dccconcepts.com/manuals-advice OR email advice@dccconcepts.com
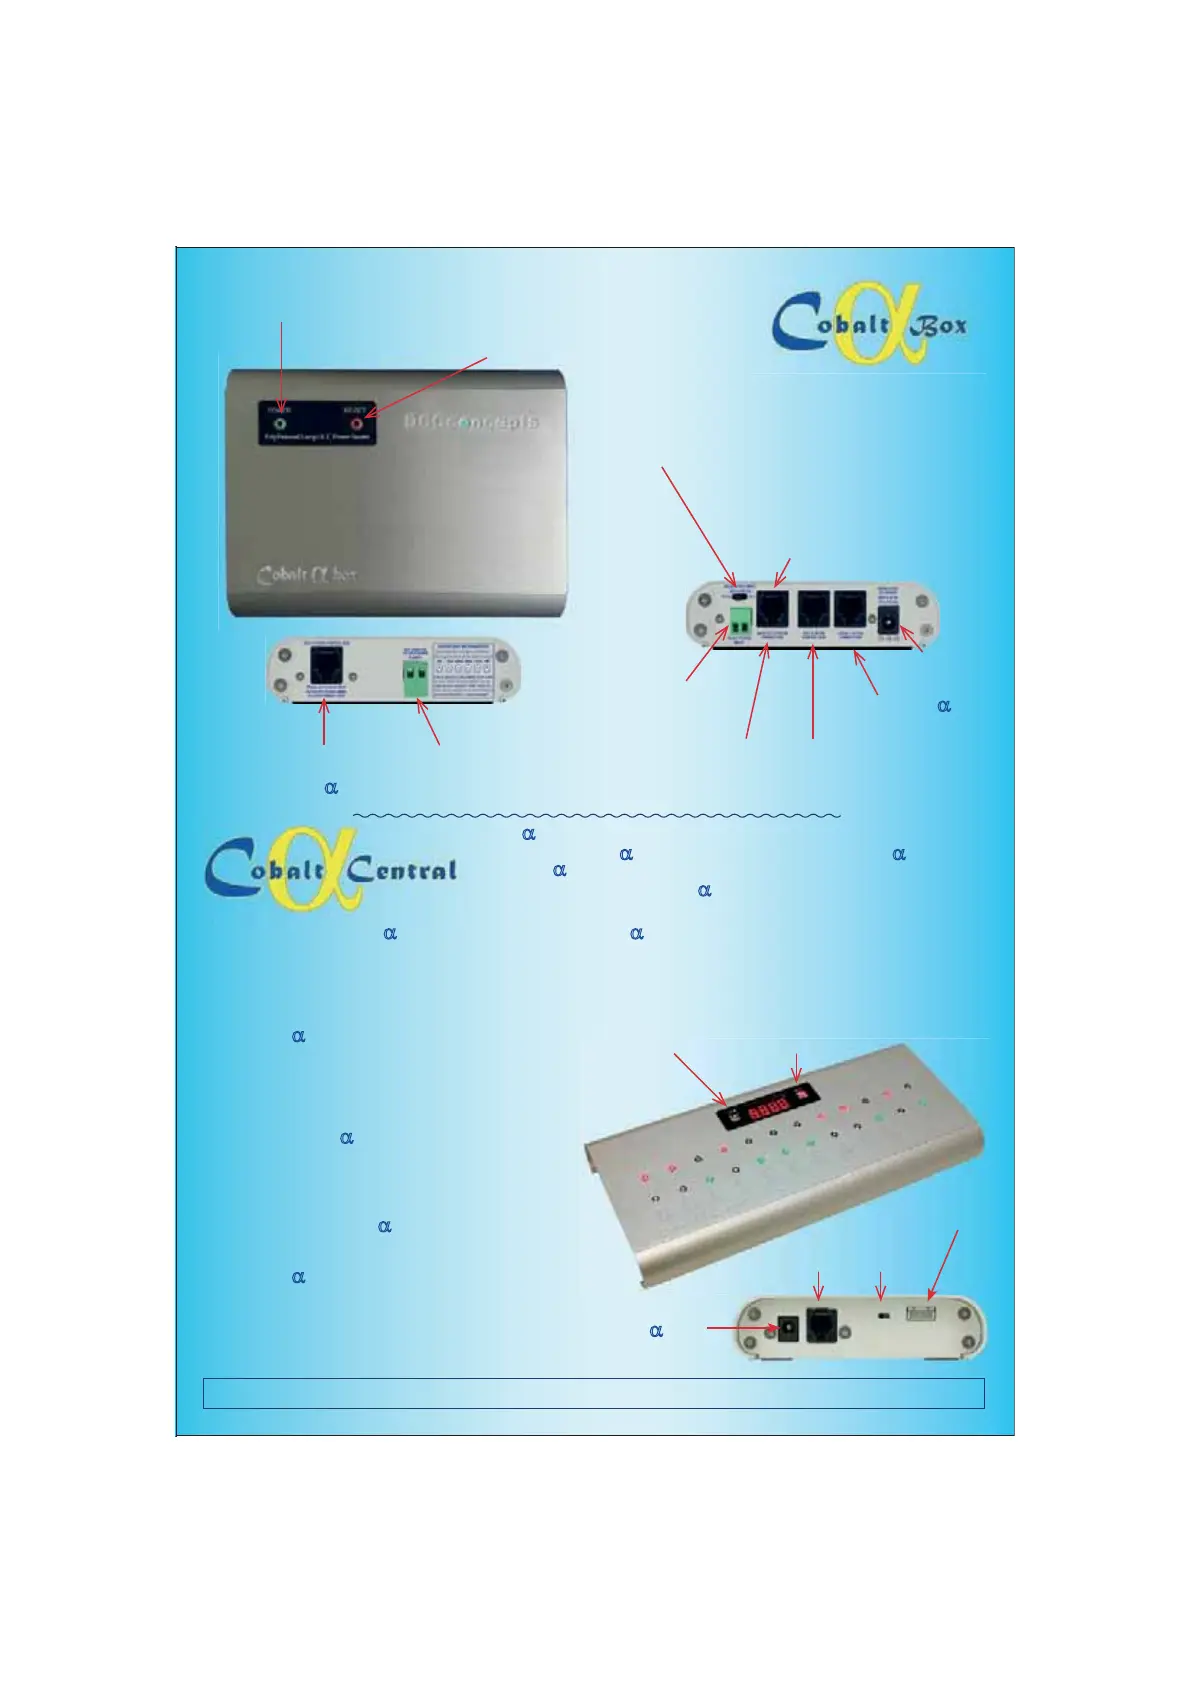
POWER SWITCH
PRESS to turn ON and OFF
RESET SWITCH.
,WZLOOOLJKWDQGÀDVKLIRYHUORDGSURWHFWLRQLV
activated. (The Alpha-Box unit will beep too)
PRESS and HOLD for 3 seconds to reset
TRACK POWER or SYSTEM BUS Selector Switch
Left position links track power outut from a DCC system,
5LJKWSRVLWLRQLVXVHGIRU1&(3RZHU&DEFRQQHFWLRQRQ¿UVW
unit or any secondary Alpha-Boxes linked from Alpha-Box #1
6HHVSHFL¿FGLDJUDPVIRUDSSURSULDWHXVHRIWKHVZLWFK
MAIN SYSTEM CONNECTION.
6-Wire RJ12 connector. For connection to
PowerCab OR secondary connection from
other brand DCC system (To be used with
the correct adapter leads only please)
Track power INPUT.
Connect track power from
ANY DCC system here.
RJ12 DCC system control Bus.
NCE bus can connect directly, all
other brands require Adapter leads
RJ12 Cobalt
D Input
Connect Alpha here
Power Input
aY'&
RJ12 CAB bus extension
NCE Cabs connect directly, other
brands DO require Adapter leads
Track power OUTPUT.
7UDFNa$FFHVVRU\3RZHUEXV
with 5 amp power, protected
RJ12 Control bus link.
Extend the DCC Control bus or
link additional Cobalt
D boxes.
7KH2Qa2II
Switch
The ACC ButtonThe CAB Button
The RJ12
Alpha Connection
Alpha DCentral looks complex, but it is very easy to set up and use.
Incorporating one Cobalt DAlpha control unit & the contents of two Alpha DSwitch-D
packs, Alpha DCentral is the simplest way to create a professional control panel ever!
Page 4 will show you a full set of Alpha
DCentral features and related information. We
have included initial connection, set-up and operating procedure here.
CONNECTION: Connect Alpha DCentral to the ALPHA input of your Alpha D box using the RJ12 curly cord that we supply. (If you are an
NCE user, you can just connect it directly to the NCE cab bus as both products use standard RS485 bus wiring conventions)
Setting the CAB bus number (Permitted range is 1 ~ 99): Alpha Central needs its own cab number as it is, in effect, the equivalent of
a DCC handset. You can set it to any cab number within the allowable range for your DC system. Please make sure the number chosen is
higher than the highest cab number already in use.
To do this, hold down the CAB button (see Image at right) as you
turn your Alpha
D &HQWUDOXQLWRQ7:2GLJLWVZLOOQRZÀDVK
Use momentary presses of the CAB button to choose which digit
will be changed. Use momentary presses of the ACC button to
change the value of the number. When you reach the number
FKRVHQKROGGRZQWKH&$%EXWWRQXQWLOWKHGLVSOD\ÀDVKHV³<(6´
The cab number is now set.
Setting multiple Alpha
D Central unit CAB numbers:,I\RX¿UVW
link them together, then ALL units will be set simultaneously.
Setting the SWITCH numbers (Permitted range is 1 ~ 2044):
The default is always 1~12, however this can be changed at any
WLPH6HWWLQJWKH¿UVWVZLWFKQXPEHUZLOOVHW$//RIWKHQXPEHUVLQ
sequence and if multiple Alpha
D Central units are connected, then
ALL switches will be renumbered by setting switch 1 on unit 1.
To do this, hold down the ACC button (see Image at right) as you
turn your Alpha
D &HQWUDOXQLWRQ)285GLJLWVZLOOQRZÀDVK
Use momentary presses of the CAB button to choose which digit
will be changed. Use momentary presses of the ACC button to
change the value of the number. When you reach the number
FKRVHQKROGGRZQWKH&$%EXWWRQXQWLOWKHGLVSOD\ÀDVKHV³<(6´
The Switching addresses of all linked units are now set.
You will need to Connect
power here if you have
more than 4
DAlpha
in series. Use a 12v DC
regulated Power Supply
The Alpha-to-Alpha
Inter-connection
 Loading...