Do you have a question about the Decorotika Adriana and is the answer not in the manual?
Information on product design, manufacturing, testing, and customer enjoyment.
Instructions to check parts, use correct connectors, and follow the manual.
Guidance on cleaning parts, managing transport damage, and environmental precautions.
Provides contact information for assembly assistance and inquiries.
Lists necessary tools for assembly, including power drills and hand tools.
Warnings against rough surfaces and recommendation for help during assembly.
Lists all furniture parts (Part1-Part6) with their respective quantities.
Lists all screws (A09, A13) and stickers (A06) with their quantities.
Attaching pieces #5 and #3 using A13 screws.
Attaching metal pieces to piece #3 using A09 screws.
Attaching piece #6 to pieces #3 and #5 using A13 screws.
Attaching piece #4 to piece #3 using A09 and A13 screws.
Attaching piece #2 and #4 to metal pieces and piece #2 using A09 and A13 screws.
Attaching piece #2 on metal pieces and piece #4 using A13 screws, then A09 screws.
Attaching metal pieces and piece #4 on piece #2 using A09 and A13 screws.
Attaching piece #1 on metal pieces and piece #4 using A09 and A13 screws.
Placing A06 stickers onto A13 screws for aesthetic enhancement.
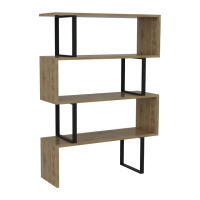
The Decorotika Adriana Bookcase is a stylish and functional piece of furniture designed for organizing and displaying various items. This assembly guide provides comprehensive instructions for setting up the bookcase, ensuring a smooth and enjoyable experience for the customer.
The Adriana Bookcase serves as a storage and display unit, ideal for books, decorative items, and other personal belongings. Its multi-tiered, open-shelf design offers versatile storage solutions, making it suitable for living rooms, studies, bedrooms, or offices. The unique, staggered shelf arrangement adds a modern aesthetic to any space while maximizing storage capacity.
The bookcase consists of several individual parts, which are assembled using specific screws and stickers. The components list includes:
The assembly hardware includes:
These specifications ensure that the customer has all the necessary components and hardware for a complete assembly.
The Adriana Bookcase is designed for straightforward assembly, with clear, step-by-step instructions. Key usage features include:
Proper maintenance ensures the longevity and aesthetic appeal of the Adriana Bookcase. Key maintenance features include:
The Decorotika Adriana Bookcase is designed to be a durable and aesthetically pleasing addition to any home or office, provided the assembly and maintenance guidelines are followed. For any assembly questions, customers can contact assembly@decorotika.com. For other inquiries, customers should contact the marketplace where they placed their order. Phone support is available for US customers at +1 302 327 8923 (Mon-Fri, 09 am - 05 pm) and for EUROPE customers at +90 553 966 7517 (Mon-Fri, 07 am - 05 pm).
| Brand | Decorotika |
|---|---|
| Model | Adriana |
| Category | Indoor Furnishing |
| Language | English |